This section of the documentation covers the daily use of WAPT.
All WAPT functionalities are explained in detail for the Administrators, the Users and the Package Deployers.
Deploying the WAPT agent
Windows
Two methods are available to deploy the waptagent.exe.
The first method is manual and the procedure must be applied on each machine.
The second one is automated and relies on a GPO.
Note
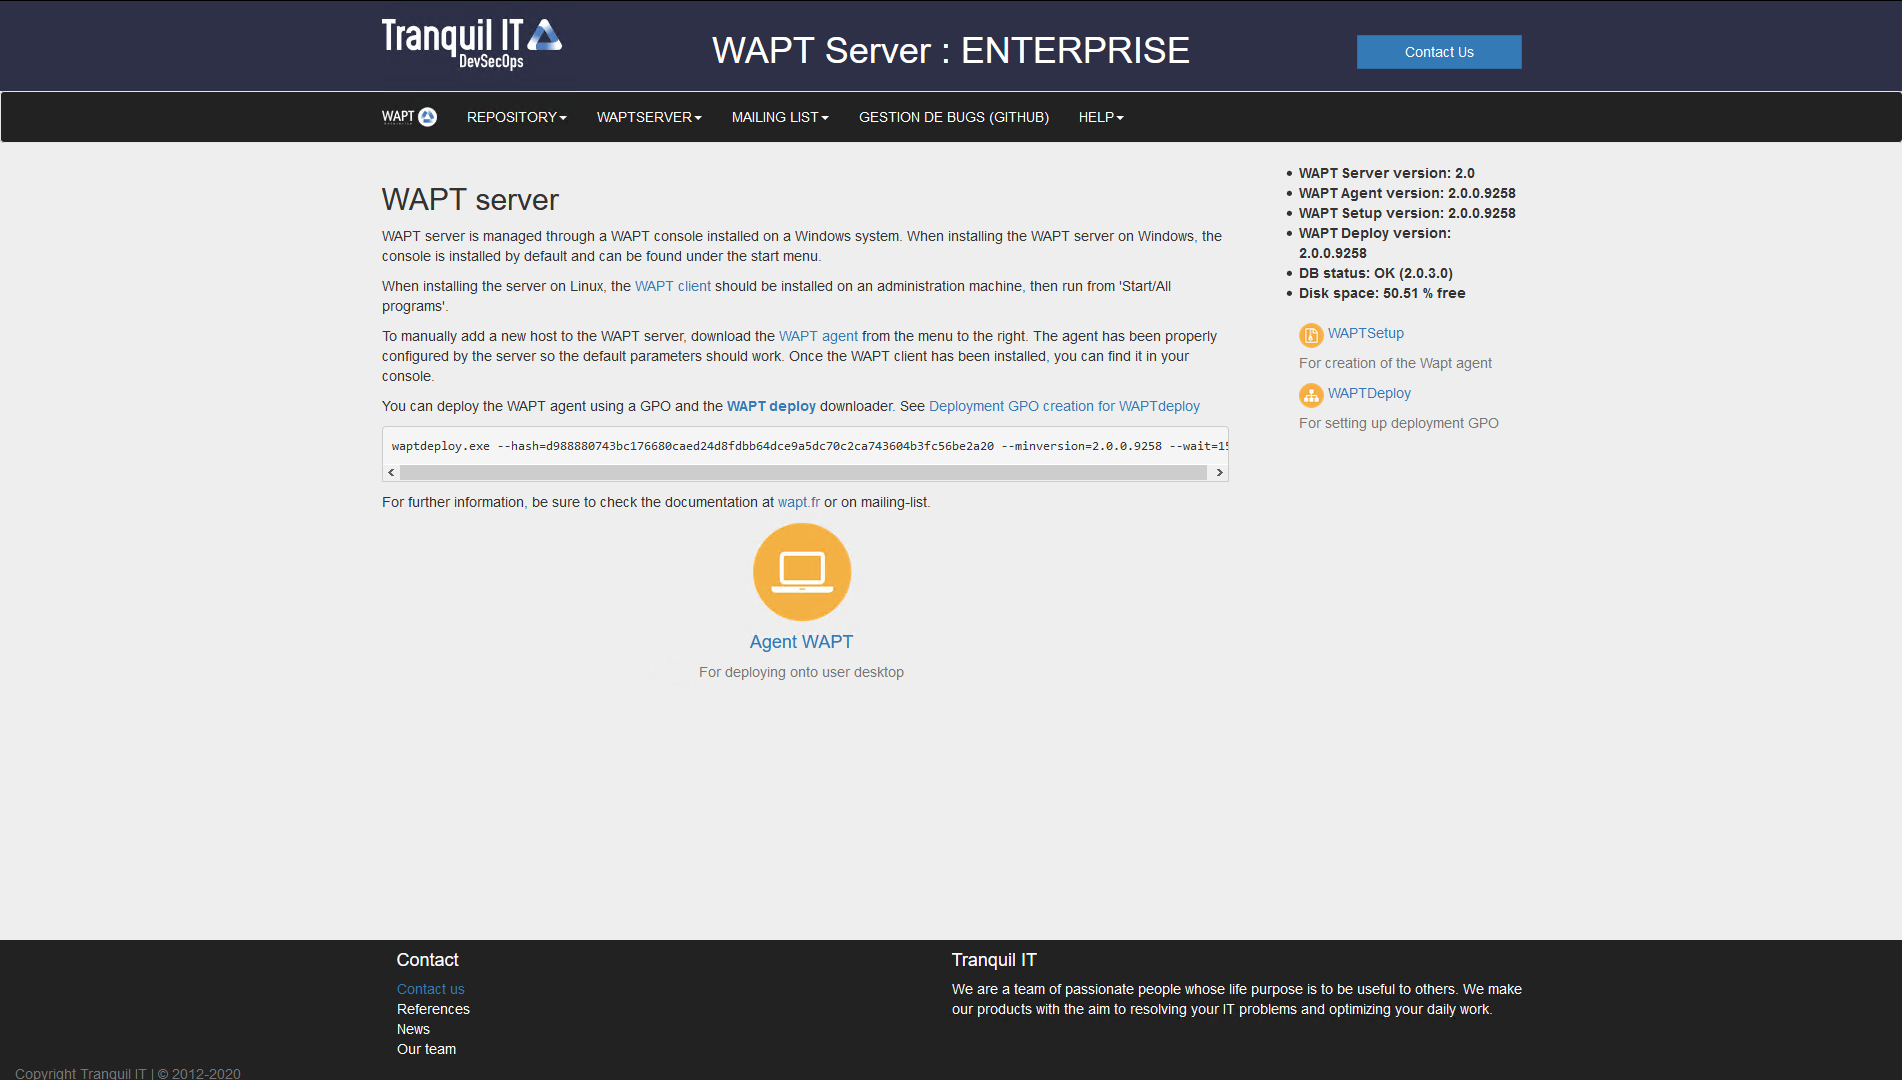
The waptagent.exe installer is available at WAPT serveur web home page. The direct download link is for example: https://srvwapt.mydomain.lan/wapt/waptagent.exe.
Warning
If you do not sign the waptagent.exe installer with a commercial Code Signing certificate or a Code Signing certificate issued by the Certificate Authority of your Organization after having generated it, web browsers will show a warning message when downloading the installer. To remove the warning message, you must sign the .exe with a Code Signing certificate that can be verified by a CA bundle stored in the machine’s certificate store.
Manually
Attention
Manually installing the WAPT agent requires Local Administrator rights on the computer. Manually installing the WAPT agent using a Domain Admin account WILL NOT WORK.
Hint
When to deploy the WAPT agent manually?
Manual deployment method is efficient in these cases:
Testing WAPT.
Using WAPT in an organization with a small number of computers.
If you don’t have a means of mass deployment.
Download the WAPT agent from your WAPT server then launch the installer.
Download the WAPT agent to be deployed on computers
Choose the language and click on OK to go to next step.
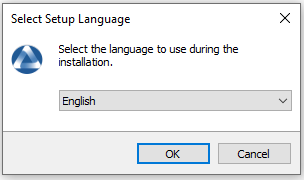
Choose the installation language
Accept the license terms and click on Next to go to next step.
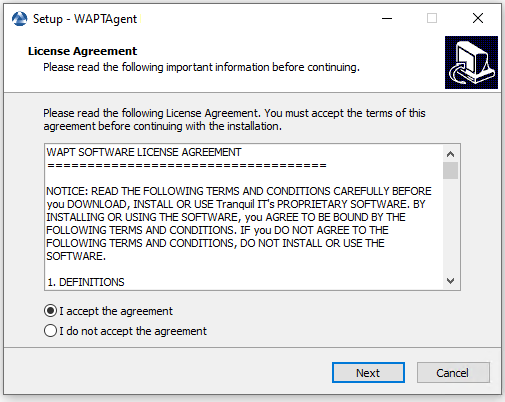
Accepting the EULA
Choose the additional parameters and click on Next to go to next step.

Choose the installer’s options
Settings |
Description |
Default value |
|---|---|---|
Install WAPT service |
Add WAPT service on your computer |
Checked |
Launch notification icon upon session opening |
Launch waptagent on systray at startup |
Not checked |
Disable hiberboot, and increase shutdown GPO timeout (recommended) |
Disable Windows fast startup for stability, enlarge timout for WAPTexit |
Checked |
Use a random UUID to identify the computer instead of BIOS |
To resolve BIOS UUID bugs |
Not checked |
Choose the WAPT repository and the WAPT Server and click on Next to go to next step.
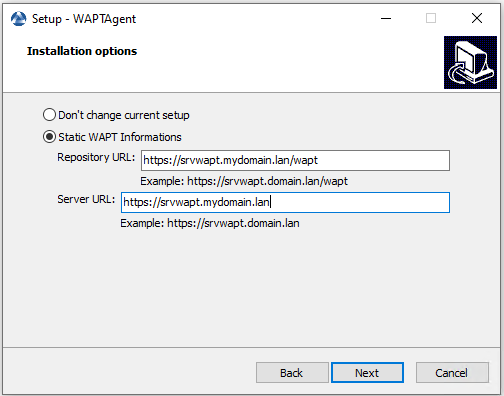
Choose the WAPT repository and server
Install the WAPT agent by clicking on Install.
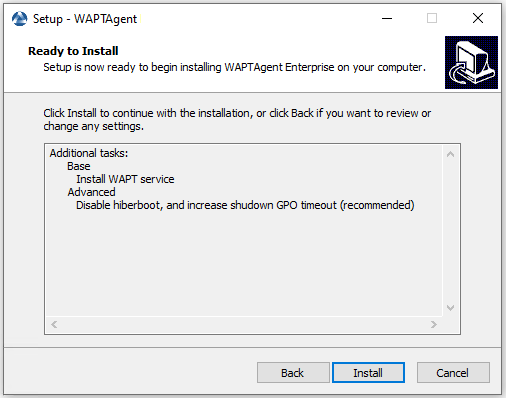
Summary of installation options
Wait for the installation of the WAPT agent to finish, then click on Finish to exit.

Installation in progress
The installation of the WAPT agent is finished. The registration of the host with the WAPT server is done automatically.
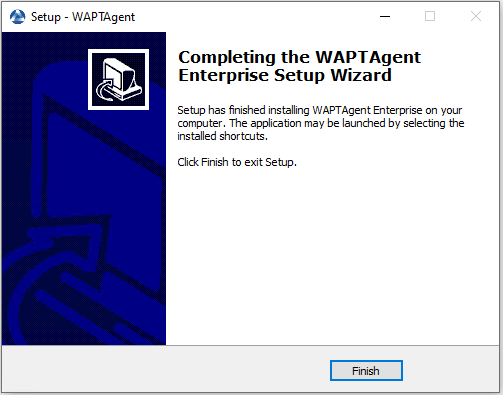
End of WAPT agent installation
To manage your Organization’s WAPT clients, visit the documentation on using the WAPT console.
Automatically
Important
Technical pre-requisites
Advanced network and system administration knowledge is required to achieve this procedure. A properly configured network will ensure its success.
Hint
When to deploy the WAPT agent automatically?
The following method is useful in these cases:
A large organization with many computers.
A Samba Active Directory or Microsoft Active Directory for which you have enough administration privileges.
The security and the traceability of actions are important to you or to your Organization.
With waptdeploy
waptagent.exe is an InnoSetup installer, it can be executed with these silent argument:
waptagent.exe /VERYSILENT
Additional arguments are available for waptdeploy.
Options |
Description |
|---|---|
|
Domain in |
|
URL of the WAPT server in |
|
URL of the WAPT repository in |
|
Group of WAPT packages to install by default. |
|
Value of |
|
Certificate bundle for https connections (to be defined by |
|
Certificate bundle for verifying package signatures. |
Hint
The .iss file for the InnoSetup installer is available here :
C:\Program Files (x86)\wapt\waptsetup\waptsetup.iss.
You may choose to adapt it to your specific needs. Once modified, you’ll just have to recreate a waptagent.
To learn more about the options available with InnoSetup, visit this documentation
waptdeploy is a small binary that:
Checks the version of the WAPT agent.
Downloads via https the waptagent.exe installer.
Launches the silent installer with arguments (checked options defined during the compilation of the WAPT agent).
/VERYSILENT /MERGETASKS= ""useWaptServer""
Updates the WAPT Server with the WAPT agent status (WAPT version, package status).
Warning
waptdeploy must be started as Local Administrator, that is why we advise you to use a GPO.
Download waptdeploy.exe from you’r WAPT server homepage.
Download the waptdeploy
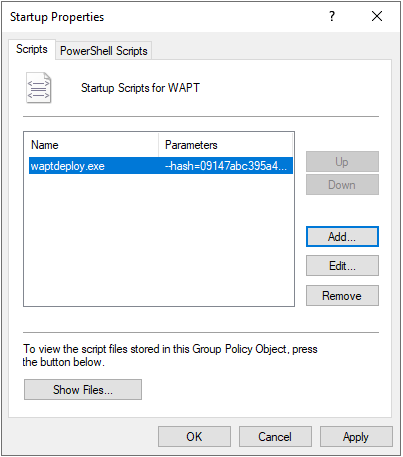
With a GPO
Create a new group strategy on the Active Directory server (Microsoft Active Directory or Samba-AD).
Add a new strategy with .
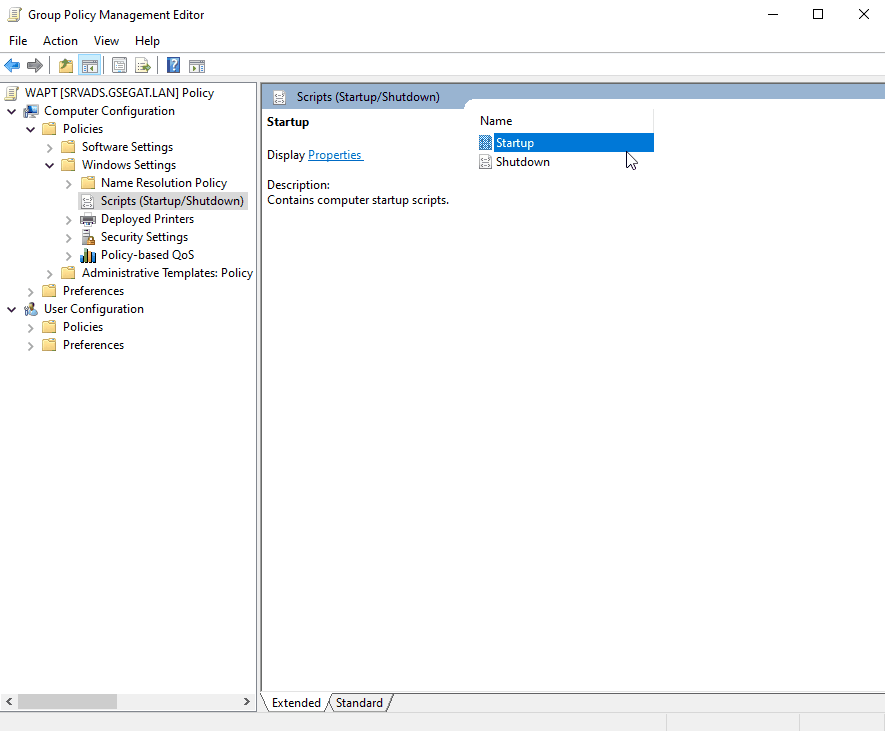
Creating a group strategy to deploy the WAPT agent
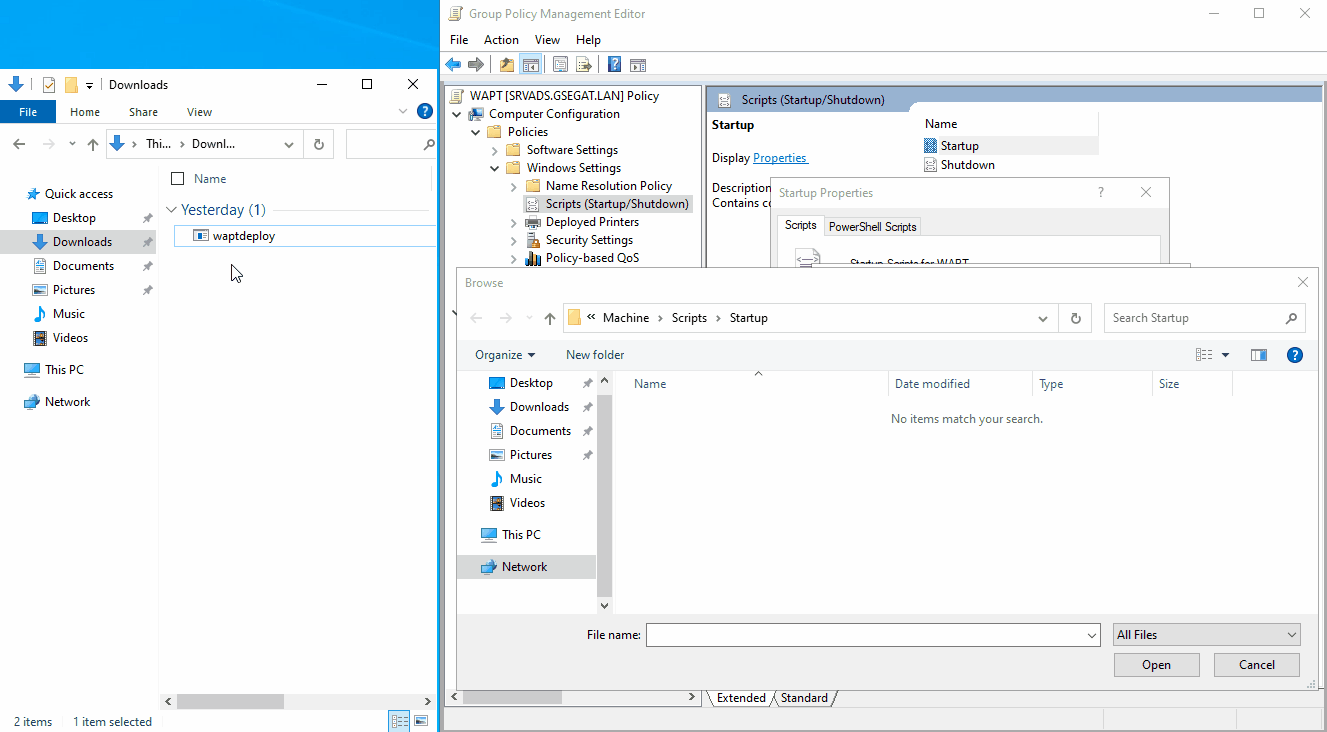
Click on Browse to select the
waptdeploy.exe.
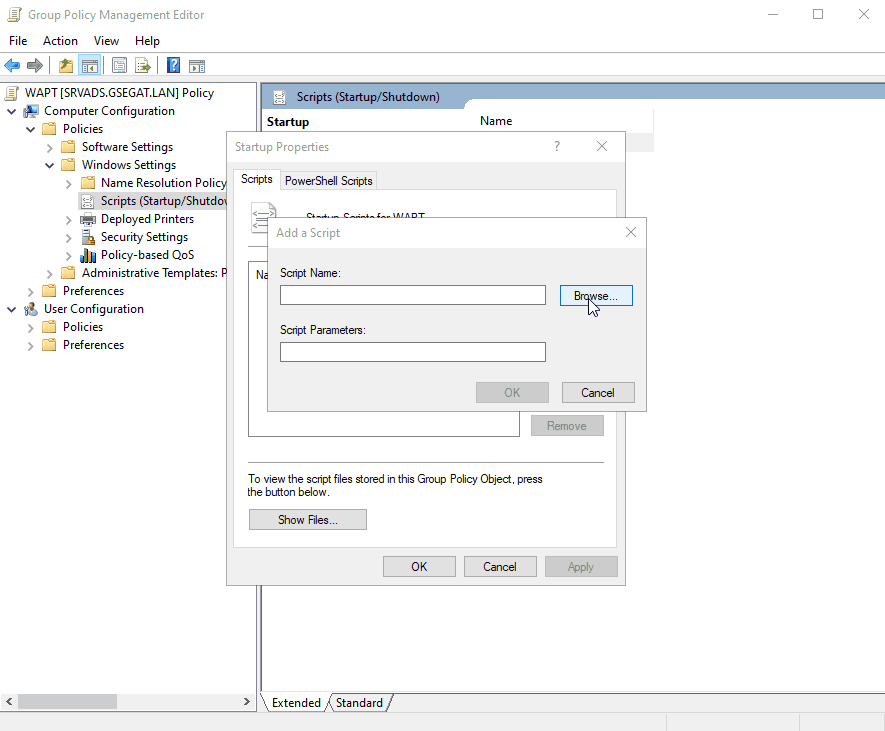
Finding the waptdeploy.exe file on your computer
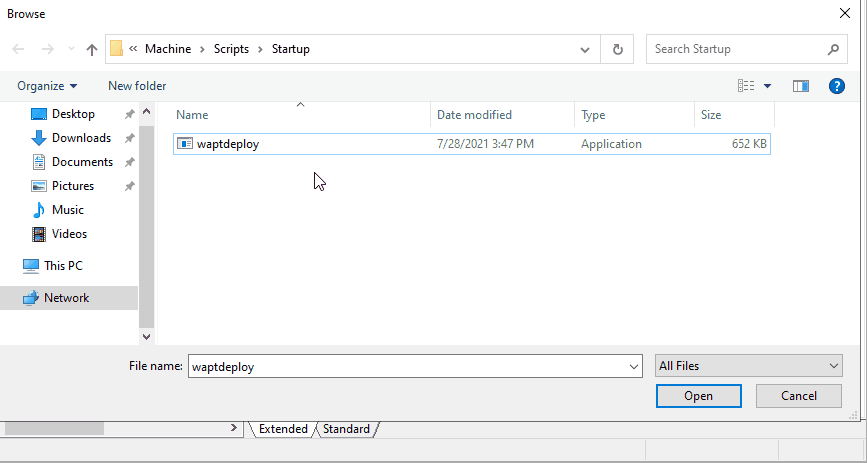
Copy
waptdeploy.exein the destination folder.
Selecting the waptdeploy.exe script
Click on Open to import the
waptdeploy.exe.
Selecting the waptdeploy.exe script
Click on Open to confirm the importation of the waptdeploy binary.
Hint
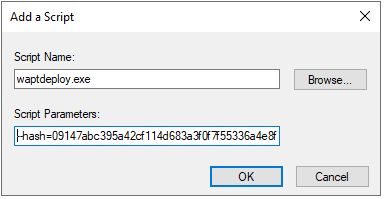
It is necessary to provide the checksum of the waptagent.exe as an argument to the waptdeploy GPO.
This will prevent the remote host from executing an erroneous / corrupted waptagent binary.
--hash=checksum WaptAgent --minversion=1.2.3 --wait=15 --waptsetupurl=http://srvwapt.mydomain.lan/wapt/waptagent.exe
Parameters and waptagent.exe checksum to use for the waptdeploy GPO are available on the WAPT Server by visiting https://srvwapt.mydomain.lan.
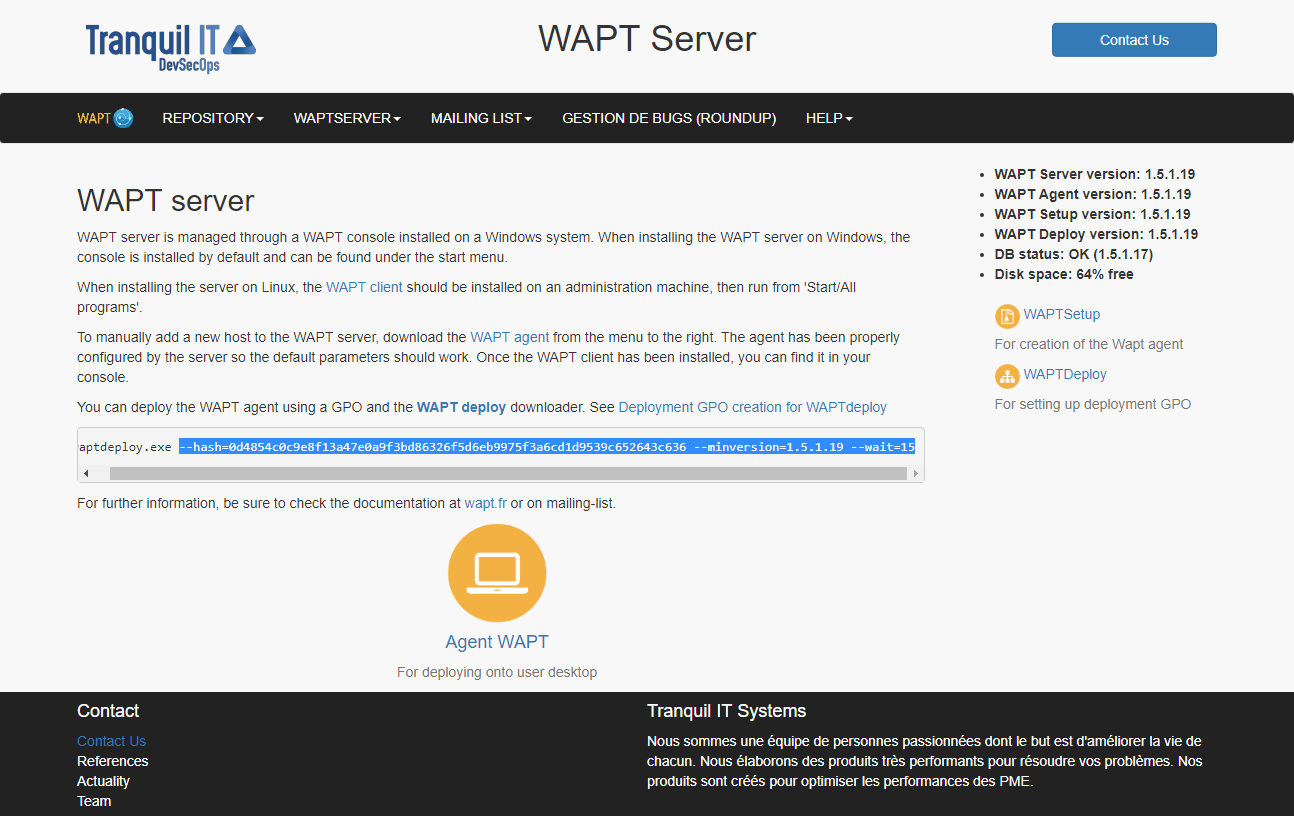
Web console of the WAPT Server
Copy the required parameters.
add the waptdeploy script to the startup GPO
Click on OK to go on to the next step.
WAPTdeploy GPO to be deployed on next startup
Click on OK to go on to the next step.
Apply resulting GPO strategy to the Organization’s Computers OU.
Note
We recommend adding waptdeploy.exe to the startup and shutdown scripts on the GPO.
Hint
More arguments are available for waptdeploy
Options |
Description |
|---|---|
|
Install waptagent.exe even if not needed. |
|
Check that the downloaded waptagent.exe setup sha256 hash matches the hash. |
|
Displays the options |
|
Install waptagent.exe if installed version is less than minversion. |
|
If given, pass this arguments to the /TASKS options of the waptagent installer. Default = installService,installredist2008, autoUpgradePolicy. |
|
Location of the repository to get |
|
Add this to the command line of waptagent.exe. |
|
Wait running and pending tasks to complete if waptservice is running before install. |
|
Explicit location to download setup executable. Can be a local path (default=:file:<repo_url>/waptagent.exe. |
With a scheduled task
You may also choose to launch waptdeploy using a scheduled task that has been set by GPO.
Hint
This method is particularly effective for deploying WAPT on workstations when the network is neither available on starting up or shutting down.
The method consists of using a GPO to copy locally waptdeploy.exe and waptagent.exe and create a scheduled task for installing.
Copy
waptdeploy.exeandwaptagent.exein the netlogon share of your Active Directory Server (\mydomain.lan\netlogon\waptagent.exe).Create a new group strategy on the Active Directory server (Microsoft Active Directory or Samba-AD).
Add a new strategy with .
Create a new file and copy waptdeploy.

New file on GPO
Set parameters.
Options |
Value |
|---|---|
Action |
Replace |
Source file(s) |
|
Destination File |
|
Suppress errors on individual file actions |
not checked |
Read-only |
not checked |
Hidden |
not checked |
Archive |
checked |
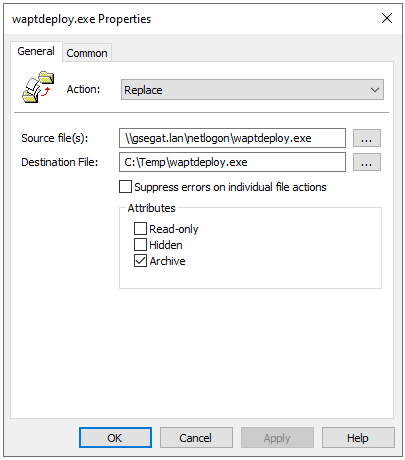
WAPT agent installation progress
Create a new file and copy waptagent.
New file on GPO
Set parameters.
Options |
Value |
|---|---|
Action |
Replace |
Source file(s) |
|
Destination File |
|
Suppress errors on individual file actions |
not checked |
Read-only |
not checked |
Hidden |
not checked |
Archive |
checked |
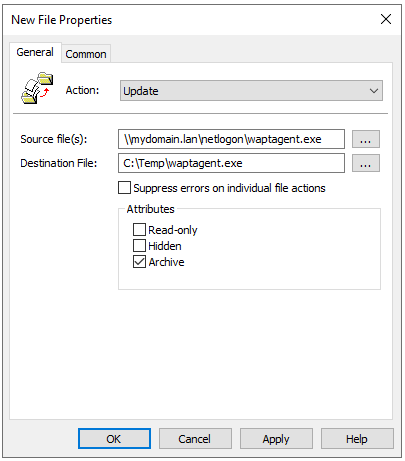
WAPT agent installation progress
Then go to the Scheduled Task menu with .
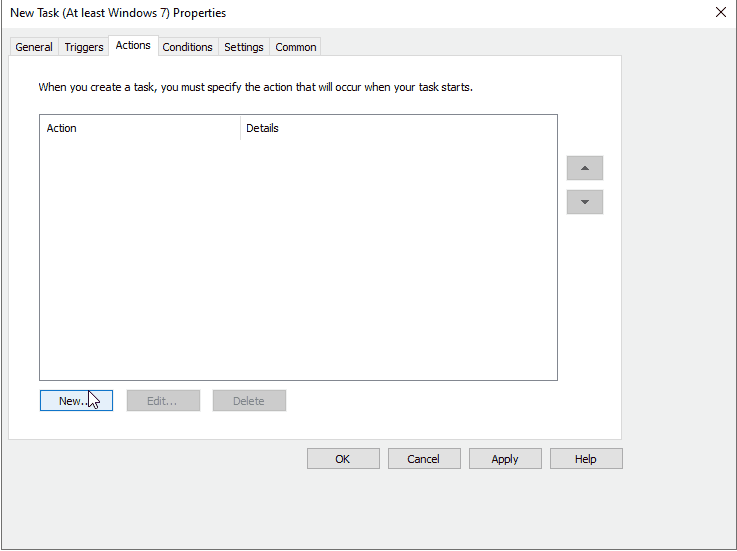
Create a new Scheduled Task with .
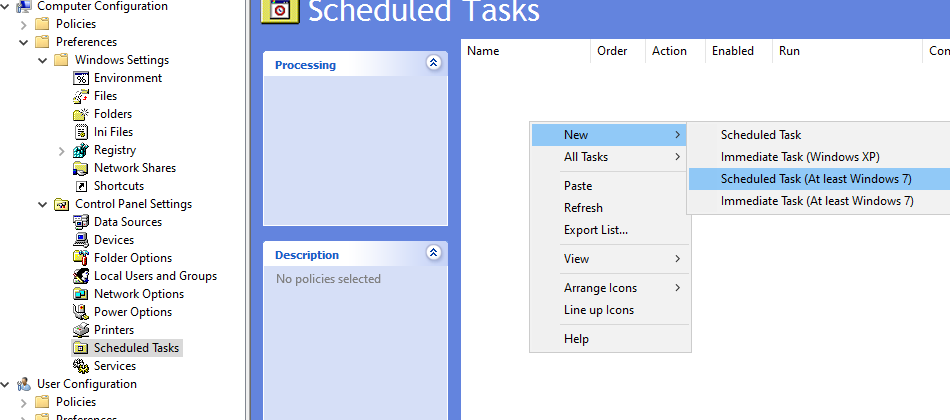
Task Create in deploywapt Properties window
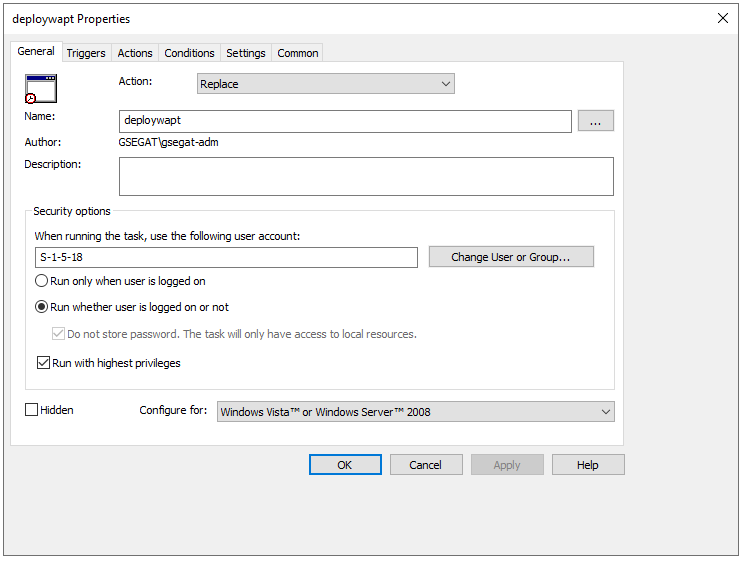
General tab in deploywapt Properties window
Set Action to
Replace.For When running the task, use the following user account paste S-1-5-18 (system account). You can visit for more information.
Check Run whether user is logged on or not.
Check Run with highest privileges, then go on to the Triggers tab.
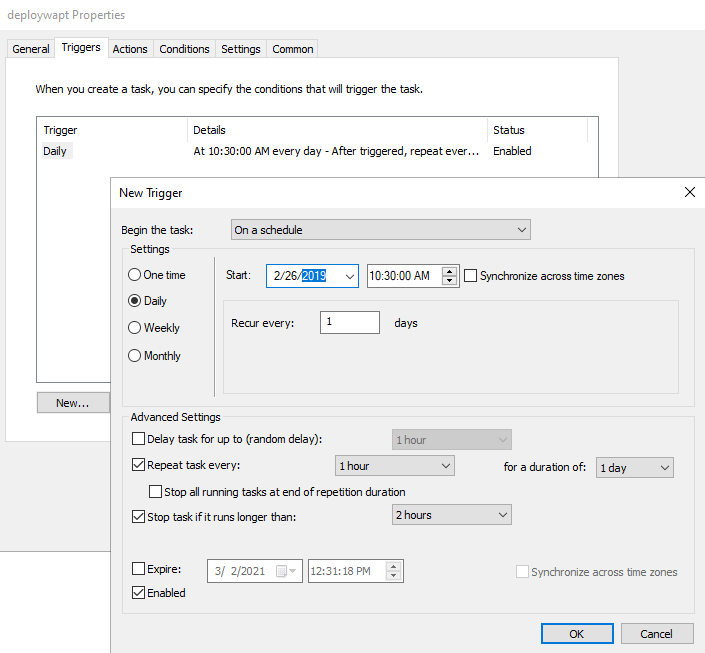
Trigger tab in deploywapt Properties window
Create a new trigger.
Check Daily, select today’s date.
Check Repeat Task every and select 1 hour and for a duration of select 1 day.
Check Stop task if it runs longer than and select 2 hours.
Check that Enabled is checked, and then go to the Actions tab.
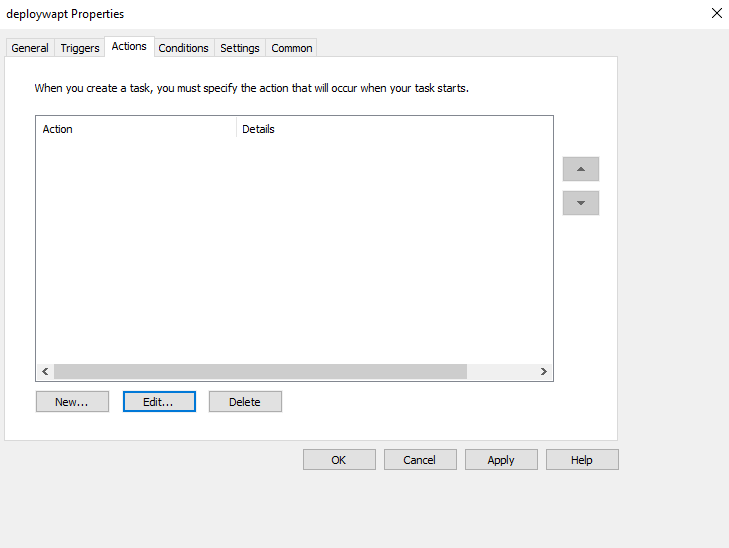
Create a new action Start a program for
waptdeploy.exe.
Options |
Value |
|---|---|
Action |
Start a program |
Program / script |
|
Add arguments (optional) |
See the next point |
Start in (optional) |
empty |
Hint
It is necessary to provide the checksum of the waptagent.exe as an argument to the waptdeploy. This will prevent the remote host from executing an erroneous / corrupted waptagent binary.
--hash=checksum WaptAgent --minversion=1.2.3 --wait=15 --waptsetupurl=http://srvwapt.mydomain.lan/wapt/waptagent.exe
Parameters and the waptagent.exe checksum to use for the waptdeploy GPO are available on the WAPT Server by visiting https://srvwapt.mydomain.lan.
Web console of the WAPT Server
Copy the required parameters and change
waptsetupurltoC:\Temp\waptagent.exe.--hash=checksum WaptAgent --minversion=1.2.3 --wait=15 --waptsetupurl=C:\Temp\waptagent.exe
Hint
More arguments are available for waptdeploy
Options |
Description |
|---|---|
|
Install waptagent.exe even if not needed |
|
Check that the downloaded waptagent.exe setup sha256 hash matches the hash. |
|
Displays the options. |
|
Install waptagent.exe if installed version is less than minversion. |
|
If given, pass this arguments to the /TASKS options of the waptagent installer. Default = installService,installredist2008, autoUpgradePolicy |
|
Location of repository to get the |
|
Add this to the command line of waptagent.exe. |
|
Wait running and pending tasks to complete if |
|
Explicit location to download setup executable. This can be a local path (default=:file:<repo_url>/waptagent.exe). |
Go on to the Settings tab.
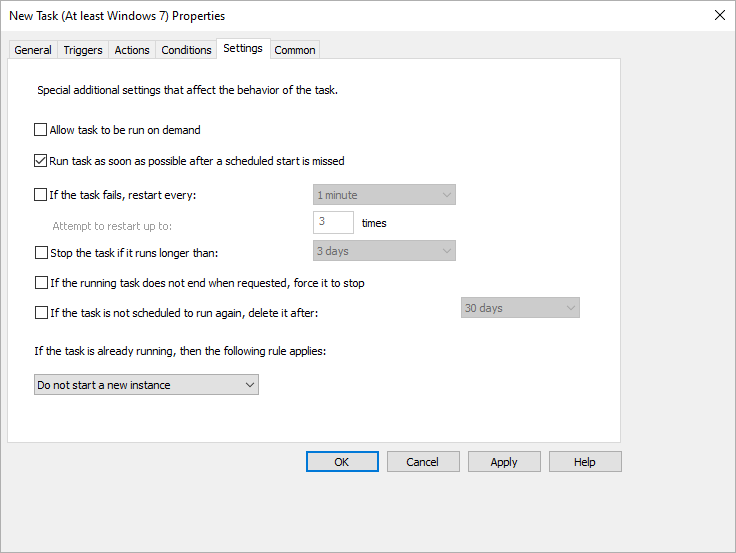
Settings tab in deploywapt Properties window
In the Settings tab, only check Run task as soon as possible after a scheduled start is missed.
Hint
To verify that your GPO is working, you can run the gpupdate /force command and verify that the scheduled task is present on your computer by launching Task Scheduler as a Local Administrator.
Linux
A Linux agent is available for Debian, Ubuntu and RedHat / Centos.
Note
The following procedure installs a WAPT agent using Tranquil IT’s repositories;
Debian
Discovery
Important
Follow this procedure for getting the right packages for the WAPT Discovery Edition. For WAPT Enterprise Edition please refer to the next block.
Note
Not Available as of 2024-09-20.
WAPT Discovery will be release later. For the free version, refer to wapt-1.8 documentation https://www.wapt.fr/en/doc-1.8/
Enterprise
Important
Follow this procedure for getting the right packages for the WAPT Enterprise Edition. For WAPT Discovery Edition please refer to the previous block.
Update the distribution :
apt update && apt upgrade -y
Install
apt-transport-httpsfor the use of https :
apt install apt-transport-https lsb-release gnupg -y
Retrieving the key
.gpgand adding the Tranquil’iT repository :
wget -O - https://wapt.tranquil.it/debian/tiswapt-pub.gpg  | apt-key add -
echo "deb https://srvwapt-pro.tranquil.it/entreprise/debian/wapt-2.1/ $(lsb_release -c -s) main" > /etc/apt/sources.list.d/wapt.list
Create
wapt.confin/etc/apt/auth.conf.dto store your login information
Hint
Replace user and password to access WAPT Enterprise repository, with those provided by our sales department.
cat > /etc/apt/auth.conf.d/wapt.conf <<EOF
machine srvwapt-pro.tranquil.it
login user
password password
EOF
Apply the following rights
chmod 600 /etc/apt/auth.conf.d/wapt.conf
install WAPT agent using apt-get:
export DEBIAN_FRONTEND=noninteractive
apt update
apt install tis-waptagent -y
unset DEBIAN_FRONTEND
Creating the agent configuration file
Hint
Use your server address for repo_url and wapt_server.
cat > /opt/wapt/wapt-get.ini <<EOF
[global]
repo_url=https://srvwapt.mydomain.lan/wapt
wapt_server=https://srvwapt.mydomain.lan
use_hostpackages=1
use_kerberos=0
verify_cert=0
EOF
Copying the package-signing certificate
You need to copy manually, or by script, the public certificate of your package signing certificate authority.
The certificate should be located on your Windows machine in C:\Program Files (x86)\wapt\ssl\.
Copy your certificate(s) in /opt/wapt/ssl using WinSCP or rsync if you are deploying on Linux or MacOS.
Copying the SSL/TLS certificate
If you already have configured your WAPT server to correctly use Nginx SSL/TLS certificates, you must copy the certificate in your WAPT Linux agent.
The certificate should be located on your Windows machine in C:\Program Files (x86)\wapt\ssl\server\.
Copy your certificate(s) in
/opt/wapt/ssl/server/using WinSCP or rsync if you are deploying on Linux or MacOS.Then, modify in your
/opt/wapt/wapt-get.iniconfig file the ABSOLUTE path to your certificate.
Hint
Change YOURCERT.crt by your certificate name.
verify_cert=/opt/wapt/ssl/server/YOURCERT.crt
Registering your Linux host with the WAPT Server
Restart the WAPT service :
systemctl restart waptservice.service
Finally, execute the following command to register your Linux host with the WAPT server.
wapt-get register
wapt-get update
Restart the WAPT service after registration :
systemctl restart waptservice.service
Congratulations, your Linux Agent is now installed and configured and it will now appear in your WAPT Console with a penguin icon.
Unsupported features
Installing updates on shutdown.
WAPT console is not currently available on Linux.
Any Windows specific feature.
Particularities with domain functionality
Testing was carried out with sssd with a Samba and Windows Active Directory domain controller and kerberos authentication.
To integrate a machine in the Active Directory domain, you can choose to follow this documentation.
To force the update of Organizational Units on the host, you can apply a gpupdate from the WAPT console.
In order for Active Directory groups to function properly, you must verify that the id hostname$ command returns the list of groups the host is member of.
Attention
We have noticed that the kerberos LDAP query does not work if the reverse DNS record is not configured correctly for your domain controllers. These records must therefore be created if they do not exist.
Ubuntu
Discovery
Important
Follow this procedure for getting the right packages for the WAPT Discovery Edition. For WAPT Enterprise Edition please refer to the next block.
Note
Not Available as of 2024-09-20.
WAPT Discovery will be release later. For the free version, refer to wapt-1.8 documentation https://www.wapt.fr/en/doc-1.8/
Enterprise
Important
Follow this procedure for getting the right packages for the WAPT Enterprise Edition. For WAPT Discovery Edition please refer to the previous block.
Update the distribution :
apt update && apt upgrade -y
Install
apt-transport-httpsfor the use of https :
apt install apt-transport-https lsb-release gnupg -y
Retrieving the key
.gpgand adding the Tranquil’iT repository :
wget -O - https://wapt.tranquil.it/debian/tiswapt-pub.gpg  | apt-key add -
echo "deb https://srvwapt-pro.tranquil.it/entreprise/ubuntu/wapt-2.1/ $(lsb_release -c -s) main" > /etc/apt/sources.list.d/wapt.list
Create
wapt.confin/etc/apt/auth.conf.dto store your login information
Hint
Replace user and password to access WAPT Enterprise repository, with those provided by our sales department.
cat > /etc/apt/auth.conf.d/wapt.conf <<EOF
machine srvwapt-pro.tranquil.it
login user
password password
EOF
Apply the following rights
chmod 600 /etc/apt/auth.conf.d/wapt.conf
install WAPT agent using apt-get:
export DEBIAN_FRONTEND=noninteractive
apt update
apt install tis-waptagent
unset DEBIAN_FRONTEND
Creating the agent configuration file
Hint
Use your server address for repo_url and wapt_server.
cat > /opt/wapt/wapt-get.ini <<EOF
[global]
repo_url=https://srvwapt.mydomain.lan/wapt
wapt_server=https://srvwapt.mydomain.lan
use_hostpackages=1
use_kerberos=0
verify_cert=0
EOF
Copying the package-signing certificate
You need to copy manually, or by script, the public certificate of your package signing certificate authority.
The certificate should be located on your Windows machine in C:\Program Files (x86)\wapt\ssl\.
Copy your certificate(s) in /opt/wapt/ssl using WinSCP or rsync if you are deploying on Linux or MacOS.
Copying the SSL/TLS certificate
If you already have configured your WAPT server to correctly use Nginx SSL/TLS certificates, you must copy the certificate in your WAPT Linux agent.
The certificate should be located on your Windows machine in C:\Program Files (x86)\wapt\ssl\server\.
Copy your certificate(s) in
/opt/wapt/ssl/server/using WinSCP or rsync if you are deploying on Linux or MacOS.Then, modify in your
/opt/wapt/wapt-get.iniconfig file the ABSOLUTE path to your certificate.
Hint
Change YOURCERT.crt by your certificate name.
verify_cert=/opt/wapt/ssl/server/YOURCERT.crt
Registering your Linux host with the WAPT Server
Restart the WAPT service :
systemctl restart waptservice.service
Finally, execute the following command to register your Linux host with the WAPT server.
wapt-get register
wapt-get update
Restart the WAPT service after registration :
systemctl restart waptservice.service
Congratulations, your Linux Agent is now installed and configured and it will now appear in your WAPT Console with a penguin icon.
Unsupported features
Installing updates on shutdown.
WAPT console is not currently available on Linux.
Any Windows specific feature.
Particularities with domain functionality
Testing was carried out with sssd with a Samba and Windows Active Directory domain controller and kerberos authentication.
To integrate a machine in the Active Directory domain, you can choose to follow this documentation.
To force the update of Organizational Units on the host, you can apply a gpupdate from the WAPT console.
In order for Active Directory groups to function properly, you must verify that the id hostname$ command returns the list of groups the host is member of.
Attention
We have noticed that the kerberos LDAP query does not work if the reverse DNS record is not configured correctly for your domain controllers. These records must therefore be created if they do not exist.
CentOS
Discovery
Important
Follow this procedure for getting the right packages for the WAPT Discovery Edition. For WAPT Enterprise Edition please refer to the next block.
Note
Not Available as of 2024-09-20.
WAPT Discovery will be release later. For the free version, refer to wapt-1.8 documentation https://www.wapt.fr/en/doc-1.8/
Enterprise
The most secure and reliable way to install the latest WAPT agent on Linux CentOS is using Tranquil IT’s public repository.
Important
Follow this procedure for getting the right packages for the WAPT Enterprise Edition. For WAPT Discovery Edition please refer to the previous block.
To access WAPT Enterprise resources, you must use the username and password provided by our sales department.
Update the distribution :
yum update
Retrieving the key
.gpg:
wget -q -O /tmp/tranquil_it.gpg "https://wapt.tranquil.it/centos7/RPM-GPG-KEY-TISWAPT-7"; rpm --import /tmp/tranquil_it.gpg
Adding the Tranquil’iT repository
cat > /etc/yum.repos.d/wapt.repo <<EOF
[wapt]
name=WAPT Server Repo
baseurl=https://srvwapt-pro.tranquil.it/entreprise/centos7/wapt-2.1/
enabled=1
gpgcheck=1
EOF
install WAPT agent using yum:
yum install tis-waptagent
Creating the agent configuration file
Hint
Use your server address for repo_url and wapt_server.
cat > /opt/wapt/wapt-get.ini <<EOF
[global]
repo_url=https://srvwapt.mydomain.lan/wapt
wapt_server=https://srvwapt.mydomain.lan
use_hostpackages=1
use_kerberos=0
verify_cert=0
EOF
Copying the package-signing certificate
You need to copy manually, or by script, the public certificate of your package signing certificate authority.
The certificate should be located on your Windows machine in C:\Program Files (x86)\wapt\ssl\.
Copy your certificate(s) in /opt/wapt/ssl using WinSCP or rsync if you are deploying on Linux or MacOS.
Copying the SSL/TLS certificate
If you already have configured your WAPT server to correctly use Nginx SSL/TLS certificates, you must copy the certificate in your WAPT Linux agent.
The certificate should be located on your Windows machine in C:\Program Files (x86)\wapt\ssl\server\.
Copy your certificate(s) in
/opt/wapt/ssl/server/using WinSCP or rsync if you are deploying on Linux or MacOS.Then, modify in your
/opt/wapt/wapt-get.iniconfig file the ABSOLUTE path to your certificate.
Hint
Change YOURCERT.crt by your certificate name.
verify_cert=/opt/wapt/ssl/server/YOURCERT.crt
Registering your Linux host with the WAPT Server
Restart the WAPT service :
systemctl restart waptservice.service
Finally, execute the following command to register your Linux host with the WAPT server.
wapt-get register
wapt-get update
Restart the WAPT service after registration :
systemctl restart waptservice.service
Congratulations, your Linux Agent is now installed and configured and it will now appear in your WAPT Console with a penguin icon.
Unsupported features
Installing updates on shutdown.
WAPT console is not currently available on Linux.
Any Windows specific feature.
Particularities with domain functionality
Testing was carried out with sssd with a Samba and Windows Active Directory domain controller and kerberos authentication.
To integrate a machine in the Active Directory domain, you can choose to follow this documentation.
To force the update of Organizational Units on the host, you can apply a gpupdate from the WAPT console.
In order for Active Directory groups to function properly, you must verify that the id hostname$ command returns the list of groups the host is member of.
Attention
We have noticed that the kerberos LDAP query does not work if the reverse DNS record is not configured correctly for your domain controllers. These records must therefore be created if they do not exist.
MacOS
Attention
Currently, the agent has only been tested on :
High Sierra (10.13);
Mojave (10.14);
Catalina (10.15);
Big Sur (10.16).
Discovery
Important
Follow this procedure for getting the right packages for the WAPT Discovery Edition. For WAPT Enterprise Edition please refer to the next block.
Note
Not Available as of 2024-09-20.
WAPT Discovery will be release later. For the free version, refer to wapt-1.8 documentation https://www.wapt.fr/en/doc-1.8/
Enterprise
Important
Follow this procedure for getting the right packages for the WAPT Enterprise Edition. For WAPT Discovery Edition please refer to the previous block.
To access WAPT Enterprise resources, you must use the username and password provided by our sales department.
On the command line
Hint
Replace user and password in the baseurl parameter to access WAPT Enterprise repository.
recovery of the list of available files
sudo curl --user "user:password" https://srvwapt-pro.tranquil.it/entreprise/release/latest/
on result, copy
tis-waptagent-version-macos-hash.pkg;create the complete link with :
https://srvwapt-pro.tranquil.it/entreprise/release/latest/
and
tis-waptagent-version-macos-hash.pkgcopied previously;
download WAPT agent :
Attention
Remplace <PastedLink> by link create before;
sudo curl --user "user:password" <PastedLink> --output tis-waptagent.pkg
install the downloaded package:
sudo installer -pkg tis-waptagent.pkg -target /
Creating the agent configuration file
Hint
Use your server adress on repo_url and wapt_server.
sudo cat > /opt/wapt/wapt-get.ini <<EOF
[global]
repo_url=https://srvwapt.mydomain.lan/wapt
wapt_server=https://srvwapt.mydomain.lan
use_hostpackages=1
use_kerberos=0
verify_cert=0
EOF
Copying the package-signing certificate
You need to copy manually, or by script, the public certificate of your package signing certificate authority.
The certificate should be located on your Windows machine in C:\Program Files (x86)\wapt\ssl\.
Copy your certificate(s) in /opt/wapt/ssl using WinSCP or rsync if you are deploying on Linux or MacOS.
Copying the SSL/TLS certificate
If you already have configured your WAPT server to use correct Nginx SSL/TLS certificates, you must copy the certificate in your WAPT Linux agent.
The certificate should be located on your Windows machine in C:\Program Files (x86)\wapt\ssl\server\.
Copy your certificate(s) in
/opt/wapt/ssl/server/using WinSCP or rsync if you are deploying on Linux or MacOS.Then, modify in your
/opt/wapt/wapt-get.iniconfig file the path to your certificate.And give absolute path of your cert.
verify_cert=/opt/wapt/ssl/server/YOURCERT.crt
Hint
Change YOURCERT.crt by your certificate name.
Graphically
recovery the last
.dpkg
https://srvwapt-pro.tranquil.it/entreprise/release/latest/
run the
.dpkg
Registering
restart the WAPT service:
sudo launchctl unload  /Library/LaunchDaemons/it.tranquil.waptservice.plist
sudo launchctl load /Library/LaunchDaemons/it.tranquil.waptservice.plist
finally, execute the following command to register your MacOS host with the WAPT server:
sudo wapt-get register
Your MacOS Agent is installed and configured and it will now appear in your WAPT Console with an apple icon.
Unsupported features
installing updates on shutdown;
WAPT console is not currently available on MacOS;
any Windows specific feature;
Particularities with domain functionality
testing was carried out with sssd with an Active Directory domain and kerberos authentication;
to integrate a machine in the Active Directory domain, you can choose to follow this documentation
to force the update of Organizational Units on the host, you can apply a gpupdate from the WAPT console;
in order for Active Directory groups to function properly, you must verify that the id hostname$ command returns the list of groups the host is member of;
Attention
We have noticed that the kerberos LDAP query does not work if the reverse DNS record is not configured correctly for your domain controllers. These records must therefore be created if they do not exist.
Updating the WAPT agents
For each server’s upgrade, you’ll have to upgrade WAPT agent.
To do so, you have to generate agent and deploy it.
Manually
You can do that manually, it’s the same as an agent installation.
Hint
It’s the only upgrade solution available for now for MacOS and Linux.
Via waptupgrade
While you generate WAPT agent, package named waptupgrade is created.
This package is a standard WAPT package designed to upgrade WAPT agents on client machines.
Hint
For now, waptupgrade only work for Windows.
Upgrading the WAPT agents using the waptupgrade package is a two step process:
first the package copies the new
waptagent.exefile on the client computer and creates a new scheduled task that will run waptagent.exe with predefined installation flags two minutes after the creation of the scheduled task. At that point the package itself is installed and the inventory on the server shows the package installation as OK, with correct version installed, but the inventory will still show the old version as the agent is not yet updated.after two minutes the scheduled task starts and runs waptagent.exe. waptagent.exe shutdowns the local WAPT service, upgrades the local WAPT install, and then restarts the service. The scheduled task is then automatically removed and the WAPT agent sends back its inventory to the WAPT server. Now the inventory on the server will show the new version of the agent.
It is recommanded to install waptupgrade on all hosts in order to get automtical updates for agents.