7. Using WAPT Self-Service
7.1. Presentation
With WAPT your users can have a selfservice for software installation.
It’s different in the Discovery and Enterprise versions.
Functionality |
Discovery |
Enterprise |
|---|---|---|
Access to self-service |
|
|
Deploying self-service packages |
|
|
Filtering self-service packages |
|
|
Management tab |
|
|


7.2. Working principle
The Users gain in autonomy while deploying software and configurations that are trusted and authorized by the Organization. This is a time saving feature for the Organization’s IT support Helpdesk.
7.2.1. Discovery
Only Local Administrators and members of the waptselfservice group can access self-service on the hosts.
Attention
These users have acces to all packages in your repository.
7.2.2. Enterprise
You can filter the list of self-service packages available for your users.
A self-service package may be deployed on hosts to list the different self-service rules that apply to the host.
The self-service packages are based on user groups.
Your users will be able to install a selection of WAPT packages without having to be a Local Administrator.
7.3. Using the self-service feature
7.3.1. Configuration Discovery Mode
On Discovery create a waptselfservice security group on your Active Directory and add your users.
Note
ALL users in the waptselfservice security group and ALL Local Administrators will have access to ALL WAPT packages in the repository.
It is not possible to filter the WAPT packages made accessible to the users in Discovery mode.
7.3.2. Configuration Enterprise Mode
To create a Self-Service Rules Package, follow these steps: Make package template from setup file → Self-service rules.
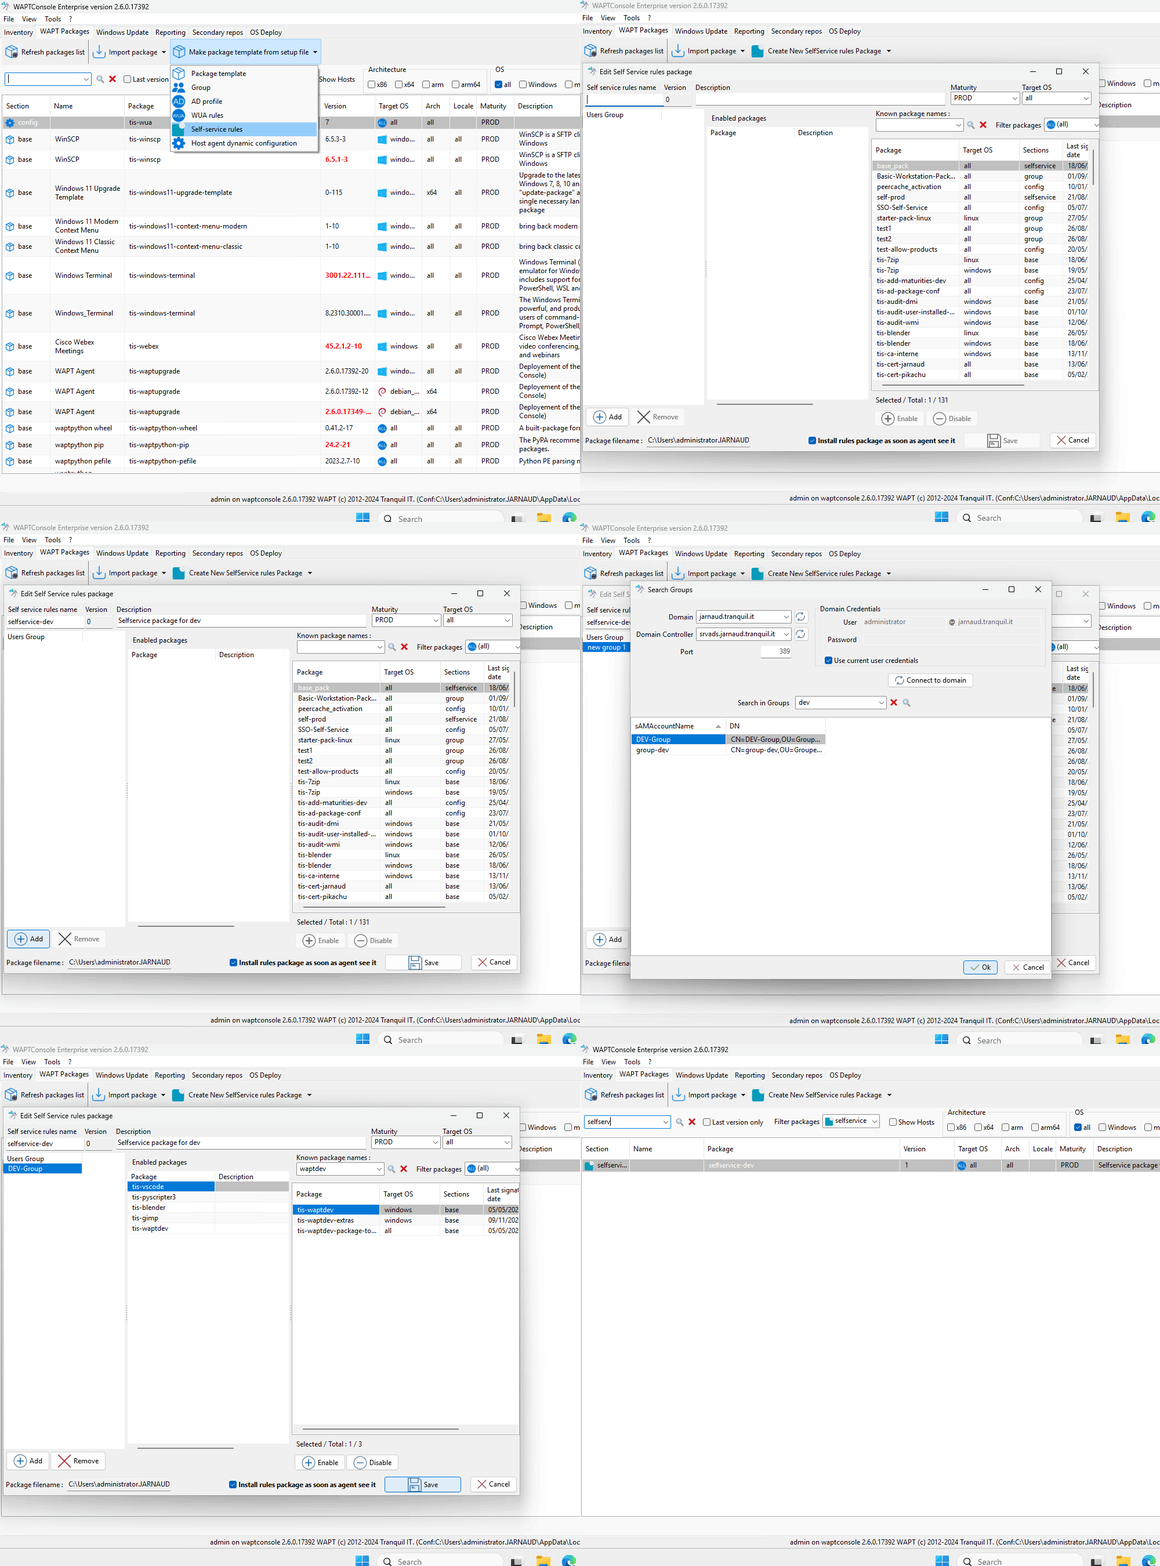
Editing a Self-Service Rules Package
Steps to Edit a Self-Service Rules Package:
Set the package details:
Enter a name, description, and select the maturity level and target operating system.
Add user groups:
In the left panel, click Add and right-click on Users Groups.
Press F2 to rename the group to match an Active Directory (AD) group in your domain (case-sensitive).
Alternatively, right-click on Users Groups and select Search in domain.
Enter your domain credentials.
Click Connect to domain.
Select the user groups you want to include.
Add authorized packages:
Select a package from the left panel and click Enable to add it to the self-service list.
Alternatively, drag and drop the package into the center panel.
Save your changes:
Click Save to finalize the package.
Your Self-Service Rules Package is now ready for use.
Note
The name of the self-service package MUST be the same as the name of the Active Directory user security group to which the self-service rules will apply..
If a group appears in multiple self-service packages, then the rules are merged.
Once the self-service package is deployed, only allowed WAPT packages listed in the self-service group(s) of which the User is a member will be shown to the logged in User.
Don’t forget to add the @domain.lan to your domain group.
Hint
If you create a security group named waptselfservice in your Active Directory and add the desired users to it.
All users in this security group, can access to all WAPT packages in the repository of the WAPT server.
Hint
If you need more information about the self-service package, go to this link.
7.4. Using WAPT Self-Service
WAPT Self-service is accessible in the Windows start menu under the name Self-Service software WAPT.

It is also available directly in the WAPT directory <base>\waptself.exe.
Note
The login and password to enter when launching the self-service are the User’s credentials (local or Active Directory credentials).
The WAPT Self-service then displays a list of packages available for installation.
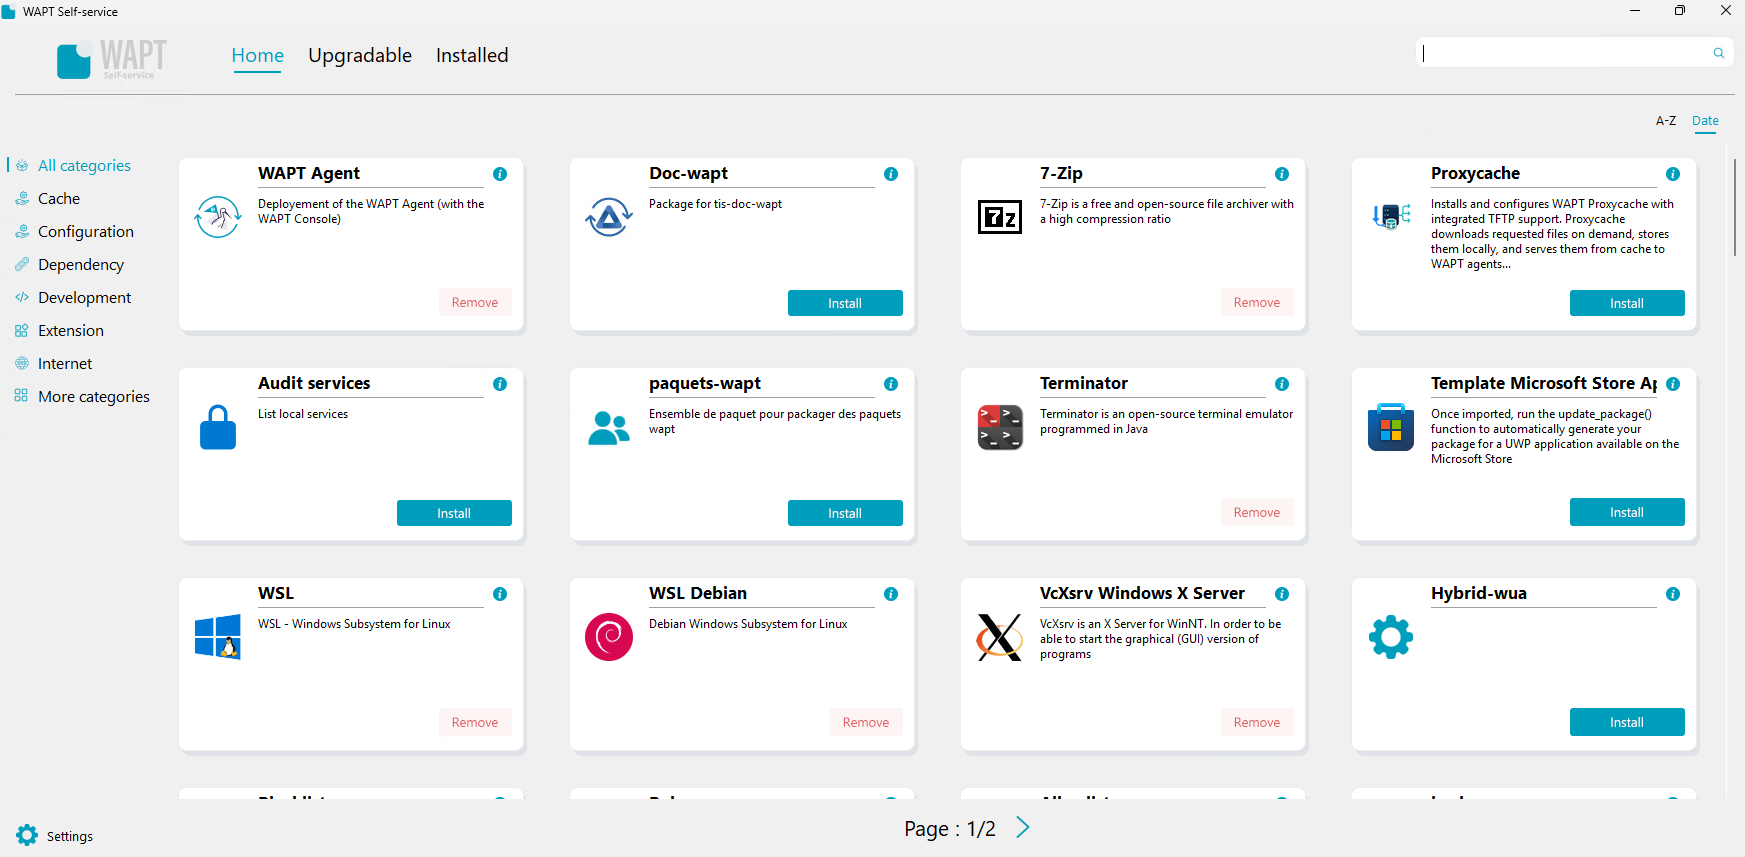
Main window of the WAPT Self-service
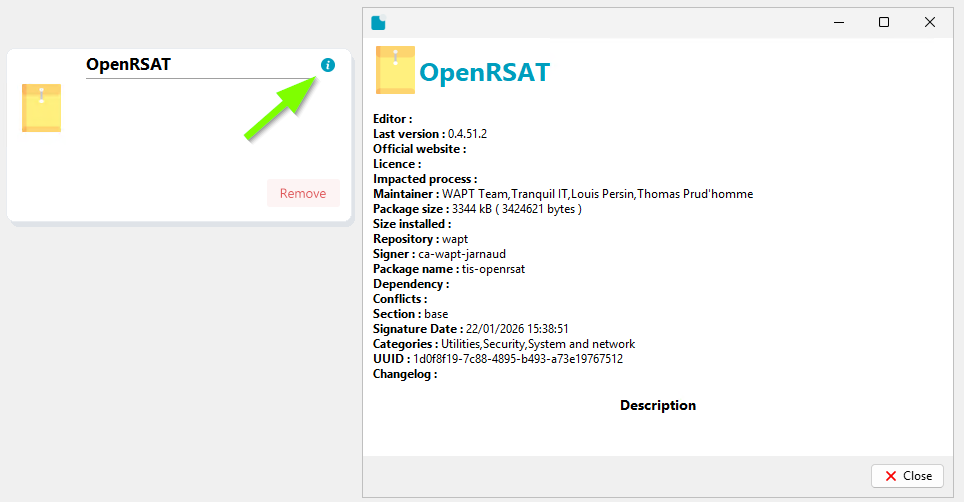
The user can have more details on each WAPT package by clicking the i button.
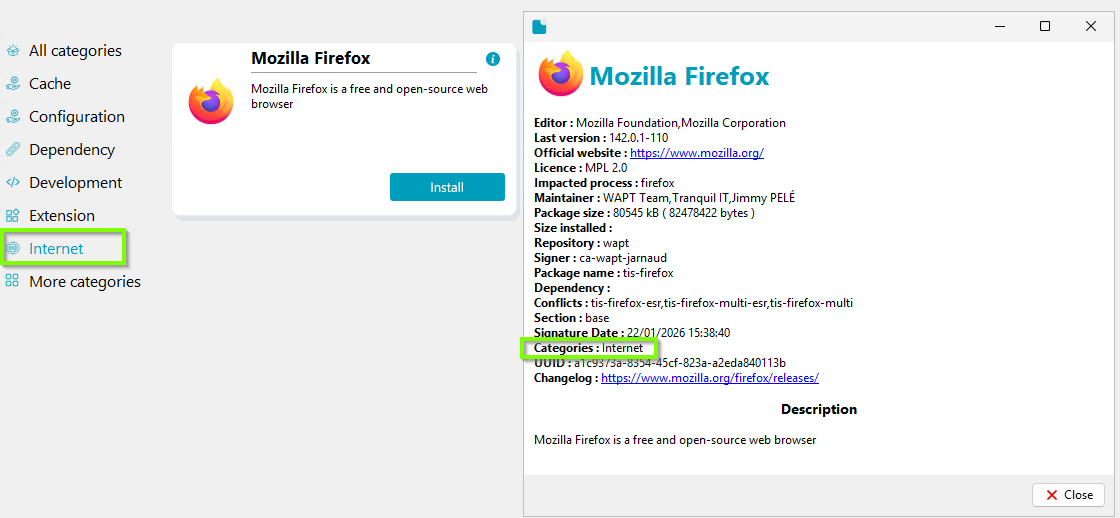
Various filters are available to the user in the left side panel, based on the categories defined in the control.py file.
The Update Catalog button is used to force a wapt-get update on the WAPT Agent;
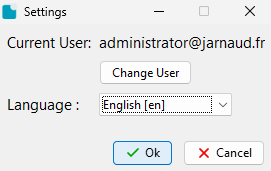
It is possible to change the language of the interface with the * button at the bottom left.
7.4.1. Manage package categories available
The Tranquil IT team typically creates WAPT store packages using these categories:
Internet
Utilities
Security
System and network
Storage
Media
Development
Office
BUT It is possible to add other categories to the WAPT packages that you design.
For example, change the category: Internet value for Firefox-esr to category: browser. Then the categorie browser will appear in the filters in the left side panel, if the Firefox-esr package is available.
7.5. WAPT Agent settings for WAPT Self-Service
WAPT Agent can be configured to allow WAPT self-service.
7.5.1. Configuring a different authentication method for the self-service
This behavior is defined with the value of service_auth_type in wapt-get.ini:
Value |
Description |
|---|---|
|
WAPT service uses Active Directory computer account for LDAP queries (filetoken auth method makes use of an encrypted (temporary key) token created by WAPT service in the user’s profile with restricted ACLs. It works only if the user has a local profile directory writable for LOCAL SYSTEM) |
|
WAPT service transmits the authentication directly to the operating system; it also recovers the groups by directly interrogating the operating system. |
|
This mode allows authentication to the WAPT Server. The WAPT Server will make a LDAP request to verify authentication and groups. For this to work, you MUST have configured LDAP authentication on the WAPT Server. |
|
This mode allows authentication with an LDAP server identified in |
You may be interested in looking up this article describing the settings for WAPT Self-Service and the WAPT service Authentification for more options.
Note
For the system authentication under GNU/Linux to work correctly, be sure to correctly configure your pam authentication and your nsswitch.conf.
The id username command MUST return the list of the groups the user is member of.
Warning
In system mode we assume that Local Administrators can see all the WAPT packages.
To change this behavior see the next point.
7.5.2. Configuring the authentification for Administrator
In system mode, the Local Administrators can see all the packages of WAPT Server repository.
If you do not want this behavior there are 2 possibilities:
Block the view of all packages for Local Administrators.
All packages are only visible for a specific user group.
7.5.2.1. Block Local Administrator on self-service
To block all packages from being displayed to Local Administrators you have to add the parameter waptservice_admin_filter in the section [global] in the wapt-get.ini.
Value |
True |
False |
|---|---|---|
|
Enable selfservice package view filtering for Local Administrators. |
Disable selfservice package view filtering for Local Administrators. |
7.5.2.2. User group self-service Administrator
It is possible to use a special user group to define a list of administrators in the Self-Service.
Create a user security group named waptselfservice and add members.
All members of this group can view all packages on the WAPT Self-Service.
With waptservice_admin_filter parameter, you have secured the administrator acces of WAPT Self-Service.
7.6. Customizing WAPT Self-Service
7.6.1. customized the self-service icone
hello a faire
7.6.2. customizing the self-service core
The WAPT Self-Service application can be customized to match your organization’s visual identity. The colors and appearance of the waptself.exe executable can be configured using JSON theme files.
The default theme files are provided in the templates directory:
C:\Program Files (x86)\wapt\templates\theme_self_default.json
C:\Program Files (x86)\wapt\templates\theme_self_dark.json
theme_self_default.json contains the default light theme, while theme_self_dark.json contains the dark theme.
The content of these files can be customized to change the appearance of WAPT Self-Service. For example, you can modify the color values to match your organization’s branding or use a completely different color scheme.
When customizing a theme, the file name must remain unchanged. WAPT Self-Service expects these specific file names to identify the corresponding themes.
Important
The default theme files are stored in the templates directory. Do not modify these files directly, as they may be overwritten when WAPT is upgraded.
To preserve your customizations across WAPT upgrades, copy the theme file you want to customize to the custom_templates directory and modify the copy there.
For example, to customize the light theme:
C:\Program Files (x86)\wapt\templates\theme_self_default.json
Copy the file to:
C:\Program Files (x86)\wapt\custom_templates\theme_self_default.json
You can then modify the color values in the file located in custom_templates. The file name must remain theme_self_default.json.
The same principle applies to the dark theme:
C:\Program Files (x86)\wapt\custom_templates\theme_self_dark.json
WAPT will use the customized template while preserving it when the WAPT installation is upgraded.
The theme files define the colors and visual properties used by WAPT Self-Service, including menus, filters, categories, backgrounds, cards, and action buttons.
For example, the following configuration can be customized to change the appearance of the Self-Service interface:
{
  "SelfVersion": "2.7.0.19613",
  "FontName": "default",
  "Menu": {
    "Base": 1973276,
    "Selected": 12426752,
    "Over": 12426752
  },
  "Filter": {
    "Base": 1973276,
    "Selected": 12426752,
    "Over": 12426752,
    "ShapeSeparator": 14078417,
    "Search": {
      "Base": 16777215,
      "Text": 1973276
    },
    "CheckboxAllVariants": 1973276,
    "ButtonTaskBar": {
      "Base": 12426752,
      "Text": 16777215
    },
    "ButtonUpdateCatalog": {
      "Base": 12426752,
      "Text": 16777215
    },
    "ButtonUpgradeAll": {
      "Base": 4227327,
      "Text": 16777215
    }
  }
}