Hint
If your WAPT Server is a virtual machine, take a snapshot of the VM. This way, you’ll be able to go back easily in the rare case that the update fails.
Warning
- After each server update, update your console
then regenerate the WAPT agent.
Before upgrading WAPT Server, please refer to the following upgrading compatibility chart:
To WAPT 1.5 |
To WAPT 1.6 |
To WAPT 1.7 |
To WAPT 1.8 |
To WAPT 2.0 |
|
|---|---|---|---|---|---|
From WAPT 1.3 |
|
|
|
|
|
From WAPT 1.5 |
|
|
|
|
|
From WAPT 1.6 |
|
|
|
||
From WAPT 1.7 |
|
|
|||
From WAPT 1.8.2 |
|


Minor WAPT server update
Debian
Hint
This process is only valid for Debian (Ubuntu Here).
Before updating, if not done already apply this configuration to your repositories.
If it is correct, execute the following block.
export DEBIAN_FRONTEND=noninteractive
apt update
apt install tis-waptserver tis-waptsetup
unset DEBIAN_FRONTEND
Then run the post-configuring script.
Attention
For post-configuration to work properly, you must first have properly configured the hostname of the WAPT server. To check, use the command echo $(hostname) which must return the DNS address that will be used by WAPT agents on client computers.
Warning
The post-configuration script rewrites the nginx configuration.
If you use a special configuration, save your wapt.conf file with the command :
cp /etc/nginx/sites-available/wapt.conf /etc/nginx/sites-available/wapt.conf.old
It will be necessary to overwrite the configuration after the post-configuration with the command :
cp /etc/nginx/sites-available/wapt.conf.old /etc/nginx/sites-available/wapt.conf
Hint
This post-configuration script must be run as root.
Run the script.
/opt/wapt/waptserver/scripts/postconf.sh
Click on Yes to run the postconf script.
do you want to launch post configuration tool?

      < yes >          < no >
Choose a password for the SuperAdmin account of the WAPT server (minimum length is 10 characters).
Please enter the wapt server password (min. 10 characters)

*****************

        < OK >          < Cancel >
Confirm the password.
Please enter the server password again:

*****************

        < OK >          < Cancel >
Choose the authentication mode for the initial registering of the WAPT agents:
Choice #1 allows to register computers without authentication. The WAPT server registers all computers that ask to be registered.
Choice #2 activates the initial registration based on kerberos (you can activate it later).
Choice #3 does not activate the kerberos authentication mechanism for the initial registering of machines equipped with WAPT. The WAPT server will require a login and a password for each machine registering with it.
WaptAgent Authentication type?

--------------------------------------------------------------------------
( ) 1 Allow unauthenticated registration
( ) 2 Enable kerberos authentication required for machines registration.
    Registration will ask for password if kerberos not available
(x) 3 Disable kerberos but registration require strong authentication
--------------------------------------------------------------------------
                    < OK >          < Cancel >
Select OK to start WAPT Server.
Press OK to start waptserver

       < OK >
Select Yes to configure Nginx.
Do you want to configure nginx?

    < Yes >        < No >
Fill in the FQDN of the WAPT server.
FQDN for the WAPT server (eg. wapt.example.com)

---------------------------------------------
wapt.mydomain.lan
---------------------------------------------

      < OK >          < Cancel >
Select OK and a self-signed certificate will be generated, this step may take a long time.
Generating DH parameters, 2048 bit long safe prime, generator 2
This is going to take a long time
.......................................+...............................+...
Nginx is now configured, select OK to restart Nginx:
The Nginx config is done.
We need to restart Nginx?

      < OK >
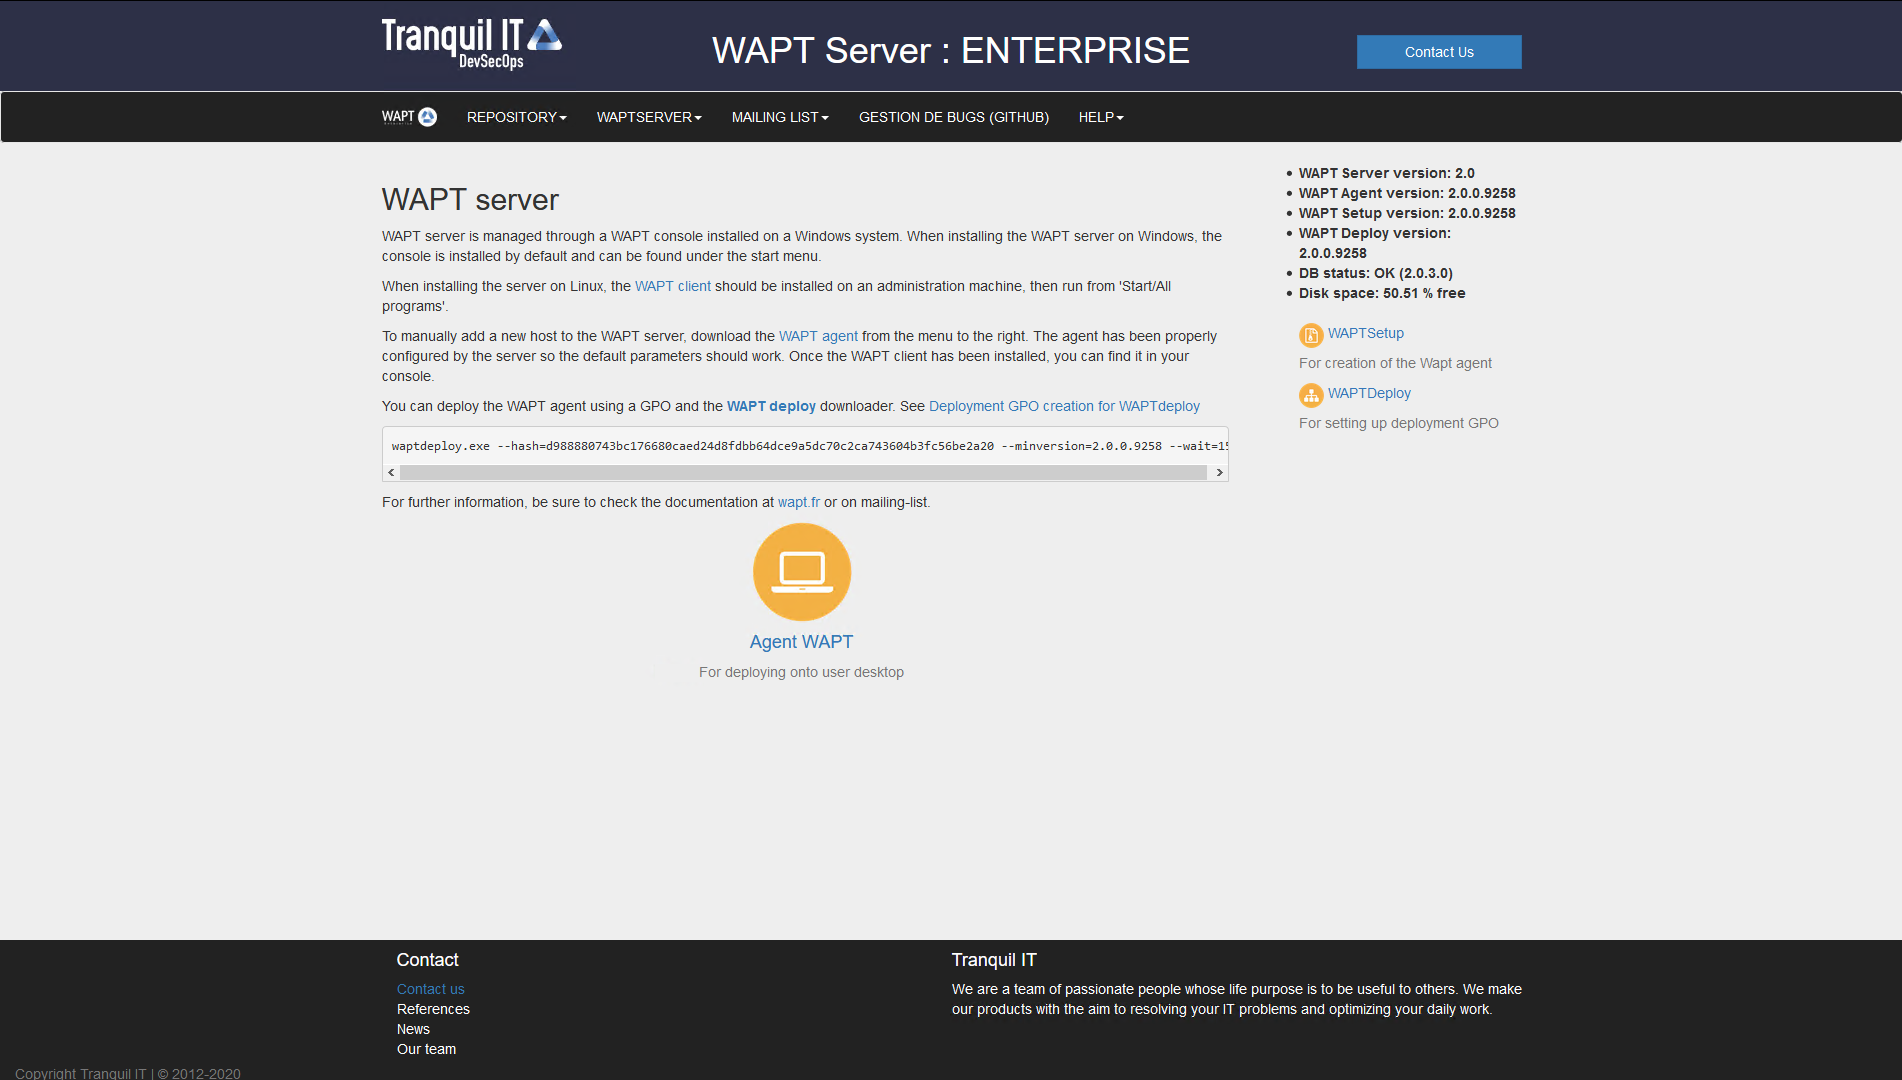
The post-configuration is now finished.
Postconfiguration completed.
Please connect to https://wapt.mydomain.lan/ to access the server.

                < OK >
Listing of post-configuration script options:
Options |
Description |
|---|---|
|
Configures Nginx so that port 80 is permanently redirected to 443 |
Once completed your server is ready.
Ubuntu
Before updating, if not done already apply this configuration to your repositories.
If it is correct, execute the following block.
export DEBIAN_FRONTEND=noninteractive
apt update
apt install tis-waptserver tis-waptsetup
unset DEBIAN_FRONTEND
Then run the post-configuring script.
Attention
For post-configuration to work properly, you must first have properly configured the hostname of the WAPT server. To check, use the command echo $(hostname) which must return the DNS address that will be used by WAPT agents on client computers.
Warning
The post-configuration script rewrites the nginx configuration.
If you use a special configuration, save your wapt.conf file with the command :
cp /etc/nginx/sites-available/wapt.conf /etc/nginx/sites-available/wapt.conf.old
It will be necessary to overwrite the configuration after the post-configuration with the command :
cp /etc/nginx/sites-available/wapt.conf.old /etc/nginx/sites-available/wapt.conf
Hint
This post-configuration script must be run as root.
Run the script.
/opt/wapt/waptserver/scripts/postconf.sh
Click on Yes to run the postconf script.
do you want to launch post configuration tool?

      < yes >          < no >
Choose a password for the SuperAdmin account of the WAPT server (minimum length is 10 characters).
Please enter the wapt server password (min. 10 characters)

*****************

        < OK >          < Cancel >
Confirm the password.
Please enter the server password again:

*****************

        < OK >          < Cancel >
Choose the authentication mode for the initial registering of the WAPT agents:
Choice #1 allows to register computers without authentication. The WAPT server registers all computers that ask to be registered.
Choice #2 activates the initial registration based on kerberos (you can activate it later).
Choice #3 does not activate the kerberos authentication mechanism for the initial registering of machines equipped with WAPT. The WAPT server will require a login and a password for each machine registering with it.
WaptAgent Authentication type?

--------------------------------------------------------------------------
( ) 1 Allow unauthenticated registration
( ) 2 Enable kerberos authentication required for machines registration.
    Registration will ask for password if kerberos not available
(x) 3 Disable kerberos but registration require strong authentication
--------------------------------------------------------------------------
                    < OK >          < Cancel >
Select OK to start WAPT Server.
Press OK to start waptserver

       < OK >
Select Yes to configure Nginx.
Do you want to configure nginx?

    < Yes >        < No >
Fill in the FQDN of the WAPT server.
FQDN for the WAPT server (eg. wapt.example.com)

---------------------------------------------
wapt.mydomain.lan
---------------------------------------------

      < OK >          < Cancel >
Select OK and a self-signed certificate will be generated, this step may take a long time.
Generating DH parameters, 2048 bit long safe prime, generator 2
This is going to take a long time
.......................................+...............................+...
Nginx is now configured, select OK to restart Nginx:
The Nginx config is done.
We need to restart Nginx?

      < OK >
The post-configuration is now finished.
Postconfiguration completed.
Please connect to https://wapt.mydomain.lan/ to access the server.

                < OK >
Listing of post-configuration script options:
Options |
Description |
|---|---|
|
Configures Nginx so that port 80 is permanently redirected to 443 |
Once completed your server is ready.
Centos / RedHat
Before updating, if not done already apply this configuration to your repositories.
If it is correct, execute the following command.
yum update -y
Install packages.
yum install tis-waptserver tis-waptsetup -y
Then run the post-configuration script.
Attention
For post-configuration to work properly, you must first have properly configured the hostname of the WAPT server. To check, use the command echo $(hostname) which must return the DNS address that will be used by WAPT agents on client computers.
Warning
The post-configuration script rewrites the nginx configuration.
If you use a special configuration, save your wapt.conf file with the command :
cp /etc/nginx/sites-available/wapt.conf /etc/nginx/sites-available/wapt.conf.old
It will be necessary to overwrite the configuration after the post-configuration with the command :
cp /etc/nginx/sites-available/wapt.conf.old /etc/nginx/sites-available/wapt.conf
Hint
This post-configuration script must be run as root.
Run the script.
/opt/wapt/waptserver/scripts/postconf.sh
Click on Yes to run the postconf script.
do you want to launch post configuration tool?

      < yes >          < no >
Choose a password for the SuperAdmin account of the WAPT server (minimum length is 10 characters).
Please enter the wapt server password (min. 10 characters)

*****************

        < OK >          < Cancel >
Confirm the password.
Please enter the server password again:

*****************

        < OK >          < Cancel >
Choose the authentication mode for the initial registering of the WAPT agents:
Choice #1 allows to register computers without authentication. The WAPT server registers all computers that ask to be registered.
Choice #2 activates the initial registration based on kerberos (you can activate it later).
Choice #3 does not activate the kerberos authentication mechanism for the initial registering of machines equipped with WAPT. The WAPT server will require a login and a password for each machine registering with it.
WaptAgent Authentication type?

--------------------------------------------------------------------------
( ) 1 Allow unauthenticated registration
( ) 2 Enable kerberos authentication required for machines registration.
    Registration will ask for password if kerberos not available
(x) 3 Disable kerberos but registration require strong authentication
--------------------------------------------------------------------------
                    < OK >          < Cancel >
Select OK to start WAPT Server.
Press OK to start waptserver

       < OK >
Select Yes to configure Nginx.
Do you want to configure nginx?

    < Yes >        < No >
Fill in the FQDN of the WAPT server.
FQDN for the WAPT server (eg. wapt.example.com)

---------------------------------------------
wapt.mydomain.lan
---------------------------------------------

      < OK >          < Cancel >
Select OK and a self-signed certificate will be generated, this step may take a long time.
Generating DH parameters, 2048 bit long safe prime, generator 2
This is going to take a long time
.......................................+...............................+...
Nginx is now configured, select OK to restart Nginx:
The Nginx config is done.
We need to restart Nginx?

      < OK >
The post-configuration is now finished.
Postconfiguration completed.
Please connect to https://wapt.mydomain.lan/ to access the server.

                < OK >
Listing of post-configuration script options:
Options |
Description |
|---|---|
|
Configures Nginx so that port 80 is permanently redirected to 443 |
Once completed your server is ready.
Windows
Discovery
Important
- Follow this procedure for getting the right packages for the WAPT Discovery
Edition. For WAPT Enterprise Edition please refer to the next block.
Note
Not Available as of 2024-09-20.
- WAPT Discovery will be release later. For the free version,
refer to wapt-1.8 documentation https://www.wapt.fr/en/doc-1.8/.
Enterprise
Hint
To access WAPT Enterprise resources, you must use the username and password provided by our sales department.
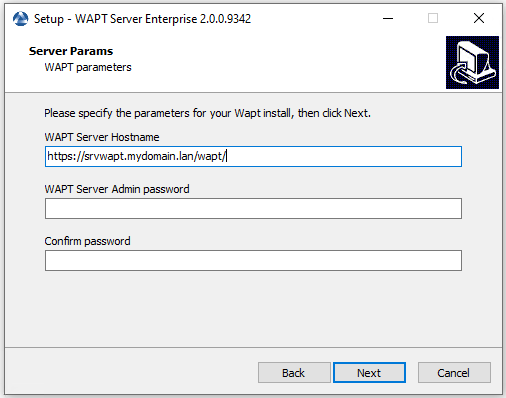
Download and execute
waptserversetup.exe.
Attention
The installation of the WAPT server must be done using a Local Administrator account on the host
Warning
The post-configuration script rewrites the nginx configuration.
If you use a special configuration, save your nginx.conf file with:
copy C:\wapt\waptserver\nginx\conf\nginx.conf C:\wapt\waptserver\nginx\conf\nginx.conf.old
- It will be necessary to overwrite the configuration after
the post-configuration with the command:
copy C:\wapt\waptserver\nginx\conf\nginx.conf.old C:\wapt\waptserver\nginx\conf\nginx.conf
Choose the installation language.
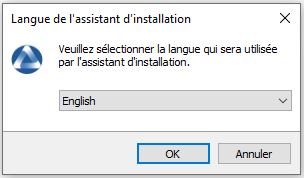
Choose the language for WAPT
Accept the GNU Public License and click on Next to go on to the next step.
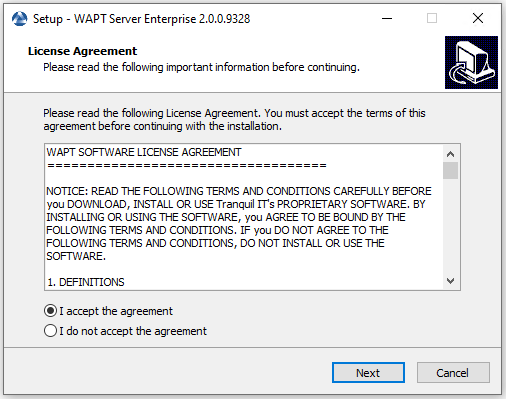
Accept the WAPT license terms
Choose the installation directory (leave the default) and click on Next to go on to the next step.
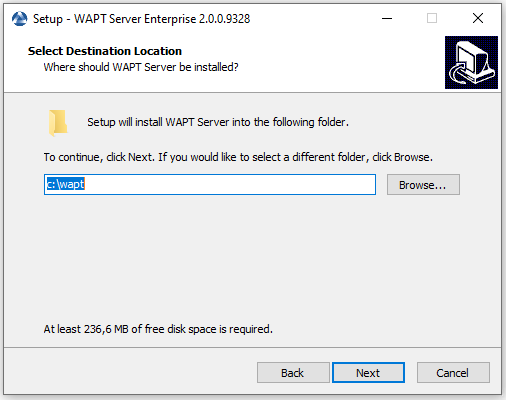
Choose the WAPT destination folder
Choose additional task (leave the default).

Choose additional task
Not change the password for the WAPT server (if not necessary).
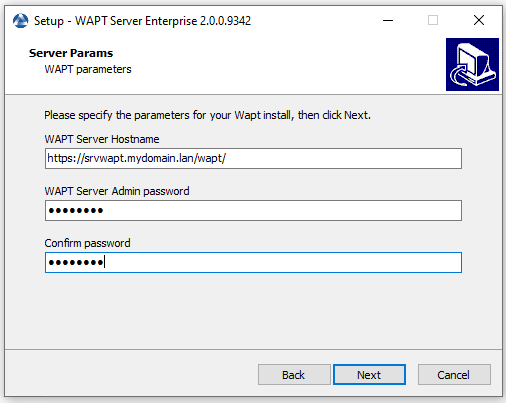
Don’t change Password
Skip creating personal key.
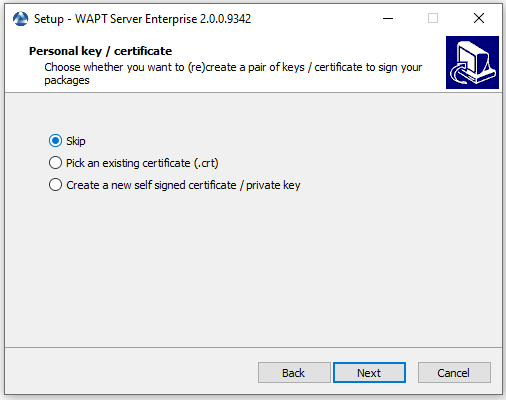
Skip create the signature key
Skip building the WAPT agent, we will do it later.
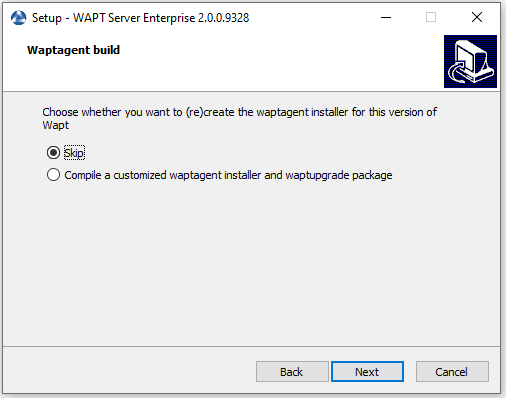
Skip build the WAPT agent
Click on the Install to launch the installation, wait for the installation to complete.

Progress of installation of the WAPT Server
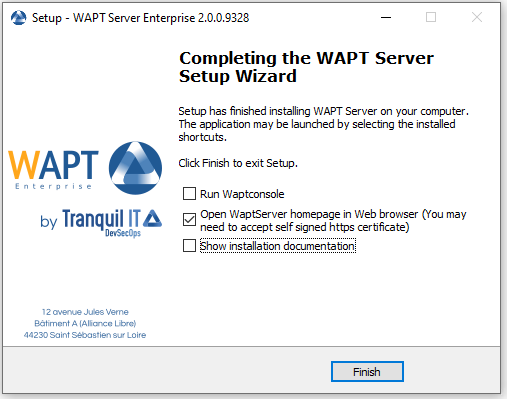
Installation has finished
Click on Finish to close the window.
The WAPT Server on your Windows is ready.
Upgrading WAPT on a from 1.8.2 to 2.0
Note
Before upgrading, ensure that installation requirements are met.
Attention
Port 443 is used by the WAPT Server and must be available.
Debian
Note
If you are running on Debian9 Stretch, you have first to upgrade to Debian10 Buster before upgrading to WAPT 2.x. WAPTServer 2.x is not available for Debian9.
First of all, update the underlying distribution.
apt update && apt upgrade -y
Add or update the package repository for Debian packages, import the GPG key from the repository and install the WAPT Server packages.
Community to Discovery
Note
Not Available as of 2024-09-20.
- WAPT Discovery will be release later. For the free version,
refer to wapt-1.8 documentation https://www.wapt.fr/en/doc-1.8/
Enterprise
Important
- Follow this procedure for getting the right packages for the WAPT Discovery
Edition. For WAPT Enterprise Edition please refer to the next block.
Install
apt-transport-httpsfor the use of https.apt install apt-transport-https lsb-release gnupg
Retrieve the key .gpg and add it to the Tranquil IT repository.
wget -O - https://wapt.tranquil.it/debian/tiswapt-pub.gpg  | apt-key add -
echo "deb https://srvwapt-pro.tranquil.it/entreprise/debian/wapt-2.0/ $(lsb_release -c -s) main" > /etc/apt/sources.list.d/wapt.list
- If the file does not exist, create
wapt.conf in
/etc/apt/auth.conf.dto store your login information.Hint
- Replace user and password to access WAPT Enterprise repository,
with those provided by our sales department.
cat > /etc/apt/auth.conf.d/wapt.conf <<EOF
machine srvwapt-pro.tranquil.it
login user
password password
EOF
- If the file does not exist, create
Apply the correct rights, update the repository and install the packages.
chmod 600 /etc/apt/auth.conf.d/wapt.conf
apt update
apt install tis-waptserver tis-waptsetup
Post-configuration
Launch the post-configuration step.
Attention
For post-configuration to work properly, you must first have properly configured the hostname of the WAPT server. To check, use the command echo $(hostname) which must return the DNS address that will be used by WAPT agents on client computers.
Warning
The post-configuration script rewrites the nginx configuration.
If you use a special configuration, save your wapt.conf file with the command :
cp /etc/nginx/sites-available/wapt.conf /etc/nginx/sites-available/wapt.conf.old
It will be necessary to overwrite the configuration after the post-configuration with the command :
cp /etc/nginx/sites-available/wapt.conf.old /etc/nginx/sites-available/wapt.conf
Hint
This post-configuration script must be run as root.
Run the script.
/opt/wapt/waptserver/scripts/postconf.sh
Click on Yes to run the postconf script.
do you want to launch post configuration tool?

      < yes >          < no >
Choose a password for the SuperAdmin account of the WAPT server (minimum length is 10 characters).
Please enter the wapt server password (min. 10 characters)

*****************

        < OK >          < Cancel >
Confirm the password.
Please enter the server password again:

*****************

        < OK >          < Cancel >
Choose the authentication mode for the initial registering of the WAPT agents:
Choice #1 allows to register computers without authentication. The WAPT server registers all computers that ask to be registered.
Choice #2 activates the initial registration based on kerberos (you can activate it later).
Choice #3 does not activate the kerberos authentication mechanism for the initial registering of machines equipped with WAPT. The WAPT server will require a login and a password for each machine registering with it.
WaptAgent Authentication type?

--------------------------------------------------------------------------
( ) 1 Allow unauthenticated registration
( ) 2 Enable kerberos authentication required for machines registration.
    Registration will ask for password if kerberos not available
(x) 3 Disable kerberos but registration require strong authentication
--------------------------------------------------------------------------
                    < OK >          < Cancel >
Select OK to start WAPT Server.
Press OK to start waptserver

       < OK >
Select Yes to configure Nginx.
Do you want to configure nginx?

    < Yes >        < No >
Fill in the FQDN of the WAPT server.
FQDN for the WAPT server (eg. wapt.example.com)

---------------------------------------------
wapt.mydomain.lan
---------------------------------------------

      < OK >          < Cancel >
Select OK and a self-signed certificate will be generated, this step may take a long time.
Generating DH parameters, 2048 bit long safe prime, generator 2
This is going to take a long time
.......................................+...............................+...
Nginx is now configured, select OK to restart Nginx:
The Nginx config is done.
We need to restart Nginx?

      < OK >
The post-configuration is now finished.
Postconfiguration completed.
Please connect to https://wapt.mydomain.lan/ to access the server.

                < OK >
Listing of post-configuration script options:
Options |
Description |
|---|---|
|
Configures Nginx so that port 80 is permanently redirected to 443 |
Restart the WAPT Server.
systemctl restart waptserver nginx
Make sure that the file owner is correct.
chown wapt:www-data -R /var/www/wapt*
Re-sign all your WAPT Packages.
CentOS / RedHat
First of all, update the underlying distribution.
yum update- Add or update the package repository for CentOS / RedHat packages,
import the GPG key from the repository and install the WAPT Server packages.
CentOS7
Community to Discovery
Important
- Follow this procedure for getting the right packages for the WAPT Discovery
Edition. For WAPT Enterprise Edition please refer to the next block.
Note
Not Available as of 2024-09-20.
- WAPT Discovery will be release later. For the free version,
refer to wapt-1.8 documentation https://www.wapt.fr/en/doc-1.8/.
Enterprise
Important
- Follow this procedure for getting the right packages for the WAPT Enterprise
Edition. For WAPT Discovery Edition please refer to the previous block.
- To access WAPT Enterprise resources, you must use the username
and password provided by our sales department.
Add the Tranquil IT repository.
cat > /etc/yum.repos.d/wapt.repo <<EOF
[wapt]
name=WAPT Server Repo
baseurl=https://srvwapt-pro.tranquil.it/entreprise/centos7/wapt-2.0/
enabled=1
gpgcheck=1
EOF
Installing the WAPT Server packages
Retrieve the key
.gpg.wget -q -O /tmp/tranquil_it.gpg "https://wapt.tranquil.it/centos7/RPM-GPG-KEY-TISWAPT-7"; rpm --import /tmp/tranquil_it.gpg
Install all necessary packages
yum install epel-release -y
yum install postgresql96-server postgresql96-contrib tis-waptserver tis-waptsetup cabextract -y
CentOS8
Community to Discovery
Important
- Follow this procedure for getting the right packages for the WAPT Discovery
Edition. For WAPT Enterprise Edition please refer to the next block.
Note
Not Available as of 2024-09-20.
- WAPT Discovery will be release later. For the free version,
refer to wapt-1.8 documentation https://www.wapt.fr/en/doc-1.8/.
Enterprise
Important
- Follow this procedure for getting the right packages for the WAPT Enterprise
Edition. For WAPT Discovery Edition please refer to the previous block.
- To access WAPT Enterprise resources, you must use the username
and password provided by our sales department.
Add the Tranquil IT repository
cat > /etc/yum.repos.d/wapt.repo <<EOF
[wapt]
name=WAPT Server Repo
baseurl=https://srvwapt-pro.tranquil.it/entreprise/centos8/wapt-2.0/
enabled=1
gpgcheck=1
EOF
Installing the WAPT Server packages
Retrieve the key
.gpg.wget -q -O /tmp/tranquil_it.gpg "https://wapt.tranquil.it/centos7/RPM-GPG-KEY-TISWAPT-7"; rpm --import /tmp/tranquil_it.gpg
Install all necessary packages
yum install epel-release -y
yum install postgresql96-server postgresql96-contrib tis-waptserver tis-waptsetup cabextract -y
Post-configuration
Attention
For post-configuration to work properly, you must first have properly configured the hostname of the WAPT server. To check, use the command echo $(hostname) which must return the DNS address that will be used by WAPT agents on client computers.
Warning
The post-configuration script rewrites the nginx configuration.
If you use a special configuration, save your wapt.conf file with the command :
cp /etc/nginx/sites-available/wapt.conf /etc/nginx/sites-available/wapt.conf.old
It will be necessary to overwrite the configuration after the post-configuration with the command :
cp /etc/nginx/sites-available/wapt.conf.old /etc/nginx/sites-available/wapt.conf
Hint
This post-configuration script must be run as root.
Run the script.
/opt/wapt/waptserver/scripts/postconf.sh
Click on Yes to run the postconf script.
do you want to launch post configuration tool?

      < yes >          < no >
Choose a password for the SuperAdmin account of the WAPT server (minimum length is 10 characters).
Please enter the wapt server password (min. 10 characters)

*****************

        < OK >          < Cancel >
Confirm the password.
Please enter the server password again:

*****************

        < OK >          < Cancel >
Choose the authentication mode for the initial registering of the WAPT agents:
Choice #1 allows to register computers without authentication. The WAPT server registers all computers that ask to be registered.
Choice #2 activates the initial registration based on kerberos (you can activate it later).
Choice #3 does not activate the kerberos authentication mechanism for the initial registering of machines equipped with WAPT. The WAPT server will require a login and a password for each machine registering with it.
WaptAgent Authentication type?

--------------------------------------------------------------------------
( ) 1 Allow unauthenticated registration
( ) 2 Enable kerberos authentication required for machines registration.
    Registration will ask for password if kerberos not available
(x) 3 Disable kerberos but registration require strong authentication
--------------------------------------------------------------------------
                    < OK >          < Cancel >
Select OK to start WAPT Server.
Press OK to start waptserver

       < OK >
Select Yes to configure Nginx.
Do you want to configure nginx?

    < Yes >        < No >
Fill in the FQDN of the WAPT server.
FQDN for the WAPT server (eg. wapt.example.com)

---------------------------------------------
wapt.mydomain.lan
---------------------------------------------

      < OK >          < Cancel >
Select OK and a self-signed certificate will be generated, this step may take a long time.
Generating DH parameters, 2048 bit long safe prime, generator 2
This is going to take a long time
.......................................+...............................+...
Nginx is now configured, select OK to restart Nginx:
The Nginx config is done.
We need to restart Nginx?

      < OK >
The post-configuration is now finished.
Postconfiguration completed.
Please connect to https://wapt.mydomain.lan/ to access the server.

                < OK >
Listing of post-configuration script options:
Options |
Description |
|---|---|
|
Configures Nginx so that port 80 is permanently redirected to 443 |
Restart the WAPT Server.
systemctl restart waptserver nginx
Make sure that the file owner is correct.
chown wapt:www-data -R /var/www/wapt*
Re-sign all your WAPT Packages.
Windows
Community to Discovery
Note
Not Available as of 2024-09-20.
Enterprise
Hint
To access WAPT Enterprise resources, you must use the username and password provided by our sales department.
Download and execute
waptserversetup.exe.Choose the installation language.
Choosing the language for WAPT
Accept the License and click on Next to go on to the next step.
Accepting the WAPT license terms
- Choose the installation directory (leave the default if correct)
and click on Next to go on to the next step.
Choosing the WAPT destination folder
- If old folder installation found, this message appear.
Click on Yes to go on to the next step.

Message of old folder WAPT destination folder
Select additional task if needed.
Selecting additional task
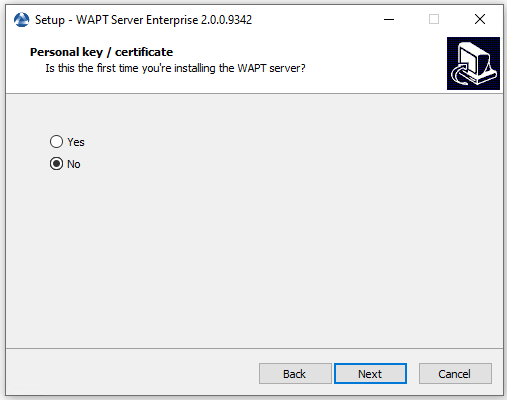
Choose No to question of first installing.
Choosing No to question
Change the WAPT Server password if needed, then press Next.
Changing the WAPT Server password
Skip creating a personal key.
Skipping the creation of the signature key
Skip building the WAPT agent, we will choose to do it later.
Skip build the WAPT agent
Click on the Install to launch the installation, wait for the installation to complete.
Installation of the WAPT Server in progress
Installation has finished
Click on Finish to close the window.
The WAPT Server on your Windows server or workstation is ready.
Attention
DO NOT use the WAPT console on the WAPT server. DO NOT install nor run your WAPT package development tools on the WAPT Server.
Your server is now ready. You may now go to the documentation on Installing the WAPT management console.
Re-sign all your WAPT Packages.
Upgrading WAPT on a from 1.6/1.7 to 1.8
Debian
Attention
Ports 80 and 443 are used by the WAPT Server and must be available.
First of all, update the Debian underlying distribution.
apt update && apt upgrade -y && apt dist-upgrade
Add the package repository for Debian packages, import the GPG key from the repository and install the WAPT Server packages.
Enterprise
Hint
To access WAPT Enterprise ressources, you must use the username and password provided by our sales department.
Replace user and password in the deb parameter to access WAPT Enterprise repository.
apt install apt-transport-https lsb-release
wget -O - https://wapt.tranquil.it/debian/tiswapt-pub.gpg  | apt-key add -
echo  "deb  https://user:password@srvwapt-pro.tranquil.it/entreprise/debian/wapt-1.8/ $(lsb_release -c -s) main"  > /etc/apt/sources.list.d/wapt.list
apt update
apt install tis-waptserver tis-waptsetup
Community
apt install apt-transport-https lsb-release
wget -O - https://wapt.tranquil.it/debian/tiswapt-pub.gpg  | apt-key add -
echo  "deb  https://wapt.tranquil.it/debian/wapt-1.8/ $(lsb_release -c -s) main"  > /etc/apt/sources.list.d/wapt.list
apt update
apt install tis-waptserver tis-waptsetup
Post-configuration
Launch the post-configuration step.
Note
We advise that you launch the post-configuration steps after each server upgrade so that the server uses the latest configuration format.
It is not required to reset a password for the WAPT console during the post-configuration step.
If you have personalized the configuration of Nginx, do not answer Yes when the post-configuration ask you to configure Nginx.
Attention
With WAPT 1.8 post-configuration, WAPT WUA packages will be moved from their current storage location to waptwua root folder (
/var/www/waptwua).If repository replication has been set, all KB/CAB packages will be re-synchronized on remote repositories.
/opt/wapt/waptserver/scripts/postconf.sh
The password requested in step 4 is used to access the WAPT console.
Start the WAPT Server.
systemctl restart waptserver
Upgrade the WAPT console by following the same set of steps as installing the WAPT console.
Then create the WAPT agent.
You will have to keep the same prefix for your packages and change nothing in relation to the private key/ public certificate pair!
This will generate a waptupgrade package in the private repository.
Note
There are two methods for deploying the updates:
Using a GPO and waptdeploy.
Using a waptupgrade package and deploy it using WAPT.
Update the WAPT agents.
The steps to follow to update WAPT agents are the same as the ones to first install the WAPT agents.
Download and install the latest version of the WAPT agent by visiting http://wapt.mydomain.lan/wapt/waptagent.exe.
As mentioned above, this procedure may be made automatic with a GPO or a waptupgrade package.
Attention
Debian Jessie is now deprecated. WAPT 1.8 will not work with old Debian versions.
Consider migrating your existing WAPT installation to Debian Buster or CentOS7.
CentOS
First of all, update the CentOS/ RedHat underlying distribution.
yum update
Enterprise
Modify the repository address then launch the upgrade.
Hint
To access WAPT Enterprise ressources, you must use the username and password provided by our sales department.
Replace user and password in the baseurl parameter to access WAPT Enterprise repository.
cat > /etc/yum.repos.d/wapt.repo <<EOF
[wapt]
name=WAPT Enterprise Server Repo
baseurl=https://user:password@srvwapt-pro.tranquil.it/entreprise/centos7/wapt-1.8/
enabled=1
gpgcheck=1
EOF

wget -q -O /tmp/tranquil_it.gpg "https://wapt.tranquil.it/centos7/RPM-GPG-KEY-TISWAPT-7"; rpm --import /tmp/tranquil_it.gpg
yum install epel-release
yum install cabextract
yum install postgresql96-server postgresql96-contrib tis-waptserver tis-waptsetup
Community
Modify the repository address then launch the upgrade.
cat > /etc/yum.repos.d/wapt.repo <<EOF
[wapt]
name=WAPT Server Repo
baseurl=https://wapt.tranquil.it/centos7/wapt-1.8/
enabled=1
gpgcheck=1
EOF

wget -q -O /tmp/tranquil_it.gpg "https://wapt.tranquil.it/centos7/RPM-GPG-KEY-TISWAPT-7"; rpm --import /tmp/tranquil_it.gpg
yum install postgresql96-server postgresql96-contrib tis-waptserver tis-waptsetup
Post-configuration
Launch the post-configuration step.
Note
We advise that you launch the post-configuration steps after each server upgrade so that the server uses the latest configuration format.
It is not required to reset a password for the WAPT console during the post-configuration step.
If you have personalized the configuration of Nginx, do not answer Yes when the post-configuration asks you to configure Nginx.
Attention
With WAPT 1.8 post-configuration, WAPT WUA packages will be moved from their current storage location to the waptwua root folder (
/var/www/waptwua).If repository replication has been set, all KB/CAB packages will be re-synchronized on remote repositories.
/opt/wapt/waptserver/scripts/postconf.sh
Start the WAPT Server.
systemctl start waptserver
Upgrade the WAPT console by following the same set of steps as installing the WAPT console.
Then create the WAPT agent.
You will have to keep the same prefix for your packages and change nothing in relation to the private key/ public certificate pair!
This will generate a waptupgrade package in the private repository.
Note
There are two methods for deploying the updates:
Using a GPO and waptdeploy.
Using a waptupgrade package and deploying it using WAPT.
Update the WAPT agents.
The steps to follow to update WAPT agents are the same as the ones to first install the WAPT agents.
Download and install the latest version of the WAPT agent by visiting http://wapt.mydomain.lan/wapt/waptagent.exe.
As mentioned above, this procedure may be made automatic with a GPO or a waptupgrade package.
Windows
Attention
In the case you choose to use a GPO to upgrade the WAPT agent, the WAPT Server must be excluded from the OU where the GPO will apply.
Note
The WAPT Server may be installed on 64bit Windows 10 clients, and 64 bit Windows Server 2012/R2, 2016 and 2019 and 2022.
On the Windows machine hosting the WAPT Server, download the latest version of the installer from Tranquil IT’s website
waptserversetup.exeand launch it as Local Administrator.Install the update.
Note
The procedure to follow is the same as the one for installing a WAPT Server on Windows.
Attention
The prefix must NOT be changed and you must NOT generate a new key!
On the workstation that you use to build your packages, manually download WAPTSetup from.
Discovery:
waptsetup.exe.Enterprise:
waptsetup.exe.
Then create the WAPT agent.
You will have to keep the same prefix for your packages and change nothing in relation to the private key/ public certificate pair!
This will generate a waptupgrade package in the private repository.
Note
There are two methods for deploying the updates:
Using a GPO and waptdeploy.
Using a waptupgrade package and deploy it using WAPT.
Update the WAPT agents.
The steps to follow to update WAPT agents are the same as the ones to first install the WAPT agents.
Download and install the latest version of the WAPT agent by visiting http://wapt.mydomain.lan/wapt/waptagent.exe (the link is your own WAPT server).
As mentioned above, this procedure may be made automatic with a GPO or a waptupgrade package.
Upgrading WAPT from versions older than 1.6
We recommend that you restart from scratch, that you provision an up-to-date WAPT Server environment alongside the old version, and that you use the old setup or a domain GPO to deploy the new WAPT agent.