Using WAPT Self-Service  
Presentation
With WAPT 1.7 Enterprise you can now filter the list of self-service packages available for your users.
Your users will be able to install a selection of WAPT packages without having to be a Local Administrator on their desktop.
The Users gain in autonomy while deploying software and configurations that are trusted and authorized by the Organization. This is a time saving feature for the Organization’s IT support Helpdesk.
How does it work?
With WAPT 1.7 Enterprise, a new type of WAPT package exists beside base, group, host, profile and unit packages: they are self-service packages.
Create a self-service package
A self-service package may now be deployed on hosts to list the different self-service rules that apply to the host.
How to use the self-service feature?
Hint
The self-service feature is only available with WAPT Enterprise.
In the Discovery version, only Local Administrators and members of the waptself-service group can access self-service on the agent.
In the Discovery version, it is not possible to filter the packages made accessible to the user.
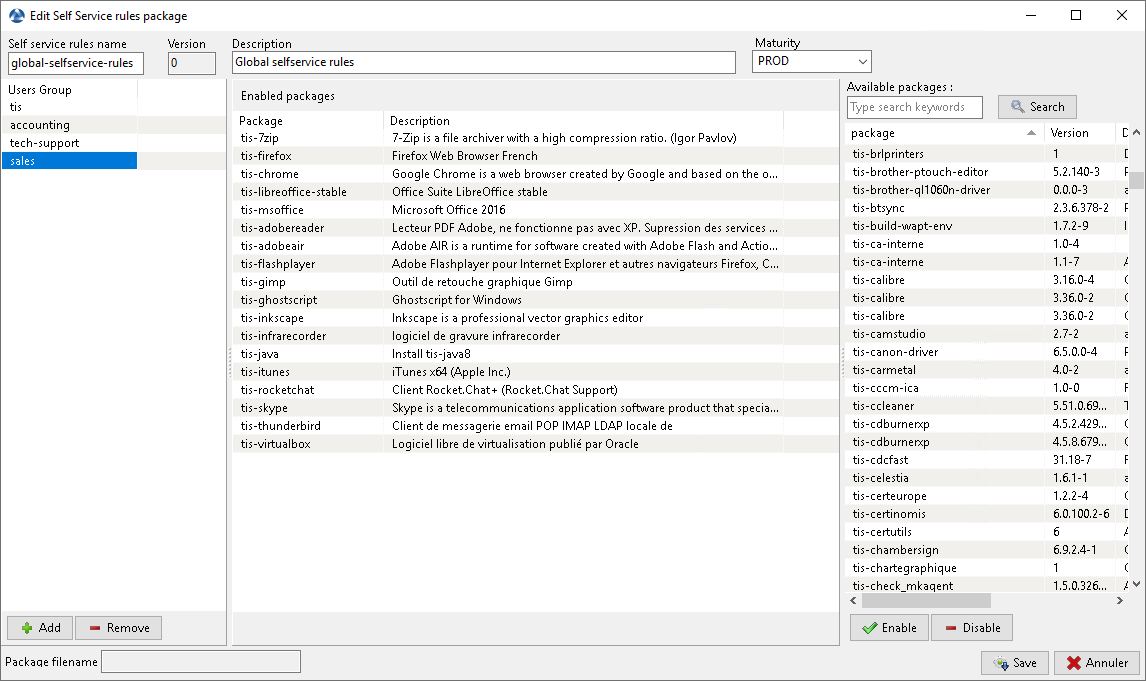
In the console go to the tab Self-service rules.
You can now create your first self-service rule package.
give a name to your new self-service package;
click on Add to add an Active Directory group (at the bottom left);
name the self-service group (with F2 or type directly into the cell);
drag the allowed software and configuration packages for this self-service group into the central column;
add as many groups as you want in the package;
save the package and deploy the package on your selection of hosts;
once the package is deployed, only allowed packages listed in the self-service group(s) of which the User is a member will be shown to the logged in User;
Note
if a group appears in multiple self-service packages, then the rules are merged;
the authentication used is system authentication, local users and groups, but if the machine is in a domain then authentication and groups will also work with users and groups in the domain;
How to use the self-service on the user station?
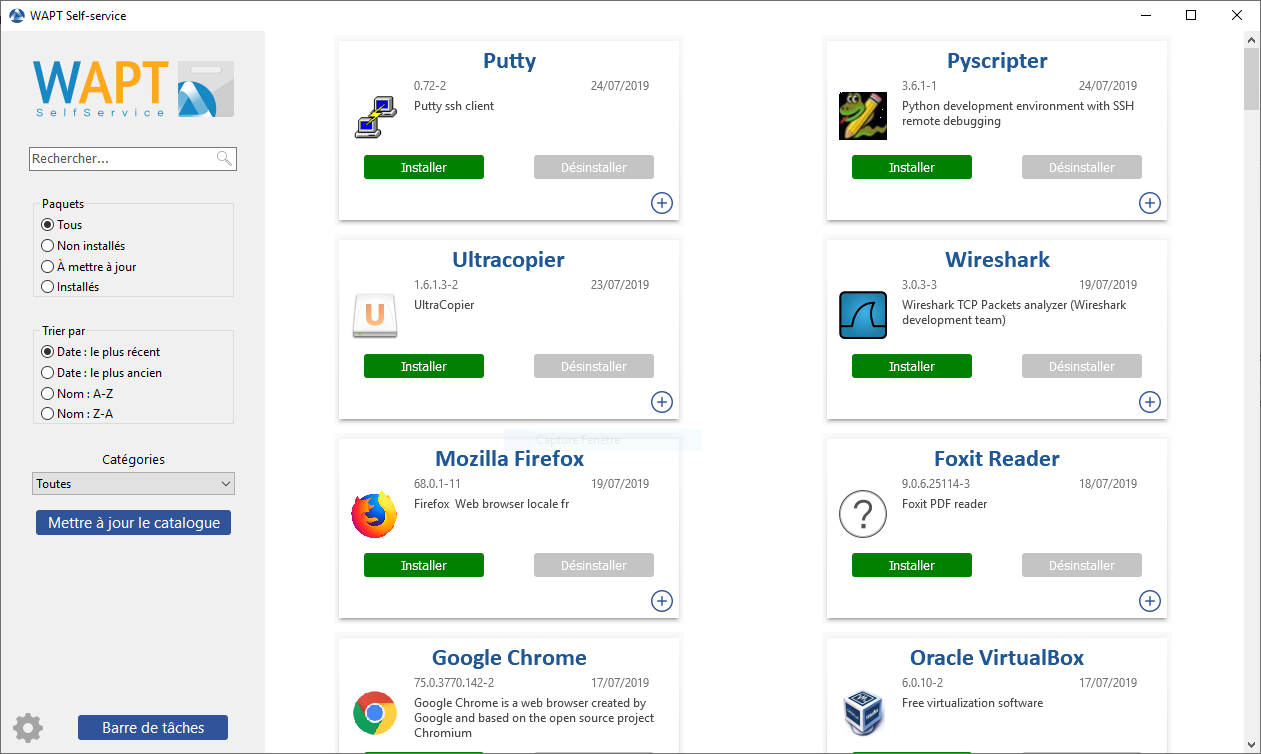
The self-service is accessible to users in the start menu under the name Self-Service software WAPT.
It is also available directly in <base>\waptself.exe.
The login and password to enter when launching the self-service are the User’s credentials (local or Active Directory credentials).
The self-service then displays a list of packages available for installation.
Self Service
the user can have more details on each package with the + icon;
different filters are available for the user on the left side panel;
the Update Catalog button is used to force a wapt-get update on the WAPT agent;
the list of package categories is displayed to the user. To add a category to the list, you must specify the category in the categories section of the
controlfile of the relevant package;the current task list of the WAPT agent is available with the task bar button;
it is possible to change the language of the interface with the configuration button at the bottom left.
Customizing the Self Service interface
Adding the Logo of your Organization
In the Enterprise version only of WAPT, it is possible to change the logo that appears in the self-service interface and therefore improve the acceptation of the Self Service feature by your users.
To do this, simply place the logo you want in <wapt>\templates\waptself-logo.png
Note
It is highly recommended to use a .png file with a 200 x 150px resolution.
Managing package categories
Default categories are:
Internet;
Utilities;
Messaging;
Security;
System and network;
Storage;
Media;
Development;
Office;
You can create your own categories easily by filling the control file’s categories section of any WAPT package and write a new category of your choice, WAPT will automatically show the package in the new category.
WAPT Agent Settings for WAPT Self-Service
WAPT Agent can be configured to force WAPT self-service packages filtering to Local Administrators WAPT Self-Service and Waptservice Authentification settings.
Configuring a different authentication method for the self-service
As mentioned above, authentication on WAPT service is configured by default in system mode.
This means that the WAPT service transmits the authentication directly to the operating system; it also recovers the groups by directly interrogating the operating system.
This behavior is defined with the value of service_auth_type in wapt-get.ini. The default value is system.
In this mode we assume that Local Administrators can see all the packages.
To change this behavior, modify the value of waptservice_admin_filter in wapt-get.ini.
You may be interested in looking up this article describing the settings for WAPT Self-Service and Waptservice Authentification for more options.
Two additional modes are available :
waptserver-ldap: this mode allows authentication to the WAPT server. The WAPT server will make a LDAP request to verify authentication and groups. Warning ! For this to work, you must have configured LDAP authentication on the WAPT server, (the configuration of the admin group will be ignored) See this article on configuring authentication against Active Directory for more information.waptagent-ldap, This mode allows authentication with an LDAP server identified inwapt-get.ini. The WAPT agent will make a LDAP request to verify authentication and groups.You may be interested in looking up this article describing the settings for WAPT Self-Service and Waptservice Authentification for more options.
Note
For the system authentication under GNU/Linux to work correctly, be sure to correctly configure your pam authentication and your
nsswitch.conf. The id username command must return the list of the groups the user is member of.
Video demonstration
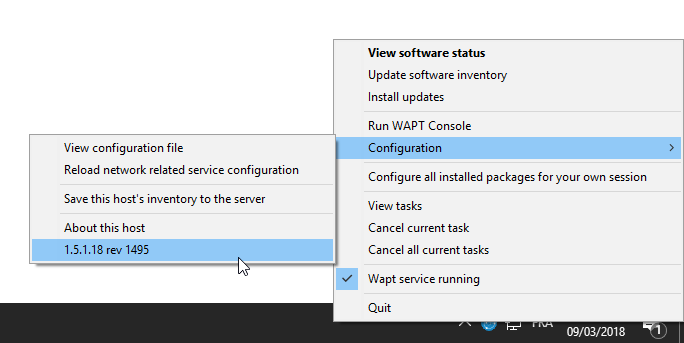
Using WAPTtray
wapttray is a utility working in user context, it is located
in the WAPT folder C:\Program Files (x86)\wapt.
wapttray launches at logon if the option has been ticked during installation. The icon will show up in the Windows tray toolbar.
We can also launch wapttray manually with a startup GPO pointing
on C:\Program Files (x86)\wapt\wapttray.exe.
The tray icon is handy for autonomous users that want to choose the right moment to upgrade their packages.
WAPTtray in Windows notification tray
Functionalities of the WAPTtray
Action |
Description |
|---|---|
Showing the status of packages |
launches the local web interface in a browser |
Launching the installation of a update |
launches the installation of pending upgrades |
Refreshing the list of available |
refreshes the list of available packages. Double-clicking on the tray icon brings about the same effect. |
Launching the WAPT console |
launches the WAPT console |
Viewing the configuration file |
opens the |
Reloading network related service configuration |
reloads the connection to the WAPT Server in the event of a network reconfiguration |
Uploading the host’s inventory to the WAPT Server |
updates the host’s inventory with the WAPT Server |
Configuring all installed packages for the User |
launches a session-setup to configure user environment for all packages installed on the host |
Canceling WAPT tasks running on the host |
shows running tasks, allows to cancel a running task, allows to cancel all running tasks |
Stopping and starting the WAPT service |
stops and reloads the WAPTservice |
Exiting the WAPTtray |
closes the tray icon without stopping the local WAPTservice |
Using WAPTExit
waptexit allows to upgrade and install WAPT packages when a host is shutting down, at the user’s request, or at a scheduled time.
The mechanism is simple. If packages are waiting to be upgraded, they’ll be installed.
Hint
When to use WAPTexit?
The WAPTexit method is very effective in most situation because it does not require the intervention of the User or the Administrator.

WAPTexit window
WAPTexit
waptexit executes by default on shutdown; it is installed by default with the WAPT agent.
The behavior of waptexit is customizable in
C:\Program Files (x86)\wapt\wapt-get.ini.
Manually triggering the execution of WAPTexit
By creating a desktop shortcut, one can allow users to launch upgrades by themselves at a time that is convenient to them simply by clicking the WAPTexit icon.
The behavior of waptexit is customizable in
C:\Program Files (x86)\wapt\wapt-get.ini.
Triggering WAPTexit with a scheduled task
One can deploy a GPO or a WAPT package that will trigger WAPTexit at a pre-scheduled time.
Triggering WAPTexit with a scheduled task is best suited for servers that are not shutdown frequently.
You may adapt the procedure describing how to deploy the WAPT agent to trigger the WAPTexit.exe script at the time of your choosing.
Hint
You can use the following script for your scheduled task, adapted to your need (Enterprise only):
waptpython -c "from waptenterprise.waptservice.enterprise import start_waptexit
start_waptexit('',{'only_priorities':False,'only_if_not_process_running':True,
'install_wua_updates':False,'countdown':300},'schtask')"
Warning
All running software that are upgraded may be killed with possible loss of data.
WAPTexit may fail to upgrade a software program if a software
that you are upgrading is in the impacted_process list
of the control file of one of the software you are trying to upgrade.
See below for more information.
The method of triggering WAPTexit at a scheduled time is the least recommended method for desktops. It is better to let WAPTexit execute at shutdown or on user request.
Avoiding the cancellation of upgrades
To disable the interruption of the installation of updates you can run waptexit with the argument:
waptexit.exe -allow_cancel_upgrade = True
Otherwise waptexit will take the value indicated in
C:\Program Files (x86)\wapt\wapt-get.ini:
[global]
allow_cancel_upgrade = False
If this value is not indicated in
C:\Program Files (x86)\wapt\wapt\wapt-get.ini,
then the default value will be 10.
Increase the trigger time in waptexit
To specify the wait time before the automatic start of the installations you can start waptexit with the argument:
waptexit.exe -waptexit_countdown = 10000
Otherwise waptexit will take the value indicated
in the configuration C:\Program Files (x86)\wapt\wapt-get.ini:
[global]
waptexit_countdown = 25
If this value is not indicated in
C:\Program Files (x86)\wapt\wapt\wapt-get.ini,
then the default value will be 1.
Do not interrupt user activity
To tell WAPT not to run an upgrade of running software on the machine (impacted_process attribute of the package), you can run waptexit with the argument:
waptexit.exe -only_if_not_process_running=True
Otherwise waptexit will take the value indicated in
C:\Program Files (x86)\wapt\wapt-get.ini:
[global]
upgrade_only_if_not_process_running = True
If this value is not indicated in
C:\Program Files (x86)\wapt\wapt\wapt-get.ini,
then the default value will be False.
Launching the installation of packages with a special level of priority
To tell WAPT to only upgrade high priority packages, you can run waptexit with the argument:
waptexit.exe -priorities = high
Otherwise waptexit will take the value indicated in
C:\Program Files (x86)\wapt\wapt-get.ini:
[global]
upgrade_priorities = high
If this value is not indicated in
C:\Program Files (x86)\wapt\wapt\wapt-get.ini, then the default value
will be Empty (no filter on priority).
Customizing WAPTexit
It is possible to customize waptexit by placing the image you want
in C:\Program Files (x86)\wapt\templates\waptexit-logo.png.
Registering/ unregistering WAPTexit
To register or unregister waptexit in local shutdown group strategy scripts, use:
to enable waptexit at host shutdown:
wapt-get add-upgrade-shutdown
to disable waptexit at host shutdown:
wapt-get remove-upgrade-shutdown