10. Using audit data into plugins for WAPT package compliance and for external services 
10.1. Displaying host audit data in the WAPT Console
You can manage audit output and display the audit result if you activate the option in the Tab. Check the Show host audit data tab to see the tab Audit Data on each client.
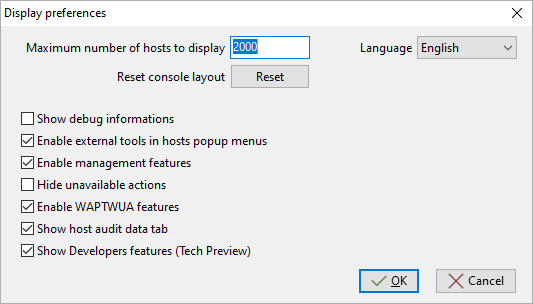
Window showing the advanced preferences
To use audits in WAPT packages, visit this page to manage audit_data.
10.1.1. Displaying encrypted data with a certificate in the audit data tab
With audit function, it is possible to encrypt sensitive data coming from remote hosts; it will be possible to read the encrypted sensitive with a certificate installed on the WAPT Administrator’s host. This way, the WAPT Server may store sensitive inventory data without the WAPT Server becoming a sensitive asset.
This method is particularly useful for example for securely managing LAPS random passwords in WAPT.
In setup.py, you can use a function to encrypt data with a certificate.
If you have the private key matching the certificate that was used to encrypt the data, the data will be decrypted and it will appear in a readable form.
Here is an example of code:
# -*- coding: utf-8 -*-
from setuphelpers import *
from waptcrypto import print_encrypted_data

def audit():
  randompassword = '1234'
  print_encrypted_data(randompassword, glob.glob('*.crt'))
This code will encrypt the password 1234 with all certificates present on the host that is used to manage WAPT. From the WAPT Console, you will see in the audit_data tab the crypted version and you can decipher the data with your private key associated to the public certificate that was used to encrypt the data.

10.2. Synchronizing WAPT inventories to GLPI
10.2.1. Working principle
WAPT Enterprise offers synchronization between the inventories of your hosts and GLPI ITSM Software.
The method automatically synchronizes changes on your IT infrastructure with the GLPI server.
WAPT can synchronize with GLPI 10 using the native JSON API. WAPT can synchronize with GLPI version 9.x using the FusionInventory plugin with XML format.
Attention
GPLI on WAPT does not work with Kerberos authentification for GLPI.
If you use Kerberos for GLPI, exclude glpi/plugins/fusioninventory/ from the Nginx authentification.
Warning
If you experience issues with GLPI server not receiving parts of inventories, you can install the package tis-audit-glpi-inventory on clients. In this way, you will get the official GLPI inventory.
10.2.2. Installing the required dependencies for GLPI 9.x
In order to receive inventories on the GLPI server, the FusionInventory plugin will need to be installed on the GLPI server. This is not required for GLPI 10 which has its own native JSON API.
Note
After installing FusionInventory on the GLPI server, an endpoint needs to be configured on the WAPT Server to send the inventories to the GLPI server:
http:/glpi.mydomain.lan/glpi/plugins/fusioninventory/
10.2.3. Configuring WAPTAgent and sync package
Install and configure the WAPT Agent on the computer that will run the synchronization. The WAPTAgent is installed by default on the WAPTServer, it just need to be configured.
To configure the WAPTAgent, please refer to the corresponding documentation.
Then you need to install the GLPI sync package:
for GLPI 9.x, you need to install the package tis-glpi-plugin-export-to-glpi9
for GLPI 10.x, you need to install the package tis-glpi-plugin-export-to-glpi10
You need to configure an audit schedule on the agent
[global]
...
waptaudit_task_period=120m
...
With the chosen package, it will create two ini file in your $WAPT_INSTALL_DIR/private (linux : /opt/wapt/private, windows : C:Program Files (x86)waptprivate`).
Connect to the host and modify glpi.ini and wapt_api.ini files.
For GLPI9:
[glpi]
username = glpi
password = xxxxxxx
url = https://glpi.xx.xxxxx.xx/plugins/fusioninventory/
For GLPI10:
[glpi]
username = glpi
password = xxxxxxx
url = https://glpi.xx.xxxxx.xx/front/inventory.php
For GLPI10, please also ensure inventory is enabled.
For both GLPI9 and GLPI10:
[wapt]
username = waptregister
password = waptregister2023!
url = https://srvwapt.ad.tranquil.it
To test the current configuration, you can trigger an audit
wapt-get audit tis-glpi-plugin-export-to-glpi9
# or
wapt-get audit tis-glpi-plugin-export-to-glpi10
10.2.4. Current items sent by WAPT to the GLPI server
Value |
Sent |
Not sent |
|---|---|---|
Computer name |
|
|
User name |
|
|
Description |
|
|
OS name |
|
|
OS version |
|
|
Language |
|
|
CPU |
|
|
Memory |
|
|
Battery |
|
|
Chassis type |
|
|
Physical or virtual |
|
|
Network card configuration |
|
|
Printer list and properties |
|
|
Installed software [1] |
|
|
Network drives |
|
|
Environment variables [2] |
|
|
Display screens references |
|
|
Mouse and keyboard references |
|
|
Controllers card references (except graphic card) |
|
|
Antivirus version |
|
|
Firewall state |
|
|
Local group list |
|
|
Memory bank list and state |
|
|
USB ports list and connected devices |
|
|
Printer status |
|
|
Card readers |
|
|
System wide Appx list |
|
Footnotes
10.2.5. Possible errors in reported inventory on the GLPI server
Inventories uploaded by the WAPT Server to the GLPI server may be incomplete or may have errors when compared to inventories uploaded directly by the FusionInventory agent deployed on hosts. One reason is that WAPT aims to report only the most important values.
If you feel that important items are missing or are reported in a wrong way, please report the issue to the Tranquil IT dev team.
To report the issue, you will need to send 2 .xml files.
First, install the FusionInventory agent on the computer on which you are observing a missing or wrongly reported inventory item.
Run the FusionInventory agent and extract the report into a
.xmlfile.
"C:\Program Files\FusionInventory-Agent\fusioninventory-inventory" > %TEMP%\inventory.xml
fusioninventory-inventory > /tmp/inventory.xml
fusioninventory-inventory > /tmp/inventory.xml
Set the debug directory in the waptserver.ini.
glpi_inventory_debug_directory = /tmp/glpi
Restart the WAPT Server
Retrieve the
/tmp/glpi/UUID.xmlfile from the WAPT Server, the UUID being the identifier of the host.Send the 2 files to the Tranquil IT dev team.
10.3. Synchronizing WAPT inventories to Cyberwatch for security breaches
10.3.1. Working principle
WAPT Enterprise offers synchronization between the inventories of your hosts and Cyberwatch ISVM Software.
The method automatically synchronizes information about updates or installed softwares to Cyberwatch tool in order to scan and alert you about detected vulnerabilities.
10.3.2. Configuring Cyberwatch server side
Connect to your Cyberwatch server and go to your profile.
In the API section, click on See my API Keys.
Click on Add and name your API access key for WAPT.
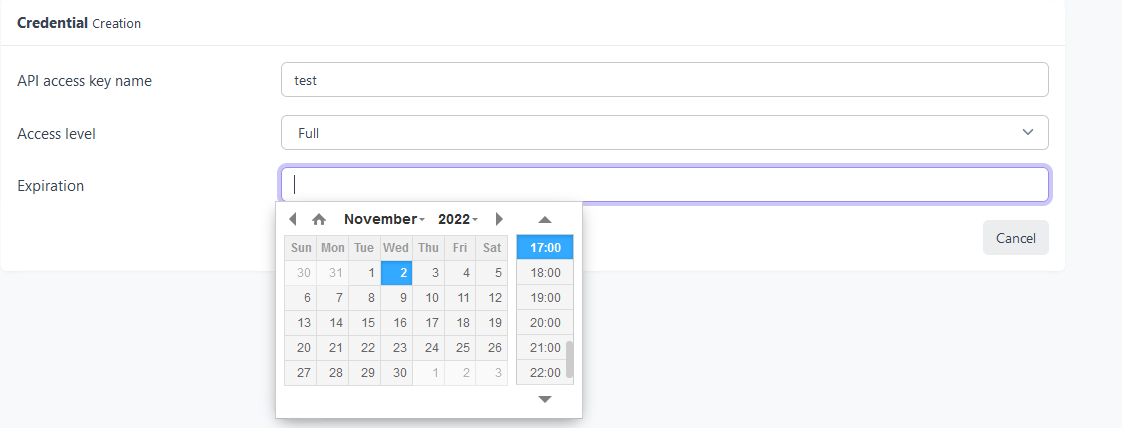
Set the access level to Full and give an expiration date. If you don’t give one, the key will never expire.
This key with its API access key ID will allow you to use the Cyberwatch API for our WAPT package.
10.3.3. Configuring WAPTAgent and sync packages
Install and configure the WAPT Agent on the computer that will run the synchronization. The WAPTAgent is installed by default on the WAPTServer, it just need to be configured.
To configure the WAPTAgent, please refer to the corresponding documentation.
Yu can have two packages :
if you have the Cyberwatch agent, you can import from Cyberwatch installing the package tis-cyberwatch-plugin-import-from-cyberwatch, it will give you information directly on your WAPT Console.
for agentless devices, you still can export to your Cyberwatch server information of you WAPT hosts installing the package tis-cyberwatch-plugin-export-to-cyberwatch-airgap, it will give you information to your Cyberwatch Console without Cyberwatch agent installed.
You need to configure an audit schedule on the agent
[global]
...
waptaudit_task_period=120m
...
With the package, whichever you chose (you can oblviously choose both), it will create two ini files in your $WAPT_INSTALL_DIR/private (linux : /opt/wapt/private, windows : C:Program Files (x86)waptprivate`).
Connect to the host and modify cyberwatch_api.ini and wapt_api.ini files.
[cyberwatch]
api_key =
secret_key =
url = https://cyberwatch.mydomain.lan
[wapt]
username = waptregister
password = waptregister2023!
url = https://srvwapt.ad.tranquil.it
To test the current configuration, you can trigger an audit
wapt-get audit tis-cyberwatch-plugin-import-from-cyberwatch
# and/or
wapt-get audit tis-cyberwatch-plugin-export-to-cyberwatch-airgap
10.4. Customizing audit reports with Mustache templates
10.4.1. Introduction and explanation
WAPT can collect detailed hardware and software audit data from client machines using the audit_data plugin.
The collected data includes system information such as:
The collected data includes system information such as installed software, running services, disk usage, user accounts, network configuration, and more.
This data is stored in structured JSON format and displayed in the WAPT console using HTML templates.
By default, WAPT provides generic templates to visualize this data. However, these templates can be fully customized to match your needs.
10.4.1.1. Why customize audit reports?
Audit report customization lets you focus on data specific to your organization Create dashboards or tables adapted to internal policies, Improve readability and ease of use for technical support teams, Generate better documentation for audits or compliance.
WAPT uses Mustache templates to render JSON data into structured HTML content inside the console.
10.4.1.2. What is Mustache?
Mustache is a logic-less template language. It allows injecting dynamic data into static HTML layouts, without complex scripting.
A Mustache template is a plain text file containing:
Static HTML
Dynamic tags like
{{key}},{{#section}} ... {{/section}},{{^section}} ... {{/section}}
It is lightweight, simple to learn, and ideal for customizing visual reports without writing code.
10.4.2. Template storage and naming conventions
All Mustache templates used to render audit data in WAPT are stored in the following folder:
C:\Program Files (x86)\wapt\templates
If you are running WAPT in a portable or development environment, it may be:
<wapt_folder>\templates
Each template file is a .html file written in Mustache format.
10.4.2.1. Naming convention
To override or define a new audit template, the file must follow a strict naming pattern:
host_audit_<section>_<key>.html
Where:
section corresponds to the audit section name (e.g. audit-network-profile)
key corresponds to the data key to render (e.g. auto-remediate-card)
Example:
host_audit_audit-network-profile_auto-remediate-card.html
This template will be used to render the key auto-remediate-card from the audit-network-profile section.
10.4.2.2. Modifying or creating a template
There are two ways to customize audit rendering:
If the template already exists: open and edit the corresponding .html file in the templates folder.
If the template does not exist: create a new file with the correct name, and write the structure in Mustache format.
Make sure the HTML is valid and uses proper Mustache syntax, as shown in the examples above.
This mechanism allows you to fully customize how audit data appears in the WAPT console, per key and per section.
10.4.3. How to write templates
10.4.3.1. Basic example – rendering audit data with placeholders
Let’s start with a simple example that shows how data from an audit can be inserted into a Mustache template.
Given the following HTML template:
<div class="system-info">
    Hostname: {{hostname}}<br>
    Operating System: {{os_name}} {{os_version}}
</div>
And the values for the placeholders are provided in a JSON object (this object is called the rendering context – it holds the data passed to the template):
{
  "hostname": "PC123",
  "os_name": "Windows",
  "os_version": "10"
}
Then the rendered result will be:
<div class="system-info">
    Hostname: PC123<br>
    Operating System: Windows 10
</div>
This basic example shows how Mustache replaces each {{ placeholder }} with the matching value from the JSON context. There is no logic, only substitution.
10.4.3.2. Mustache syntax overview
Mustache is simple and declarative. Below are the most common tags with practical examples.
10.4.3.2.1. Display a single value – {{key}}
Use {{key}} to insert a single value from the rendering context into the template.
The value of the key hostname will be searched for in the current context (and if not found, in any parent context). When a value is found, the entire tag is replaced with the value, properly HTML-escaped to avoid injection.
JSON context:
{
  "hostname": "PC123"
}
Template:
<p>Hostname: {{hostname}}</p>
Rendered result:
<p>Hostname: PC123</p>
10.4.3.2.2. Conditional block – {{#section}} ... {{/section}}
This syntax allows you to display a block of content only if the value of the key exists and is considered “truthy” (not null, false, or empty). It’s commonly used to conditionally render a section, or to iterate over a list.
Example with an object
JSON context:
{
  "user": {
    "name": "Alice"
  }
}
Template:
{{#user}}
  <p>User: {{name}}</p>
{{/user}}
Rendered result:
<p>User: Alice</p>
If the user key was missing or null, nothing would be rendered.
Example with a list
If the value of the section is a list (array), the block is rendered once for each item, with the context set to the current item.
JSON context:
{
  "services": [
    {"name": "WAPT"},
    {"name": "Antivirus"}
  ]
}
Template:
<ul>
  {{#services}}
    <li>{{name}}</li>
  {{/services}}
</ul>
Rendered result:
<ul>
  <li>WAPT</li>
  <li>Antivirus</li>
</ul>
10.4.3.2.3. Inverse block – {{^section}} ... {{/section}}
The inverse section {{^section}} is used to show a block only if the value is falsy – meaning it does not exist, is false, null, or an empty list. This is useful to display fallback messages or “no data” indicators.
JSON context:
{
  "has_battery": false
}
Template:
{{^has_battery}}
  <p>This device has no battery.</p>
{{/has_battery}}
Rendered result:
<p>This device has no battery.</p>
If “has_battery”: true, the block would not be rendered at all.
10.4.3.2.5. Current value – {{.}}
The {{.}} tag is used when iterating over a list of simple values (strings, numbers, booleans). It refers to the current value in the context.
If you are iterating over an array like [“important”, “urgent”], each {{.}} corresponds to the current string in the loop.
JSON context:
{
"tags": ["important", "urgent", "todo"]
}
Template:
<ul>
{{#tags}}
<li>{{.}}</li>
{{/tags}}
</ul>
Rendered result:
<ul>
<li>important</li>
<li>urgent</li>
<li>todo</li>
</ul>
10.4.4. Available Mustache helpers
WAPT provides many custom helpers that can be used inside Mustache templates to transform, format, or extract data.
These helpers extend the basic Mustache syntax and are especially useful when working with audit data.
The available helpers are listed below:
Comparison and logic
IIf – Inline conditional rendering (if cond then val1 else val2)
If_ – Full conditional expression (advanced)
Equals_ – Compares values
Match – Matches regex (case-sensitive)
MatchI – Matches regex (case-insensitive)
List and object operations
Items – Converts a dictionary to an iterable list
Get – Retrieves a key from an object with default fallback
Count – Counts items in a list or keys in a dict
Values – Extracts values from a dict
Keys – Extracts keys from a dict
First – Gets the first n items in a list
Last – Gets the last n items
Slice – Extracts a slice [start:end] from a list
Data formatting
HumanBytes – Converts byte sizes to KB, MB, GB
CSV – Joins lists of objects into CSV format
String and text manipulation
Lower – Converts to lowercase
Upper – Converts to uppercase
Pad – Pads a string to the right
PadLeft – Pads a string to the left
Sub – Extracts a substring
CamelCase – Converts string to camelCase
SnakeCase – Converts string to snake_case
EnumTrim – Cleans enumerated values (e.g., trim [0])
EnumTrimRight – Like EnumTrim but trims only on the right
Date and time formatting
LocalDateTime – Converts UTC to localized datetime
LocalDate – Local date from UTC input
DateFmt – Custom date formatting with strftime-style format
DateTimeToText – Converts date to readable text
DateToText – Formats date value (legacy variant)
TimeLogToText – Parses duration from logs (e.g., “00:04:32”)
HTML and rendering
{{> file.ext }} – Includes a partial file (HTML, CSS, TXT, PNG, JPG) from templates/partials/
ToJson2 – Converts a value to formatted JSON
ToJson – Basic JSON conversion
JsonQuote – Escapes JSON content inside a string
JsonQuoteUri – Escapes JSON for safe use in URLs
SimpleToHtml – Renders basic line/text formatting
MarkdownToHtml – Parses Markdown into HTML
WikiToHtml – Parses wiki-style markup into HTML
Other utilities
JoinValues – Joins values of a list or dict with separator
Join – Joins items (keys or values) into a string
NewGuid – Generates a new UUID
ExtractFileName – Extracts filename from a full path
Encoding and hashing
b64encode – Base64-encodes a string
sha256 – SHA-256 hash of a string
sha1 – SHA-1 hash of a string
md5 – MD5 hash of a string
BlobToBase64 – Encodes binary blob to base64
b64decode – Decode a base64-encoded string
_chr – Converts ASCII codes to characters
Networking and HTTP
HttpGet – Performs an HTTP GET request
HttpGetSafe – Like HttpGet but safer for templates
DoHttpGet – Low-level GET with optional certificate check
HttpPost – Sends an HTTP POST request
HttpPostSafe – POST variant with safety checks
DoHttpPost – Low-level POST with optional cert verification
Each helper accepts a value or a list of values as input and returns a formatted result usable inside any Mustache tag.
Documentation for each helper is provided in the next section.
See Mustache helpers documentation Available Mustache helpers.
10.4.3.2.4. Comment –
{{! comment }}¶Mustache allows inline comments using {{! … }}. These comments are completely ignored during rendering and will not appear in the output HTML.
This is useful for leaving notes for template authors without affecting the output.
Template:
{{! This is a comment for developers }}
<p>Hello</p>
Rendered result: