2.1. Installing WAPT Server on Debian and derivatives
2.1.1. Setting up the server
In order to install a supported version of Debian and its derivatives, or Red Hat and its derivatives.
Warning
Install 64bit version.
Install the Server without the graphical user interface.
Systemd must be enabled
Attention
The upgrade procedure is different from an initial installation. For an upgrade, please refer to the documentation on upgrading the WAPT Server.
2.1.1.1. Configuring the network parameters
The different parameters presented below are not specific to WAPT; you may adapt them as required for your environment.
Modify the following files in order to get a proper naming (FQDN) and network addressing strategy.
In the following example:
2.1.1.2. Configuring the name of the WAPT Server
Hint
The short name of the WAPT Server MUST not be longer than 15 characters (the limit is due to sAMAccountName restriction in Active Directory).
The name of the WAPT Server MUST be a FQDN, that is to say it has both the server name and the DNS suffix.
Modify the
/etc/hostnamefile and write the FQDN of the WAPT Server.
# /etc/hostname of the WAPT Server
srvwapt.mydomain.lan
Configure the
/etc/hostsfile, be sure to put both the FQDN and the short name of the WAPT Server.
# /etc/hosts of the WAPT Server
127.0.0.1   localhost localhost.localdomain localhost4 localhost4.localdomain4
::1         localhost localhost.localdomain localhost6 localhost6.localdomain6
10.0.0.10   srvwapt.mydomain.lan srvwapt
Hint
On the line defining the DNS server IP address, be sure to have the IP of the WAPT Server (not 127.0.0.1), then the FQDN, then the short name.
Do not change the line with localhost.
2.1.1.3. Configuring the IP address of the WAPT Server
Configure the IP address of the WAPT Server in the
/etc/network/interfaces.
# /etc/network/interfaces of the WAPT Server
auto eth0
iface eth0 inet static
  address 10.0.0.10
  netmask 255.255.255.0
  gateway 10.0.0.254
Apply the network configuration by rebooting the host with a reboot.
reboot
If it has not already been done, create the DNS entry for the WAPT Server in the Organization’s Active Directory or DNS server.
After having rebooted, configure the system locale in English in order to have non-localized logs for easier searching of common errors.
apt install locales-all -y
localectl set-locale LANG=en_US.UTF-8
localectl status
Check whether the machine is properly synchronized with NTP server. If it is not synchronized please refer to the OS documentation to configure timedatectl.
timedatectl status
Update and upgrade the Operating System and make sure that the Debian default certificate authorities bundle is installed.
apt update && apt upgrade
apt install ca-certificates -y
Reboot the WAPT Server.
reboot
The server is now ready.
Installing the WAPT Server requires a few steps:
Configuring the repositories.
Installing additional Linux packages.
Installing and provisioning the PostgreSQL database.
Post-configuring the WAPT Server.
Note
The WAPT Server packages and repository are signed by Tranquil IT and it is necessary to get the gpg public key below in order to avoid warning messages during installation.
2.1.2. Installing the WAPT Server packages
Update the APT source, retrieve the .gpg key from Tranquil IT, then add Tranquil IT’s repository.
apt install apt-transport-https lsb-release gnupg wget -y
bash -c 'wget -qO- https://wapt.tranquil.it/$(lsb_release -is)/tiswapt-pub-2026.gpg > /usr/share/keyrings/tiswapt-pub.gpg'
echo "deb [signed-by=/usr/share/keyrings/tiswapt-pub.gpg] https://wapt.tranquil.it/$(lsb_release -is)/wapt-2.6/ $(lsb_release -c -s) main" > /etc/apt/sources.list.d/wapt.list
Warning
breaking change: For WAPT versions earlier than 2.6.1.17654, please use this gpg key.
wget -qO- https://wapt.tranquil.it/$(lsb_release -is)/tiswapt-pub.gpg > /usr/share/keyrings/tiswapt-pub.gpg
Then install the WAPT Server packages.
export DEBIAN_FRONTEND=noninteractive
apt update
apt install tis-waptserver tis-waptsetup -y
unset DEBIAN_FRONTEND
2.1.3. Standard mode post-configuration
Note
For the CSPN security certification mode, please visit this documentation.
Attention
For post-configuration to work properly:
The hostname of the WAPT Server MUST be properly configured. To check, use the command echo $(hostname) which MUST return the DNS address that will be used by WAPT Agents on client computers.
The DNS resolver MUST be correctly configured.
The WAPT Server MUST be able to contact a Domain Controller in write mode for Kerberos authentication mode.
The post-configuration script rewrites the nginx configuration. A backup file is created when running the postconf in the same directory.
This post-configuration script MUST be run as root.
Run the script.
/opt/wapt/waptserver/scripts/postconf.sh
Click on Yes to run the postconf script.
Do you want to launch post configuration tool?

            < yes >          < no >
Choose a password (if not defined) for the SuperAdmin account of the WAPT Server (minimum length is 10 characters).
Please enter the wapt server password (min. 10 characters)

*****************

                < OK >          < Cancel >
Confirm the password.
Please enter the server password again:

*****************

                < OK >          < Cancel >
Choose the authentication mode for the initial registering of the WAPT Agents:
Choice #1: Allows to register computers without authentication. The WAPT Server registers all computers that ask to be registered.
Without a certificate, it is not possible to download WAPT Packages and query some WAPT Server endpoints.
This method is recommended if you are installing WAPT for the first time.
Choice #2: Activates the initial registration based on Kerberos (you can activate it later).
If you experience some problems while upgrading or if you use a reverse proxy, this method is recommended while upgrading.
If you want to use option 2 and your Kerberos keytab does not exist, the
postconf.shscript will create it, after you valid option 2.Creating your Keytab, after select enable kerberos option for the first time.
Enter Kerberos REALM (domain name)

-----------------------------------
MYDOMAIN.LAN
-----------------------------------

      < Yes >        < Cancel >
Enter a Domain Controller name in write mode

-----------------------------------
srvads1.mydomain.lan
-----------------------------------

      < Yes >        < Cancel >
Enter a username authorized to join machines to the domain.

-----------------------------------
administrator
-----------------------------------

      < Yes >        < Cancel >
Enter administrator password

-----------------------------------
**************
-----------------------------------

      < Yes >        < Cancel >
Enter the URL that will be used by the WAPTAgent

-----------------------------------
srvwapt.mydomain.lan
-----------------------------------

        < Yes >        < Cancel >
Choose the name of the computer used by the waptserver

-----------------------------------
SRVWAPT
-----------------------------------

        < Yes >        < Cancel >
Keytab file is correctly generated in /etc/nginx/http-krb5.keytab

                        < OK >
Unable to create keytab file. Please refer to
https://www.wapt.fr/fr/doc/wapt-security-configuration-server.html#configuring-kerberos-authentication-enterprise-feature

                                                    < OK >
Choice #3: Does not activate the Kerberos authentication mechanism for the initial registering of hosts equipped with WAPT.
The WAPT Server will require a login and a password for each host registering with it.
WaptAgent Authentication type?

--------------------------------------------------------------------------
(x) 1 Allow unauthenticated registration
( ) 2 Enable kerberos authentication required for machines registration.
        Registration will ask for password if kerberos not available
( ) 3 Disable kerberos but registration require strong authentication
--------------------------------------------------------------------------
                                        < OK >          < Cancel >
Upgrade WAPT 2.X to 2.6, verify the verify_cert option.
Note
If you are upgrading from WAPT 2.X to 2.5, verify the current configuration of the WAPT Agents and more specifically the verify_cert option.
If in your current configuration verify_cert is set to True or a set to a file path (certificate pinning), then choose option #1 below.
If in your current configuration verify_cert is set to False, then choose option #2 below.
WaptAgent client certificate checking

----------------------------------------------------------------------------
(x) 1 Authenticate Agents using https client certificate (recommended)
( ) 2 Don't check https client certificate (legacy)
----------------------------------------------------------------------------
                                        < OK >          < Cancel >
If you want to use WAPT for OS Deployment, select Yes.
If you have chosen Yes to activate os deployment, the post-configuration will ask whether to use a secure authentication to deploy OS images. It will ask a user / password when you will deploy OS images using WADS.
If you have chosen No, Nginx will not enable WADS API endpoints for WAPT Agents.
Do you want to activate os deployment?

        < Yes >        < No >
Secure authentication for WADS requires the user to be authenticated on the machine where the OS deployment will take place.
Would you like to activate secure authentication on wads?

        < Yes >        < No >
Still about wads, if you answered Yes to the last two questions, you will be asked a final question:
Would you like to mention subnet ip exempt from wads authentication

        < Yes >        < No >
If you answer Yes here too, you will have to give subnets as a list, for example: 192.168.0.0/24,192.168.1.0/24.
Choose if you want to use WAPT WUA for Windows Update.
Do you want to activate WUA?

        < Yes >        < No >
If you choose Yes, Nginx will enable WUA API endpoints for the WAPT Agents.
Select Yes to configure Nginx.
Do you want to configure nginx?

        < Yes >        < No >
Fill in the FQDN of the WAPT Server.
FQDN for the WAPT Server (eg. wapt.example.com)

---------------------------------------------
srvwapt.mydomain.lan
---------------------------------------------

            < OK >          < Cancel >
Select OK and a self-signed certificate will be generated, this step may take a long time.
Generating DH parameters, 2048 bit long safe prime, generator 2 This is going to take a long time
.......................................+...............................+...
Nginx is now configured, select OK to restart Nginx:
The Nginx config is done.
We need to restart Nginx?

              < OK >
Select OK to start WAPT Server.
Press OK to start waptserver and wapttasks daemons

             < OK >
The post-configuration is now finished.
Postconfiguration completed.
Please connect to https://wapt.mydomain.lan/ to access the WAPT Server.

                                  < OK >
Added in version 2.5: The access to the WAPT web interface is now password protected.
Finally, the postconf show somes informations about the WAPT Server SSL certificate and the URL to download WaptSetup and install on the WAPT Administrator’s computer.
Options |
Description |
|---|---|
|
Specifies a configuration file path (default: |
|
Configures Nginx so that port 80 is permanently redirected to 443 |
|
Runs the post-configuration in quiet mode. |
|
Runs nginx configuration if the post-configuration is set in quiet mode. |
|
Defines the size for dhparam key (default: 2048). |
|
Defines the admininistrator password for the WAPT Server if the post-configuration is set in quiet mode. |
|
Defines the WAPT Server name and ip for certificate CN and SubjectAltNames. The separator is a comma (default: fqdn and IP address). |
|
Defines settings for CSPN TOE mode (default: False). This enable more strict security default values, and disable all the features that are not included in the TOE of the CSPN certification |
2.1.4. Secure mode post-configuration
Warning
CSPN (First Level Security Certification by ANSSI) mode does not include WAPTWUA, WADS, Secondary Repos or Peercache. These features are not part of the Target Of Evaluation (TOE).
Attention
For post-configuration to work properly:
The hostname of the WAPT Server MUST be properly configured. To check, use the command echo $(hostname) which MUST return the DNS address that will be used by WAPT Agents on client computers.
The DNS resolver MUST be correctly configured.
The WAPT Server MUST be able to contact a Domain Controller in write mode.
The post-configuration script rewrites the nginx configuration. A backup file is created when running the postconf in the same directory.
This post-configuration script MUST be run as root.
In CSPN mode, the WAPT Server installation activates more security features and is less tolerant with misconfigurations.
In this mode:
Administrator password length is 20 characters and password complexity is enforced.
Administrator and user certificate password length is 20 characters and password complexity is enforced.
Kerberos registration and authentication are mandatory.
Client-Side Certificate Authentication is mandatory.
The SSL certificate verification is mandatory.
Various backward compatibility settings are disabled.
Functionalities excluded from the CSPN TOE (namely secondary repositories, peercache, WADS and WAPT WUA) are disabled.
Waptconsole login on server is restricted to kerb and *admin methods (admin mode can be disabled after initial setup).
Session cookies maximum lifetime is 12 hours.
Default lifetime for certificates signed by WAPT is 3 years.
Hint
If you want to stick to one specific wapt version on the server, like a specific CSPN version, it is recommanded to disable wapt repo configuration by removing /etc/yum.repos.d/wapt.repo or specifying
the full version number in that same file, like baseurl=https://wapt.tranquil.it/redhat10/wapt-2.6.1.17567/
The Kerberos service account created for authentication on the Wapt server must be configured with msDS-SupportedEncryptionTypes: 24 (AES 128, AES 256), either AD wide or at least on the service computer object. The msktutil script run during postconf should set this value correctly.
Run the script with option
--cspn-toe.
/opt/wapt/waptserver/scripts/postconf.sh --cspn-toe
Click on Yes to run the postconf script.
Do you want to launch post configuration tool?

            < yes >          < no >
Click on ok if SELinux is detected.
SELinux detected, tweaking httpd permissions.

                      < OK >
Click on ok if SELinux is correctly configured for Nginx reverse proxy.
SELinux correctly configured for Nginx reverse proxy

                      < OK >
Choose a password (if not defined) for the SuperAdmin account of the WAPT Server. The minimum length is 20 characters with at least 1 upper case characters, 1 lower case characters and 1 punctuation mark.
Please enter the wapt server password (min. 20 characters, punctuation, upper and lower case):

*****************

                < OK >          < Cancel >
Confirm the password.
Please enter the server password again:

*****************

                < OK >          < Cancel >
Select Yes to configure Nginx.
Do you want to configure nginx?

        < Yes >        < No >
Fill in the FQDN of the WAPT Server.
FQDN for the WAPT Server (eg. wapt.example.com)

---------------------------------------------
wapt.mydomain.lan
---------------------------------------------

            < OK >          < Cancel >
Enter the Kerberos Realm name.
Enter Kerberos REALM

-------------------------------------------
MYDOMAIN.LAN
-------------------------------------------

            < OK >          < Cancel >
Enter a valid Domain Controller name.
Enter a Domain Controller name in write mode

-------------------------------------------
dc1
-------------------------------------------

            < OK >          < Cancel >
Enter a username having write privilege on the Active Directory.
Enter a username with administrator privileges

-------------------------------------------
administrator
-------------------------------------------

            < OK >          < Cancel >
Enter the username’s password.
Enter administrator password

-------------------------------------------
*****************************
-------------------------------------------

            < OK >          < Cancel >
Enter the URL that will be used by the waptagent.
Enter the URL that will be used by the waptagent

---------------------------------------------
srvwaptname.mydomain.lan
---------------------------------------------

            < OK >          < Cancel >
Choose the name of the computer used by the waptagent.
Choose the name of the computer used by the waptserver

---------------------------------------------
srvwaptname
---------------------------------------------

            < OK >          < Cancel >
If the credentials are correct, the keytab is generated in
/etc/nginx/http-krb5.keytab. The correct ACL are set. Else, you must read the documentation.Restart Nginx.
The Nginx config is done.
We need to restart Nginx?

              < OK >
The last step, start waptserver and wapttasks.
Press OK to start
waptserver and wapttasks
daemons

              < OK >
The post-configuration is now finished.
Postconfiguration completed.

                                  < OK >
But in CSPN TOE mode, TOTP is required on admin account.
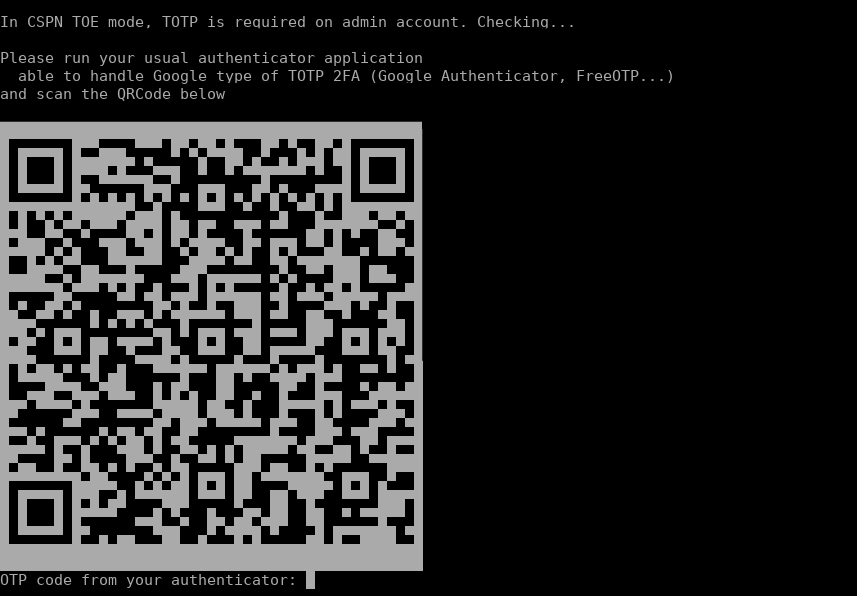
secure postconf OTP code
Use your second device (smartphone,YubiKey, etc.) and get the code who will appear in the picture. Put the code in the dedicated field.
Note
If you are having problems with your kerberos system. Check the owner and the right on, the keytab file ( http-krb5.keytab ).
chown root:nginx /etc/nginx/http-krb5.keytab
chmod 640 /etc/nginx/http-krb5.keytab
Options |
Description |
|---|---|
|
Configures Nginx so that port 80 is permanently redirected to 443. |
|
Defines the settings for CSPN TOE mode (default: False). |
|
Defines the server name and ip for certificate CN and altdnsnames. Separator is a comma (default: None). |
Warning
In CSPN mode, WADS and WUA will not appear in the WAPT console. However, the Peer Cache, reporting and Secondary Repositories features can be enabled, though they should not be activated because it is not assessed in the CSPN target.
- Enabling Peer Cache in the WAPT console :
By edit a new agent configuration :
Go to . Check the option Use Peer Cache.
By use a WAPT configuration package :
Create a package in WAPT Packages → . Check the option Use Peer Cache.
- Enabling Secondary Repositories in the WAPT console :
- For the agent :
By edit a new agent configuration :
Go to . Check Use repository rules.
By use a WAPT configuration package :
Create a package in WAPT Packages → . Check the option Use repository rules.
- For Configuring an agent as a secondary repository :
By edit a new agent configuration :
Go to . Go to the Repo-sync tab and check Synchronize packages and system updates on the agent.
By use a WAPT configuration package :
Create a package in WAPT Packages → . Go to the Repo-sync tab and check Synchronize packages and system updates on the agent
The WAPT Server is now ready. You may go to the documentation on installing the WAPT Console.