2. Using the WAPT Console
To install and start the WAPT Console visit the documentation for installing the WAPT Console.
If you have skipped the step for creating the WAPT Agent, return to the documentation on building the WAPT Agent installer.
On your management computer, hosts are displayed in the WAPT Console.
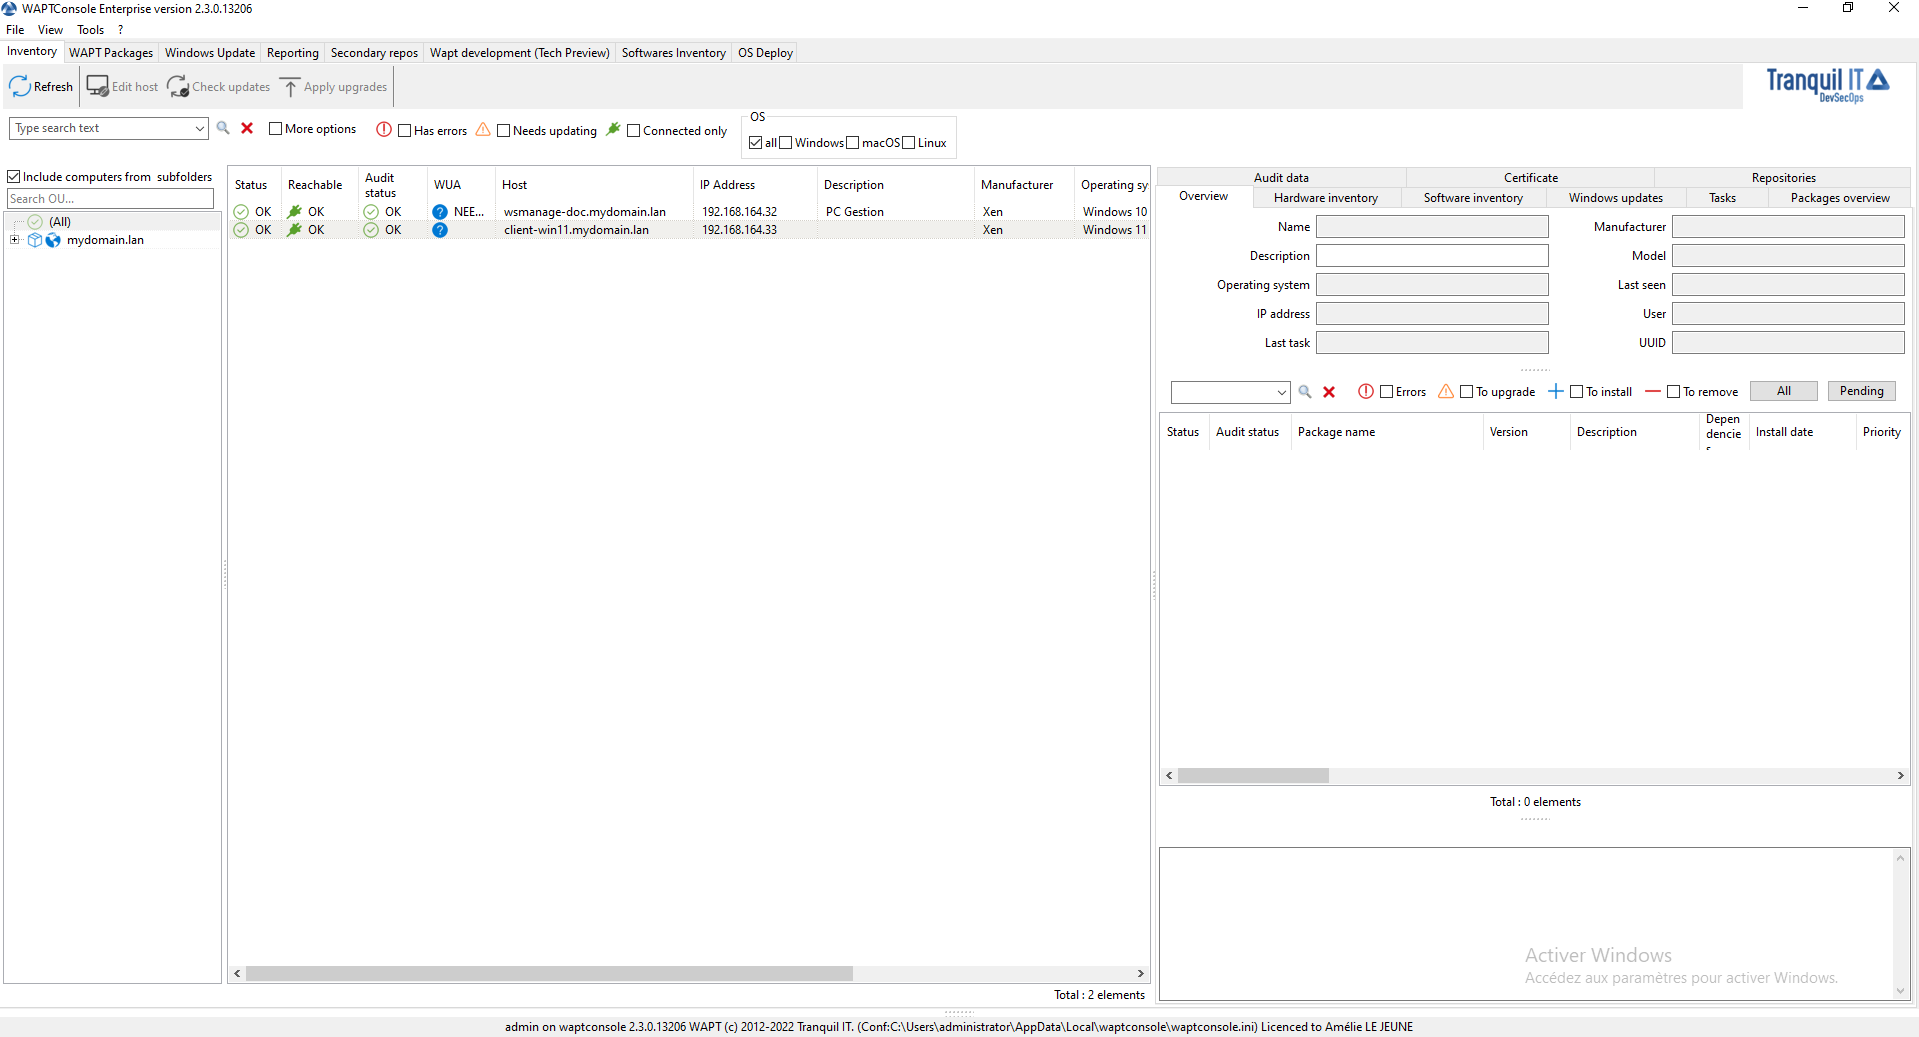
Inventory of hosts registered with WAPT
Note
The recommended size for using the WAPT console is 1920x1080 and the minimum size is 1280x1024.
If a host does not appear in the WAPT Console after having installed the WAPT Agent, open the Windows command line utility cmd.exe on the host and type wapt-get register.
2.1. Overview of the wapt console inventory tab
The Inventory tab of the WAPT console is organised into four main sections.
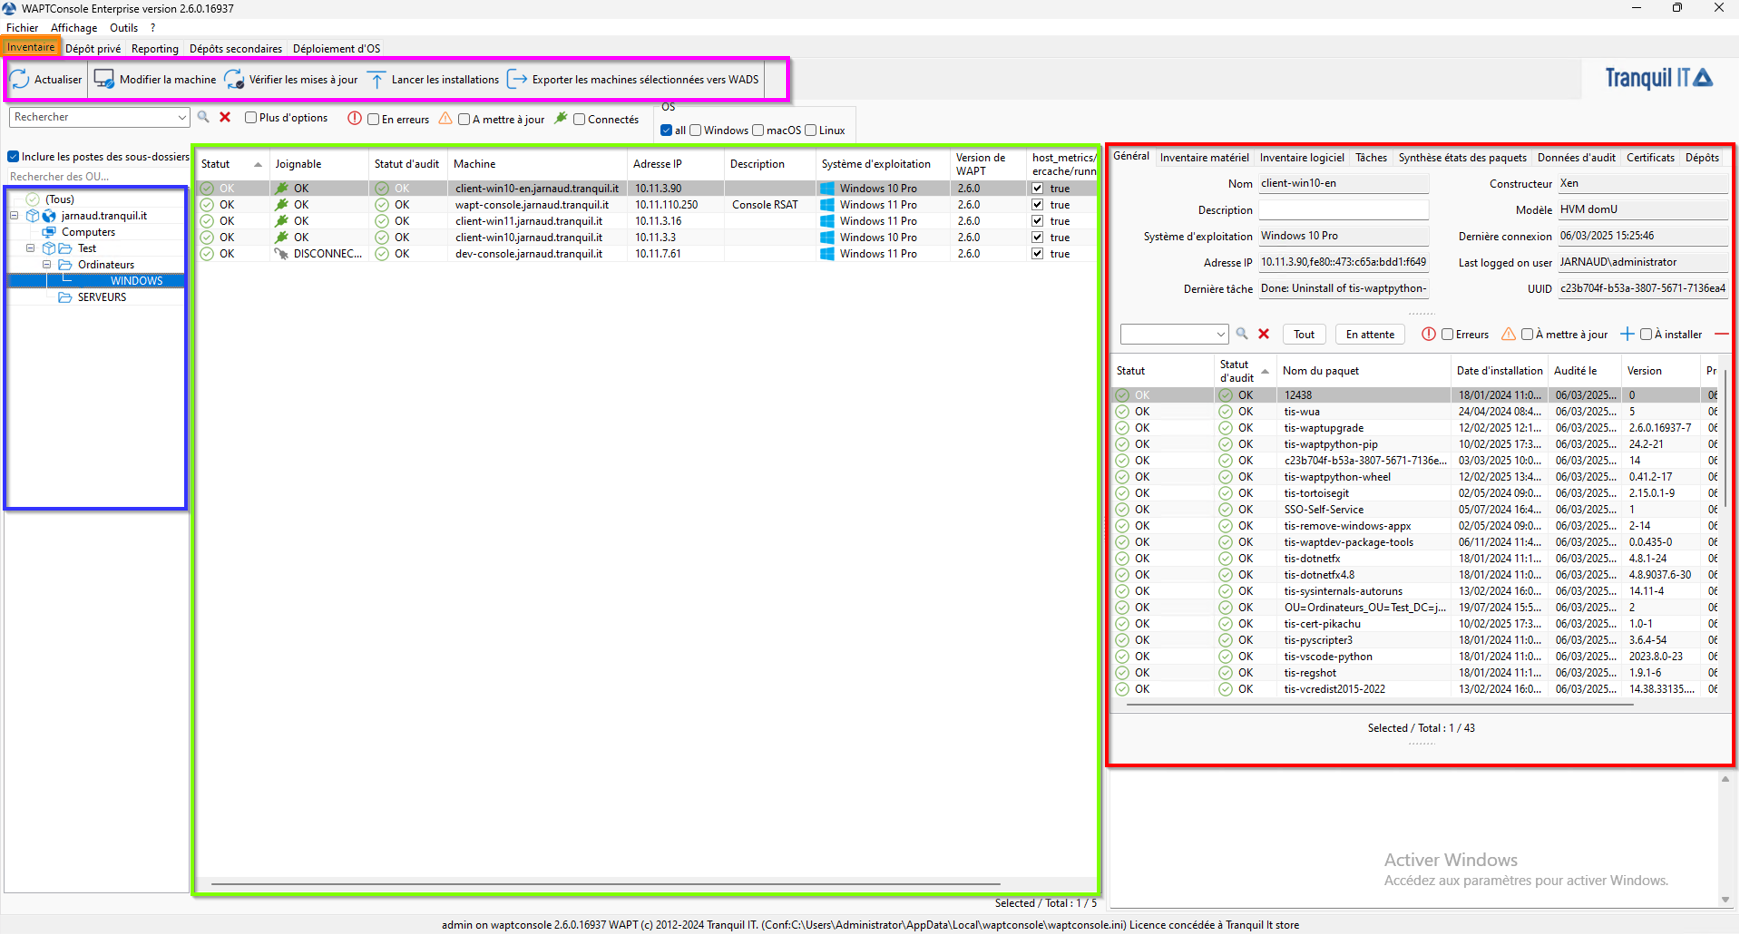
WAPT inventory tab
The top section (purple frame) features a customisable toolbar, with shortcuts for frequent actions (e.g. checking for updates, installing packages, refreshing the console). This layout ensures quick access to essential functions while allowing users to adapt the interface to their workflow.
To modify the toolbar, do a right-click in the toolbar. In the “available commands”, select the button you need and add in the “toolbar commands”. A example with The Export selected hosts to WADS button.
On the left (blue frame), the tree displays machines grouped according to their Active Directory (AD) location, derived from the computer_ad_dn property in the host information.
Machines without AD appear by default in the “All” category BUT with WAPT, you can create some “fake OU” to regroup computer, more information here.
The centre (green frame) lists all registered machines in a customisable table, displaying default columns such as packet status, reachability, audit status, hostname and IP address.
Users can customise the columns by adding, deleting or rearranging them using drag and drop, and save their preferred layout in the waptconsole user file.
The right section (red frame) provides detailed information about the selected machine, with various tabs:
General; basic informations like package status, host name, last user logged on, UUID, etc.
Hardware inventory; basic inventory of the machine (OS, WAPT version, etc.).
Software inventory; All installed software, including applications installed without WAPT.
Tasks; Real-time monitoring of WAPT service actions.
Package overview; All installed packages, with their versions, audit results, etc.
Audit data; Set of data returned via package audit functions or custom fields such as warranty dates directly added to the machine database.
Certificates; Displays the public certificates registered on the machine, enabling WAPT actions to be performed.
Repositories; server/agent which is the source of package import/export for the machine.
2.2. Showing the inventory
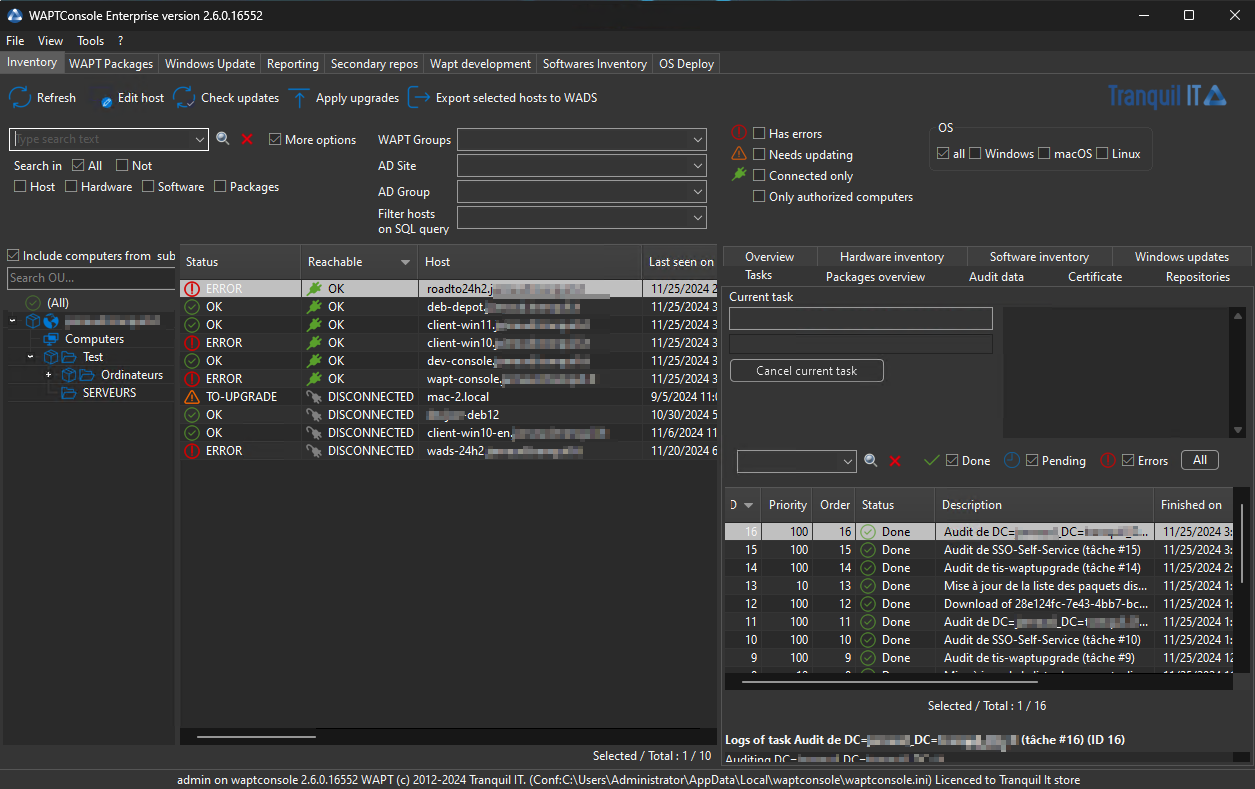
When the WAPT Agents register, they send some information to the WAPT Server.
Information displayed in the WAPT Console is not updated in real-time, you have to refresh the display to view new status and information.
Click on the Refresh button or press F5 on the keyboard.

The WAPT Console displaying the WAPT inventory
The WAPT Console lists hosts that are registered with the WAPT Server and some information that is useful for managing the hosts.
Selecting a host displays its information in the right panel of the WAPT Console (Hardware inventory and Software inventory).
2.3. Dark mode on the WAPT Console
You can activate the dark mode of the wapt console by going to display, then selecting the desired mode from the drop-down list. Auto mode is your machine’s default mode. After modification restart the wapt console.
WAPT interface in dark mode
2.4. Performing actions on the hosts
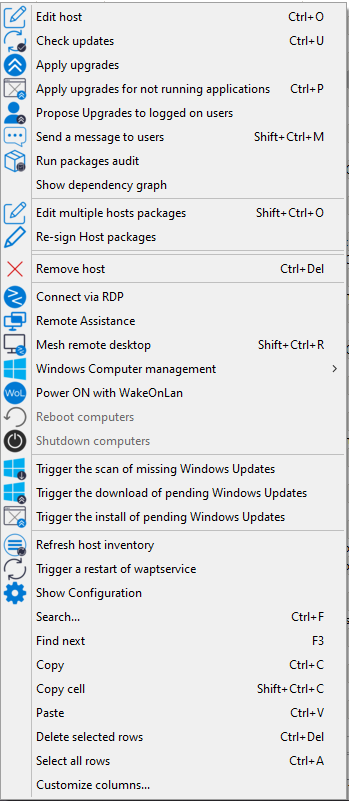
Host configuration menu list in the WAPT Console
Hint
Show Configuration allows you to view the wapt-get.ini file configuration of your client machine.
Some actions are not available when selecting multiple hosts.
List of actions available on a selection of hosts in the WAPT Console
Name |
Multi-selection |
Description |
|---|---|---|
Edit host |
|
Used to modify the host package (add dependencies, set conflicts, etc.). |
Check updates |
|
Used to update packages on the host package (without installation). |
Apply upgrades |
|
Used to update and install packages on the host package. |
Apply upgrades for applications not currently running |
|
Apply upgrades for applications not currently running. |
Propose upgrades for applications not currently running |
|
Propose upgrades for applications not currently running. |
Send a message to users |
|
Send a html formatted message. |
Run package audits |
|
Enables an audit to be run on the host package. |
Add packages to host dependencies |
|
Add packages to host dependencies. |
Remove packages from host dependencies |
|
Remove packages from host dependencies. |
Re-sign host packages |
|
Re-sign host packets with the certificate used by the console during the action. |
Add package to host conflicts |
|
Add package to host conflicts for uninstall this package. |
Remove package from host conflicts |
|
Remove package from host conflicts. |
Remove the host |
|
Remove the host in the inventory. |
Connect via RDP |
|
Allows you to connect via RDP to the remote workstation. |
Remote Assistance |
|
Remote Assistance for Windows workstation. |
Mesh remote desktop |
|
Allows you to connect via mesh to the remote workstation. |
Windows Computer management |
|
Used to use the console MMC. |
Update AD Group Policies on hosts |
|
Update AD Group Policies on hosts. |
Run CleanMgr on host |
|
Run CleanMgr on host. |
Computer management |
|
Used to use the console Computer management. |
Local users and groups management |
|
Run local users and groups management. |
Service management |
|
Manage Windows services (start, stop, restart). |
Power ON with WakeOnLan |
|
Power ON a workstation with WakeOnLan. |
Reboot computers |
|
Reboot computers. |
Shutdown computers |
|
Shutdown computers. |
Trigger the scan of missing Windows updates |
|
Trigger the scan of missing Windows updates. |
Trigger the download pending Windows updates |
|
Trigger the download pending Windows updates. |
Trigger the install of pending Windows updates |
|
Trigger the install of pending Windows updates. |
Refresh host inventory |
|
Update host inventory. |
Trigger a restart of waptservice |
|
Trigger a restart of waptservice. |
Show Configuration |
|
Allows to view the |
2.5. Sending messages to selected hosts
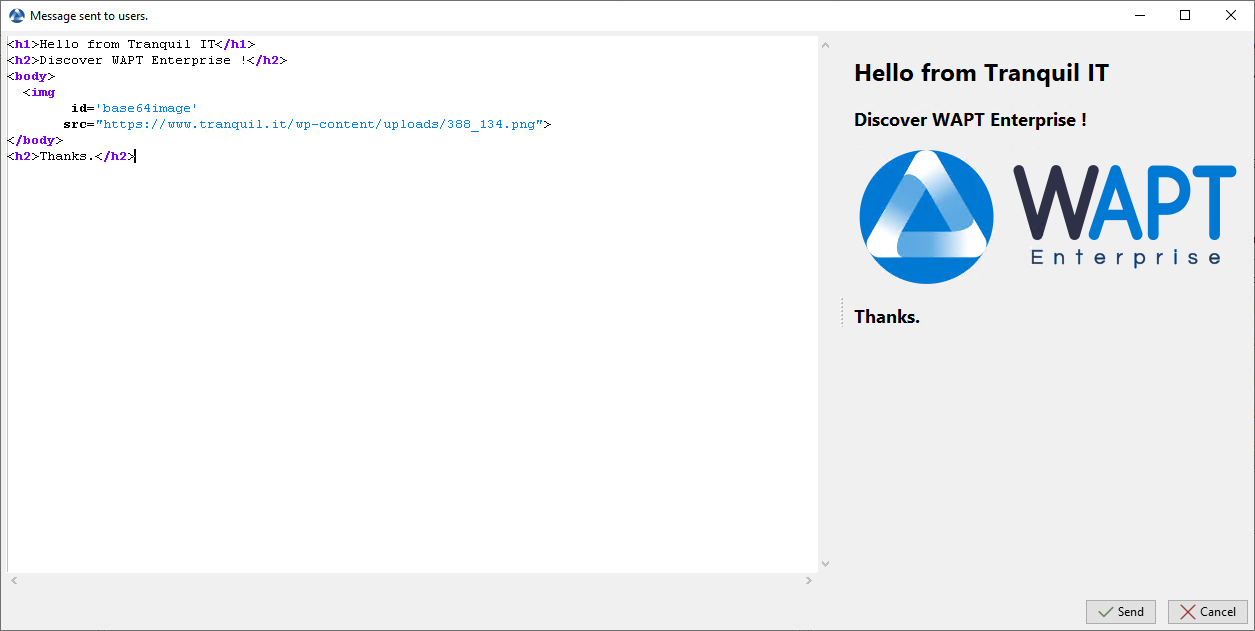
With option Send message to users, when you do a right-click on select hosts, you can send a html formatted message to connected users.
You can send html format only, no css nor javascript. It is possible to send images, gifs, anything as long you can encode it with html.
Here is an example of code to send a text and an image. Images and gif have to be in base64 encoded or else you may use the base64image id.
<h1>Hello from Tranquil IT</h1>
  <h2>Discover WAPT Enterprise !</h2>
   <body>
   <img
      id='base64image'
     src="https://www.tranquil.it/wp-content/uploads/388_134.png">
   </body>
  <h2>Thanks.</h2>
When you create your message, you will have a preview on the right pane.
Sending a message to connected users from the inventory tab
When you have finished, click on Send, this is how your user will see it.

Result of a message sent
The first icon above can be customized. Please see how to use a custom icon in your waptmessage.
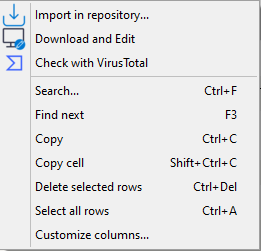
2.6. Importing WAPT packages from external repositories
Importing a WAPT package consists of:
Importing an existing WAPT package from an external repository.
Changing its prefix (for example from tis to my-prefix).
Re-signing the WAPT package with the Administrator’s or the Code signing private key to allow the deployment of the imported package on your WAPT equipped hosts.
Finally, uploading it on the main WAPT repository.
Attention
Please pay attention to the certificate fingerprint when you download your first package from our testing repository. Our testing repository certificate fingerprint: b82fc8ef4a4475c0f69ac168176c2bfc58f572eb716c4eadd65e4785c155dd8e
official repository certificate fingerprint: 8c5127a75392be9cc9afd0dbae1222a673072c308c14d88ab246e23832e8c6bb (this certificate should already be trusted after you install the WAPT agent).
By importing a package in your repository and signing it, YOU THEN BECOME RESPONSIBLE for that package and for what it does. It has been signed with your own private key.
Tranquil IT disclaims any liability if you choose to use WAPT packages retrieved from its repositories.
Without a support contract, Tranquil IT does not guarantee the suitability of the package for your own particular use case, nor does she guarantee the ability of the package to comply with your Organization’s internal security policies.
Tranquil IT uses a package build farm to maintain its repository up to date, which is nicknamed LUTI (from the French word “l’outil”, the tool). LUTI status is now available publicly at https://luti.tranquil.it.
LUTI monitors, when possible, the software vendor website to trigger a package update. It will check the software installer file status on virustotal, and then test the install, uninstall and upgrade of the package. The build results are available in the WAPT testing repository.
After 5 days, if the virustotal status of the package has not changed, the new package will be uploaded to WAPT main repository. There is an exception to this rule for web browsers, which are uploaded from the WAPT testing repository to the WAPT public repository after 1/2 an hour.
Go to the Private repository tab.
Available WAPT packages displayed in the WAPT Console
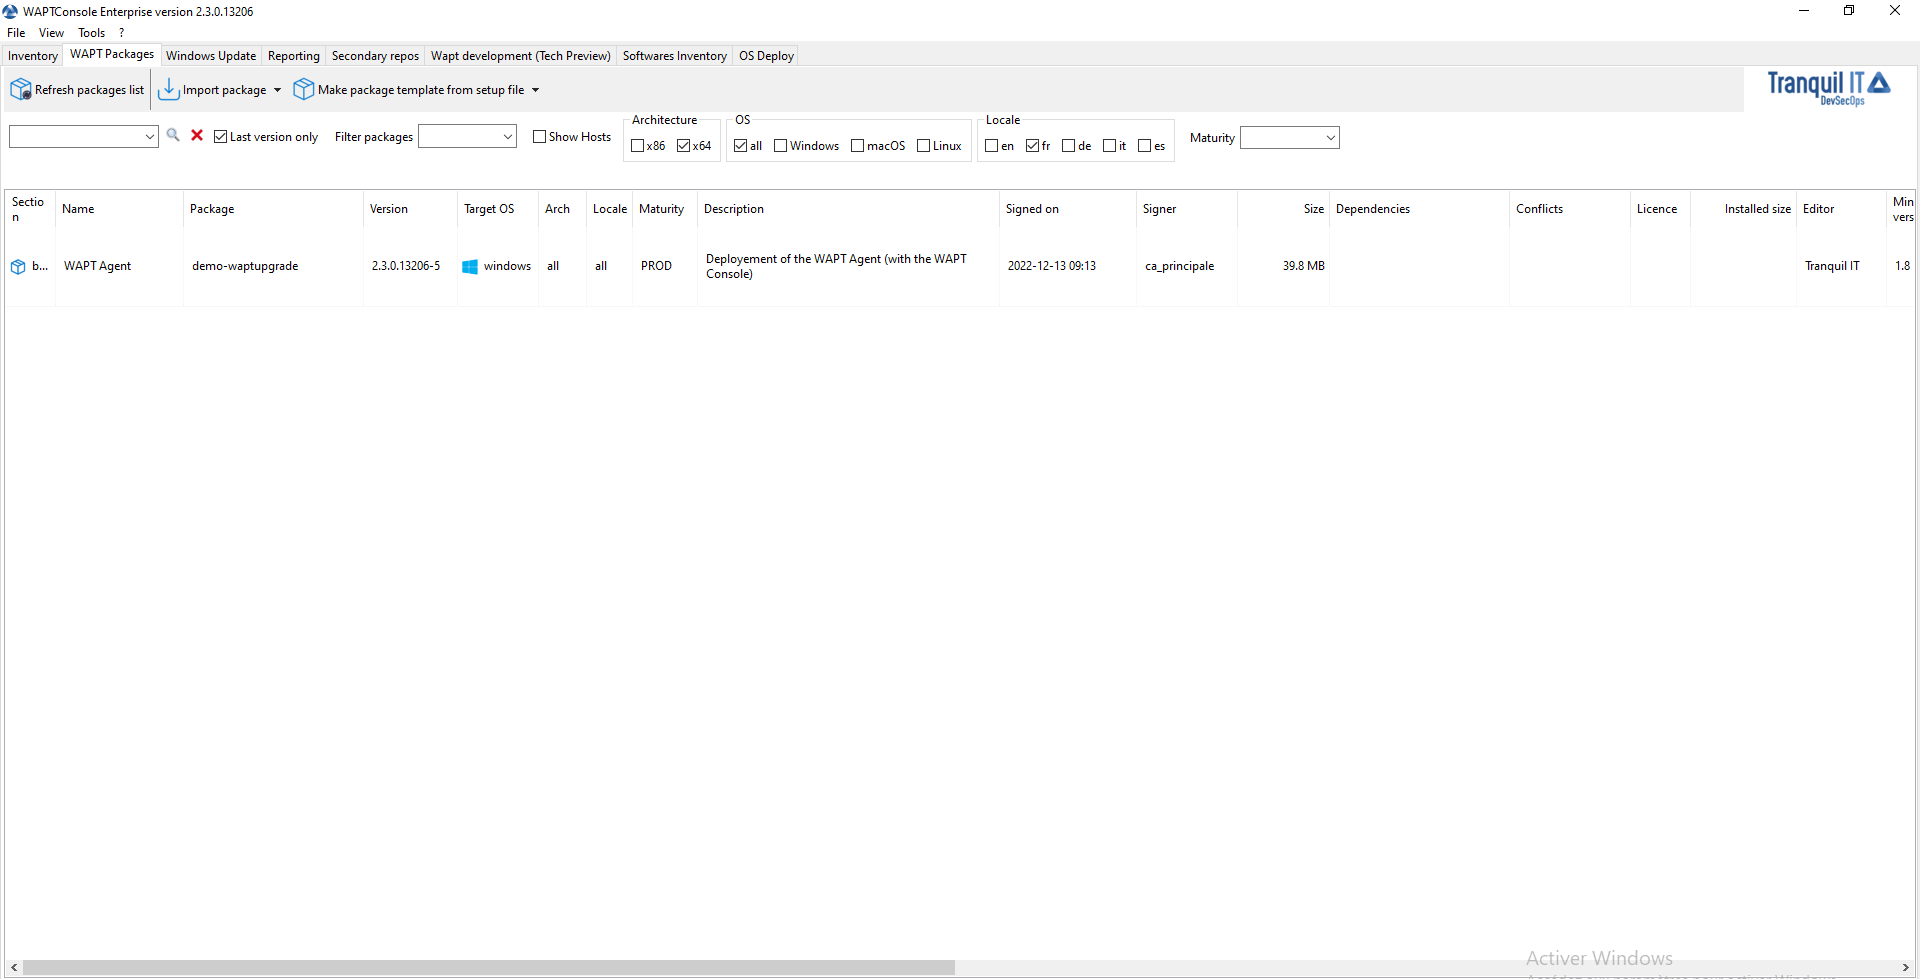
Every WAPT package version loaded on the WAPT repository is shown.
If no package has been imported, the list is empty. Only the test-waptupgrade package will be present if the WAPT Agent has been generated previously.
2.6.1. Importing a WAPT package from an external repository on the Internet
This method allows you to download WAPT packages directly from a WAPT repository that is outside of your Organization.
By default the Tranquil IT repository is configured. To add another repository, check the documentation for configuring external repositories.
By default, the SSL/ TLS certificates to external repositories are verified.
Click on Import package and Import from Internet.
Note
The grid view displays the list of available packages on the remote repository. It is possible to choose the architecture, the OS and the locale.
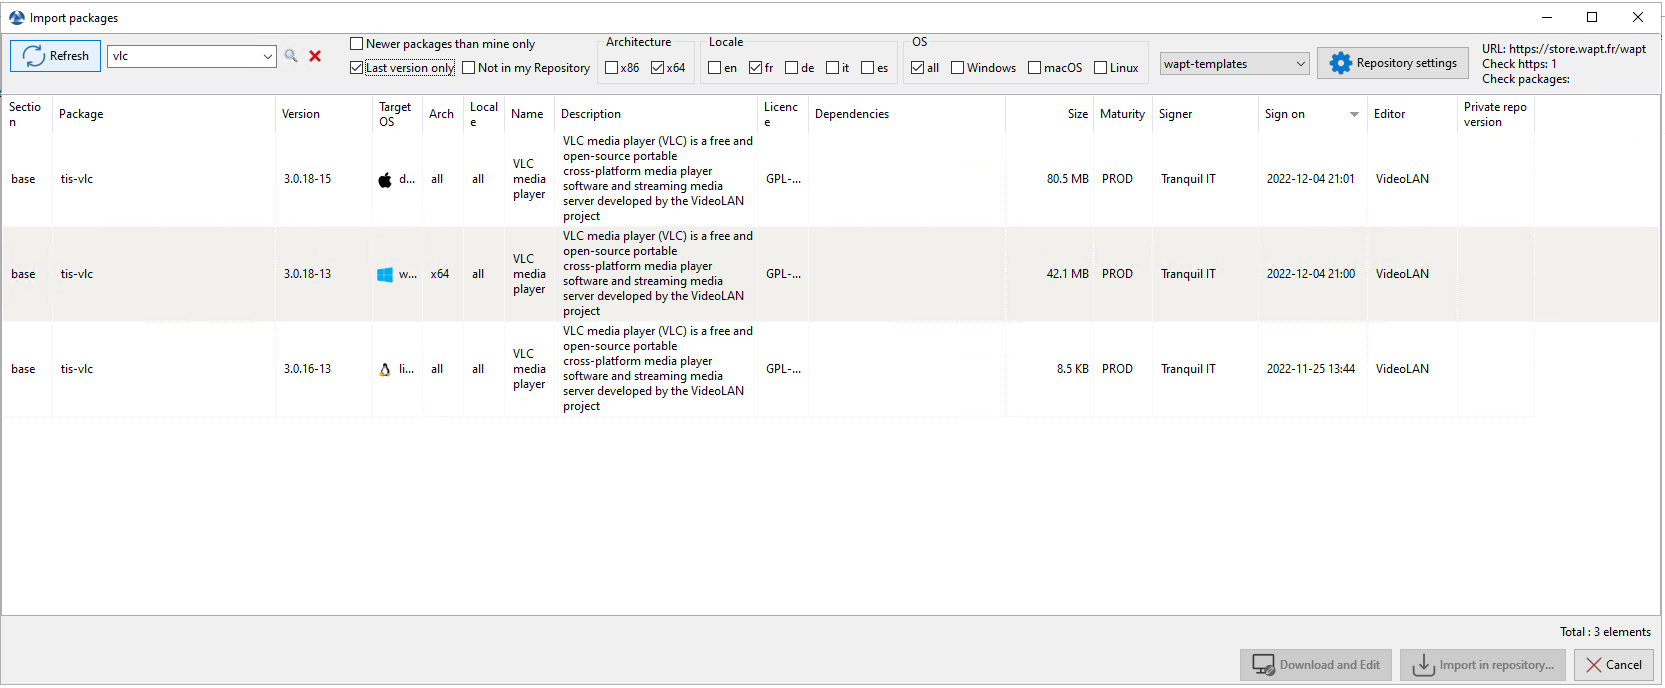
Imported WAPT package in the local WAPT repository
There are 2 methods for importing a WAPT package:
;
Or in the bottom right of the Window Import in repository.
Hint
You can check the package with Virus Total in order to check if the package is not flagged in the Antivirus list.
Validate the importation in your local repository. It is possible to change the maturity of a WAPT package before importing the WAPT package into your private repository.
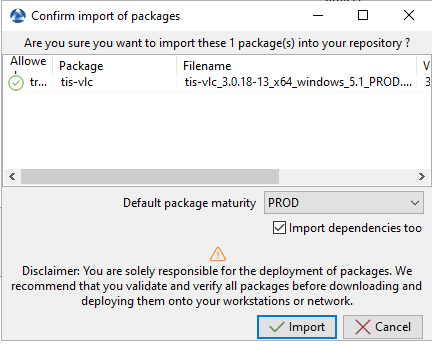
Dialog box to import a public WAPT package into your WAPT private repository
Hint
You can update all your packages from your repository by checking Newer packages than mine only and Last version only, then use Ctrl+A to select all newer packages that are available on the Tranquil IT store and that you have on your repository in a older version, then click on Import in repository.
You can search WAPT packages that are not in your local repository if you check Not in my Repository.
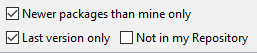
Checkbox to select newer version and last version of a WAPT package from Internet
The download of the WAPT package starts.
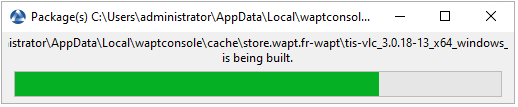
Progress of the package import process
Then, enter your private key password.
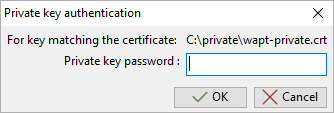
Entering the password for unlocking the private key in the WAPT Console
The WAPT Console confirms that the WAPT package has been imported into the local WAPT repository.
The package then appears in the local WAPT repository with the Organization’s prefix.

WAPT Console displaying the imported WAPT package
2.6.1.1. Downloading a restricted package version from your repository
Note
The WAPT Enterprise theme store is reserved for customers with a valid WAPT Enterprise license.
Packages downloaded from the WAPT Enterprise store can be deployed on all workstations with a WAPT Enterprise license.
It is the customer’s responsibility to validate the license of the software he is deploying and to respect the constraints related to this license (depending on the software: paying the license, deploying the software totle in a given context, e.g. educational environment only, etc.).
To meet the needs of her WAPT Enterprise customers, Tranquil IT started a thematic store program with some of her WAPT Enterprise customers.
Currently more than 1800 packages have been prepared by Tranquil IT teams and are progressively being put online on the WAPT store.
To download a package from the thematic store, it is necessary to be identified.
The authentication of the store in the console is supported from the latest WAPT 2.4 version and upward. If you are in WAPT 2.3 version, you have to download the package from the website and import it into your WAPT console.
To authenticate yourself on the thematic store, follow the procedure below:
Connect to the following url: https://wapt.tranquil.it/store and click on the my account link
Click on login.
The store will redirect you to the Tranquil IT SSO client authentication.
If you are logging in for the first time, click on forgot password (An email will be sent to you sent to you to initialize your password).
After changing your password (or just login), return in your account.
Navigate to the API key tab.
Create a new api keys for example name is ‘WAPT CONSOLE’ (your token is create you will be able to see it once, so keep it carefully).
This is illustrated in GIF format as:
WAPT Store web connexion and creation of a token
In your WAPT Console, go to then select the Tranquil IT store in the repository list, click on Show advanced parameters then add you user (your email address) and your token copied before.

WAPT Console advanced parameters for credentials
Important
The email address used must be the one provided to Tranquil IT sales or technical service. If your email address is not known to our services, it will not be possible to authenticate you or to reset your password.
If you have a connection problem you can call your technical or commercial contact person at Tranquil IT sales representative.
Once you are connected you can then download the WAPT Enterprise packages.
2.6.1.2. Changing the maturity of a WAPT package before importing into the repository
It is possible to change the maturity of a WAPT package before loading it into your private repository by choosing DEV, PREPROD or PROD in Default package maturity.
Dialog box to prepare and confirm the import of a WAPT package into a WAPT repository
2.6.1.3. Editing a package before importing into the repository
It is possible to edit a package downloaded from an external repository before importing it into your main WAPT repository.
To do this, 2 choices are available:
;
or by clicking Download and Edit on the bottom right of the window;
PyScripter, if installed, will open the control and setup.py files of the WAPT package.
For more information, visit the documentation on creating WAPT packages from scratch.
2.6.2. Importing WAPT packages from a local file
You can import a .wapt file from any storage.
Click on Import package and then Import from file.
Select the file to import.
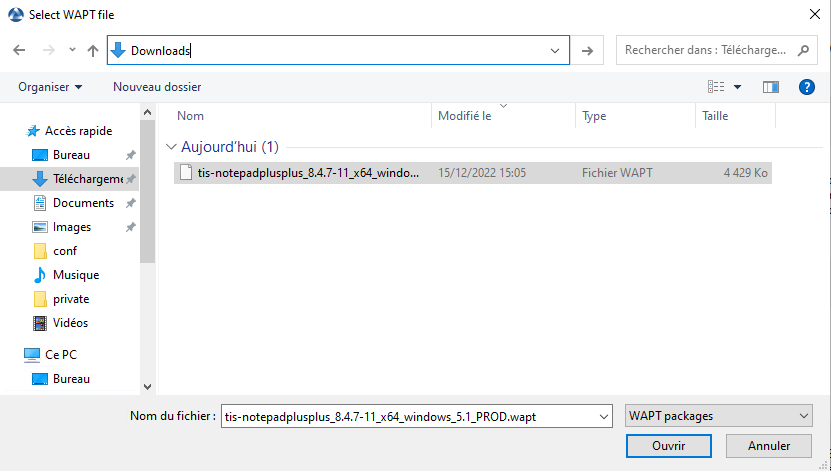
Click on the Open button to import the file.
The WAPT Console confirms that the package has been imported in the local WAPT repository.
The package then appears in the local WAPT repository with the Organization’s prefix.
WAPT Console displaying the imported WAPT package
Note
It is not possible to change the maturity before importing here.
When uploading a new WAPT package to the private repository, the changing of the prefix and the re-signing of the WAPT package are transparent and automatic.
2.7. Updating WAPT packages in the repository
2.7.1. Downloading a newer package version from your repository
Tranquil It maintains its packages as far as possible (https://store.wapt.fr/wapt).
Open the wapt console and go to the WAPT Packages.
Click on Import package → Import from internet.
Confirm window repositories settings by click on OK.
Check Newer packages than mine only, last version only and Compatible with the registered hosts.
Here is a list of packages with new versions.
Select the packages with add to basket.
Now you can import few packages by clicking on Import basket packages.
Wait few minutes.
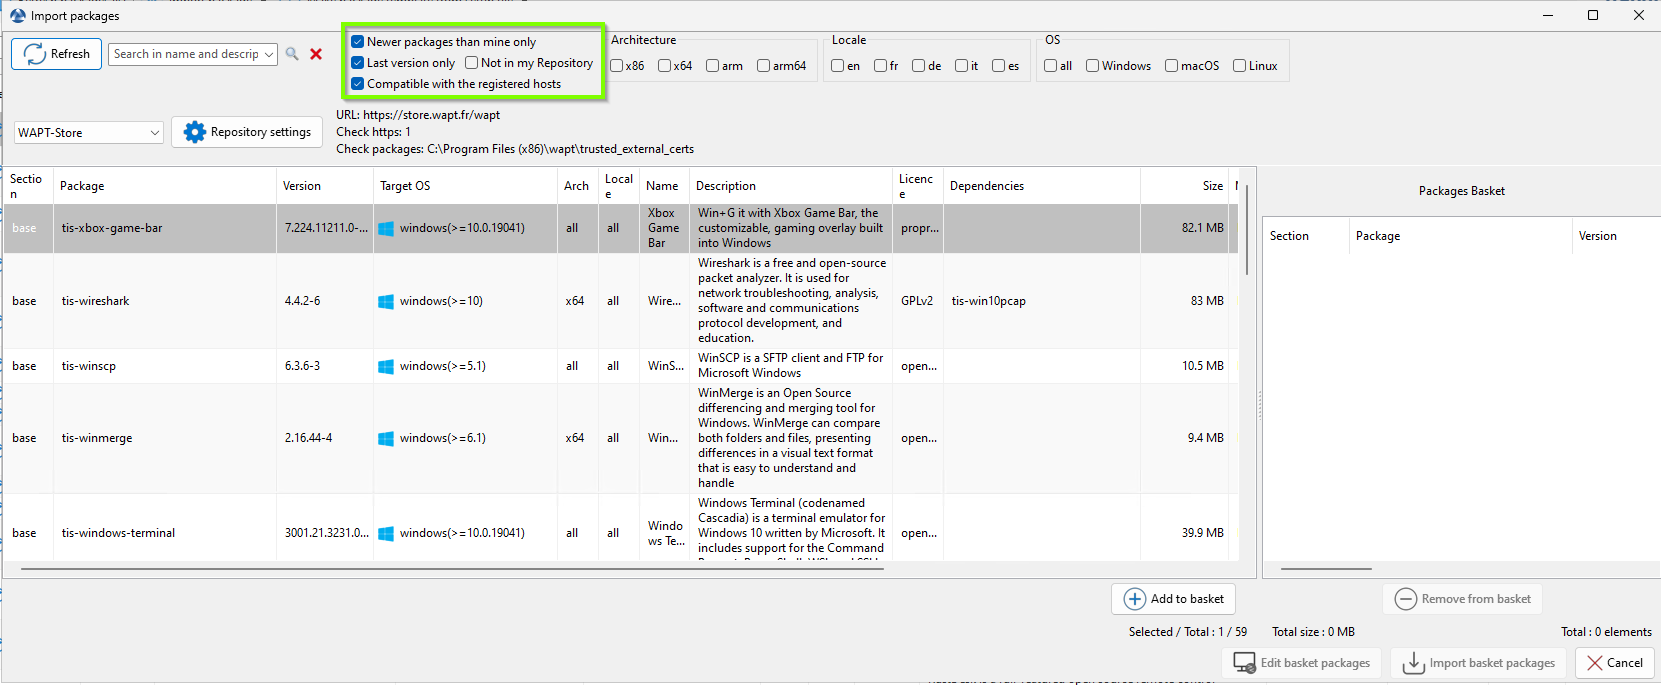
WAPT-Console import packages new version
You can choose to update all the packages in your repository by adding it to your basket, or focus on upgrading only some packages.
Hint
Package Update Notifications
You can subscribe to specific packages and receive a daily email at 09:00 AM whenever updates are available for your subscribed packages. The email summarizes all relevant changes, ensuring you stay informed and can take timely action.
Simply click the “Subscribe” button located in the top-right corner of the package page (https://wapt.tranquil.it/store/fr/).
2.7.2. Updating packages from the Tranquil IT repository
When you want to upgrade one or several WAPT Packages with the Update the package from the store option, here is how it works. First, select on or several package you want to upgrade.

WAPT Console displaying a newer package version
Then a window with the selected packages will open, you can click on Update the package from the store. After that, it will fetch the new version from the Tranquil IT repository with our code improvement. You will see the same dialog box when you import from internet.
WAPT Console update_package windows displaying a newer package version
2.7.3. Updating WAPT packages in the local repository
Warning
The package code is static and fixed. If the repository changes URL or if the publisher changes the method of retrieving the binary (for example, by changing the API, the download link or the installation process), you will not be able to automatically update your package to the new version. Manual intervention will be required to adapt the code and maintain compatibility.
So prefer the recommended method.
When you want to upgrade one or several WAPT Packages with the Launch update package option, here is how it works. First, select one or several packages that you want to upgrade.
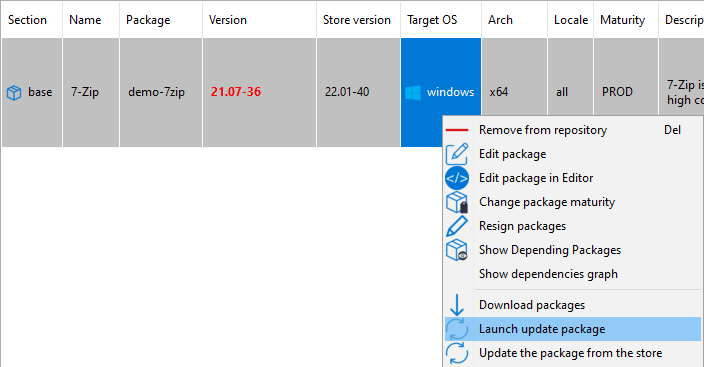
WAPT Console displaying a newer versions of packages
Then a window with the selected packages will open, you can click on Launch update_package on selected packages. After that, if you did not check Upload directly, you will have to click on Upload selected packages in order to sign, build and upload the package to the WAPT Server.
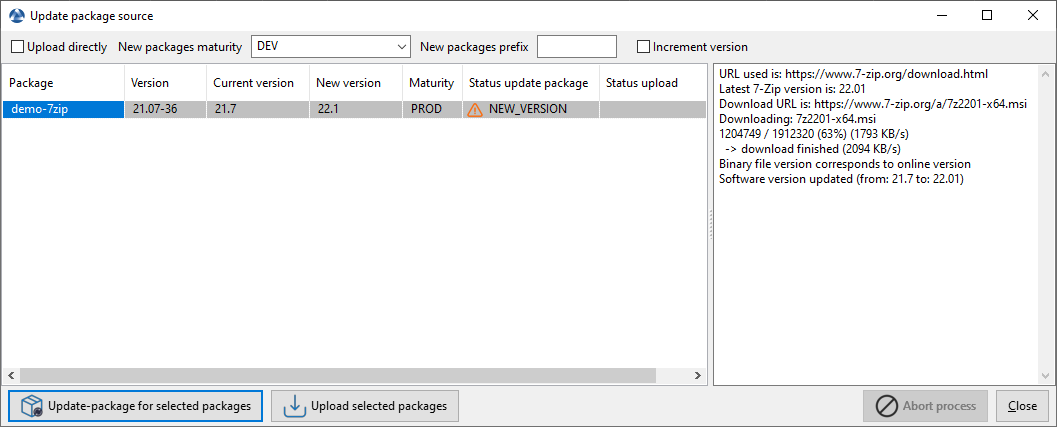
WAPT Console update_package windows displaying a newer package version
2.8. Managing WAPT packages hosted in the repository
In the WAPT Packages tab, the list of packages currently available in the WAPT repository appears. By default, the WAPT Console will only show the latest version of WAPT packages.

Listing of items in the WAPT Packages tab
Label |
Description |
|---|---|
The Type name or description search bar |
Allows to search by WAPT package name or description. |
The Last version only checkbox |
Allows to display all version of WAPT packages in the WAPT Console. |
The Filter packages dropdown menu |
Allows to filter WAPT packages by type (all, base, group, profile, selfservice, unit, waptwua). |
The Show hosts |
Displays the hosts on which the selected WAPT package is installed. |
The Architecture x86 checkbox |
Allows to filter on hosts having a x86 based processor architecture. |
The Architecture x64 checkbox |
Allows to filters on hosts having a x64 based processor architecture. |
The OS all checkbox |
Allows to filter hosts based on any OS. |
The OS Windows checkbox |
Allows to filter hosts based on the Windows OS. |
The OS macOS checkbox |
Allows to filter hosts based on the macOS OS. |
The OS Linux checkbox |
Allows to filter hosts based on the Linux OS. |
The Locale en checkbox |
Allows to filter hosts localized in English. |
The Locale fr checkbox |
Allows to filter hosts localized in French. |
The Locale de checkbox |
Allows to filter hosts localized in German. |
The Locale it checkbox |
Allows to filter hosts localized in Italian. |
The Locale es checkbox |
Allows to filter hosts localized in Spanish. |
The Maturity dropdown list |
Allows to filter on the maturity level configured on the hosts. |
2.8.1. Doing a search based on a WAPT package
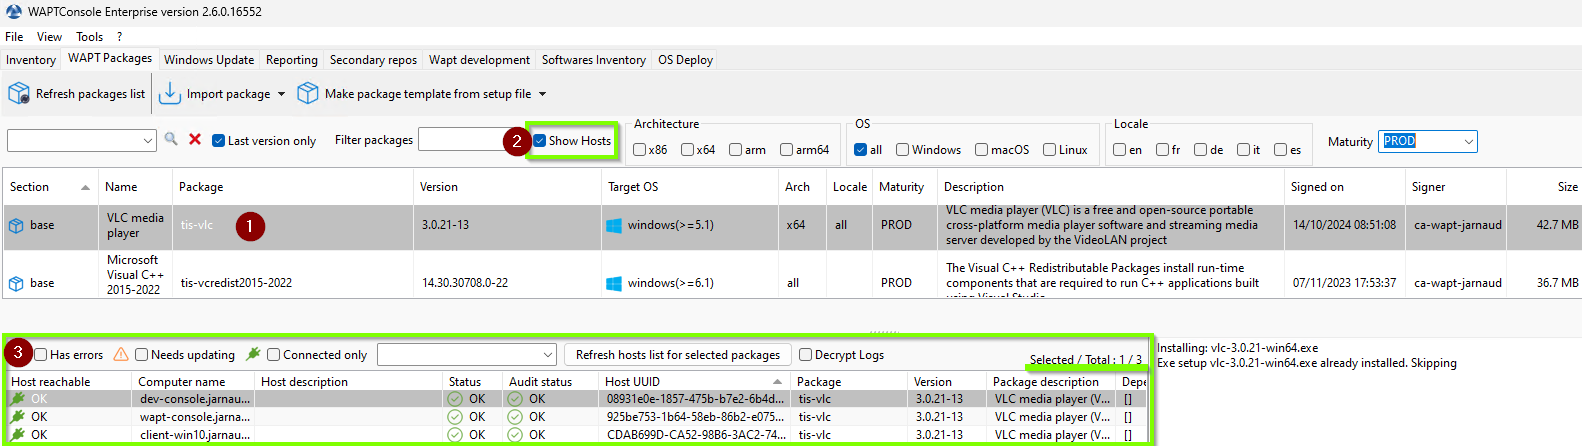
In the repository, select the package and then click on Show Hosts.
The grid will display the hosts on which the package is installed. Note that the filter is only active on the Package attribute of the selected package.
The different columns display information about the packages installed on the host (e.g. package version, package status, audit status, installation date, architecture).
Filtering hosts based on a WAPT package
You can also add the columns Log install and Last Audit Output to display at a glance the installation and audit logs.
2.8.2. Showing package dependencies
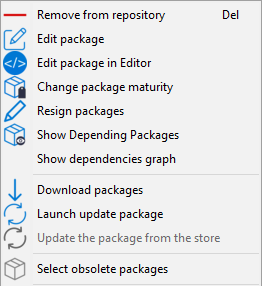
In the Repository tab, select the WAPT package and then click on Show Depending Packages. It will show whether the WAPT package has a dependency.
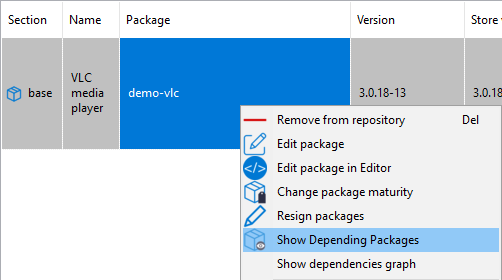
Right-click on selected package to see if some other software is a dependency
In this example, the unit package Computers has demo-vlc in its dependencies.
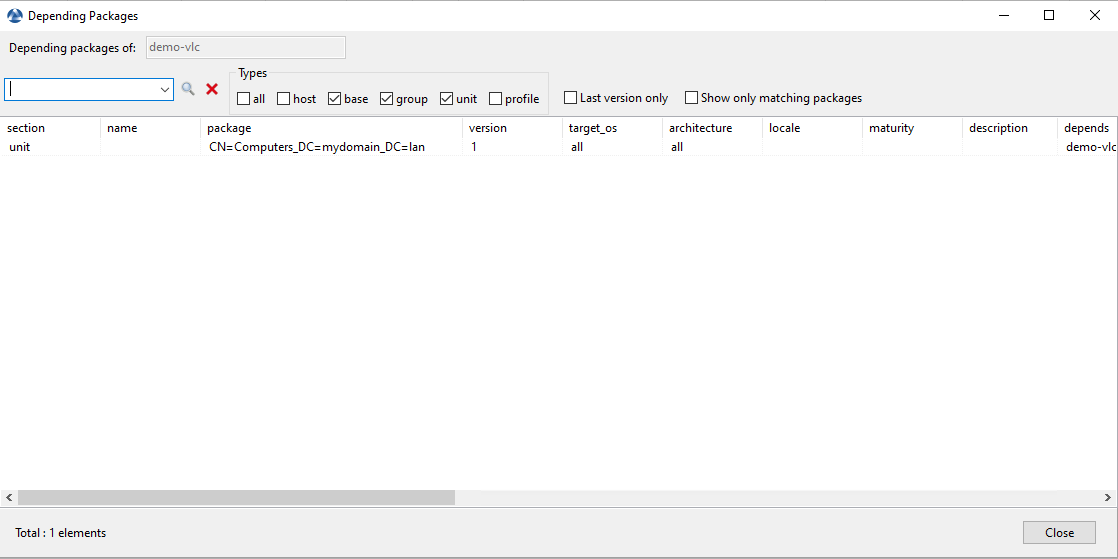
Example of a package of which the selected package has a dependency
Note
A quick reminder of how dependencies work in WAPT.
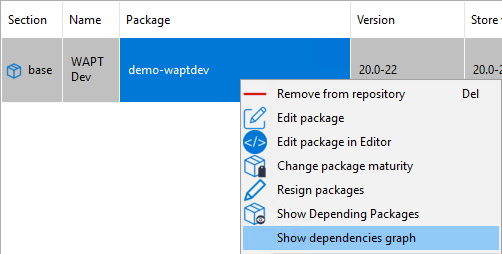
2.8.3. Showing dependencies graph
In the repository, select the WAPT package and then click on Show Dependencies graph to see all dependencies and sub-dependencies.
Right-clicking on a package to see its dependency graph
In this example, we can see all dependencies and sub-dependencies of demo-waptdev package.
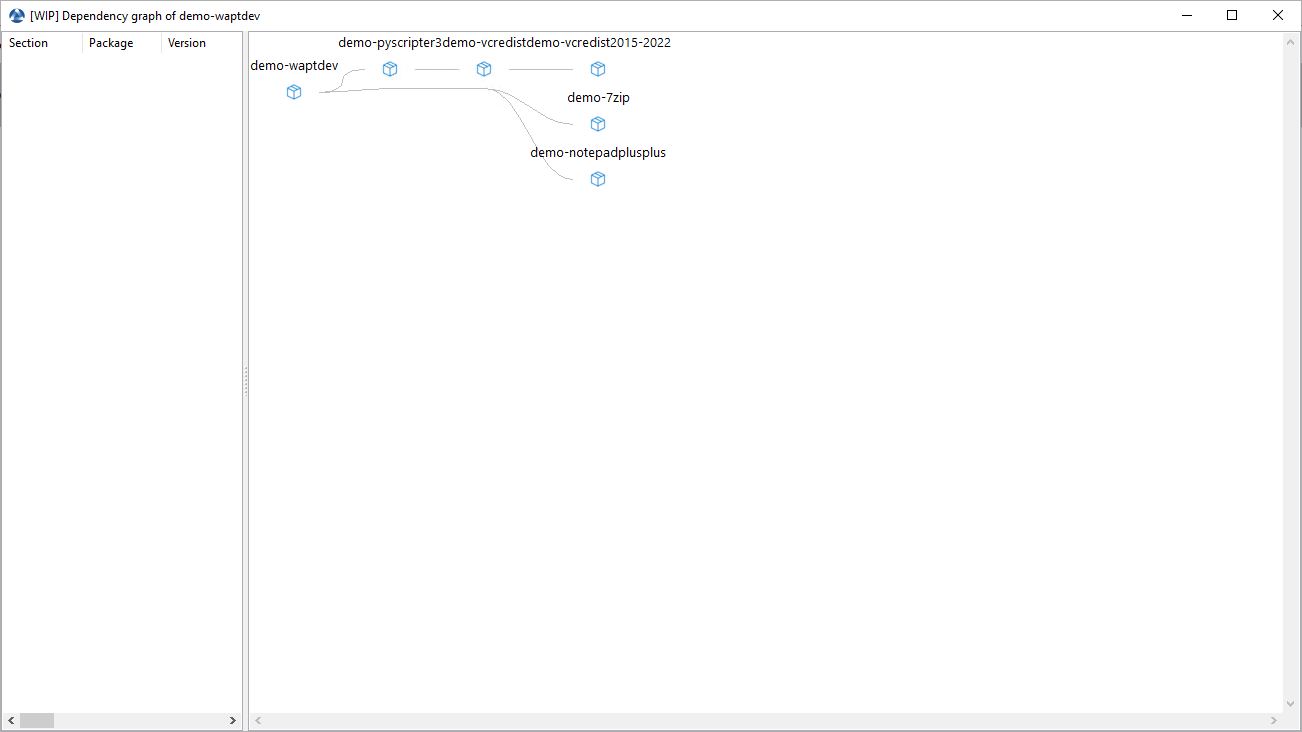
Exemple of a package with its graph dependencies
Hint
You can do the same thing with a host in Inventory tab.
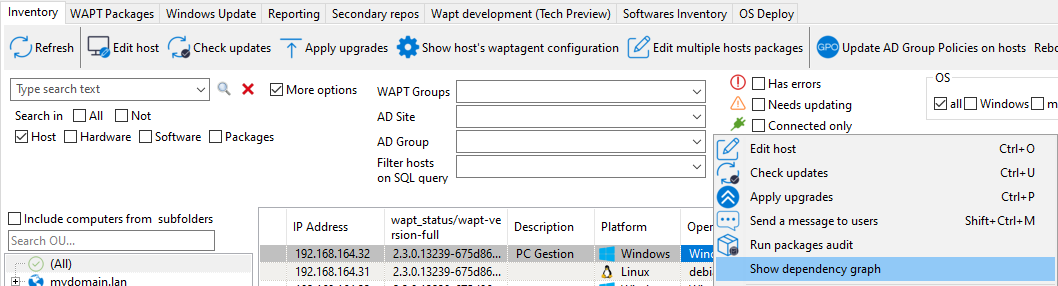
In this example, we can see all dependencies and sub-dependencies of the selected host.
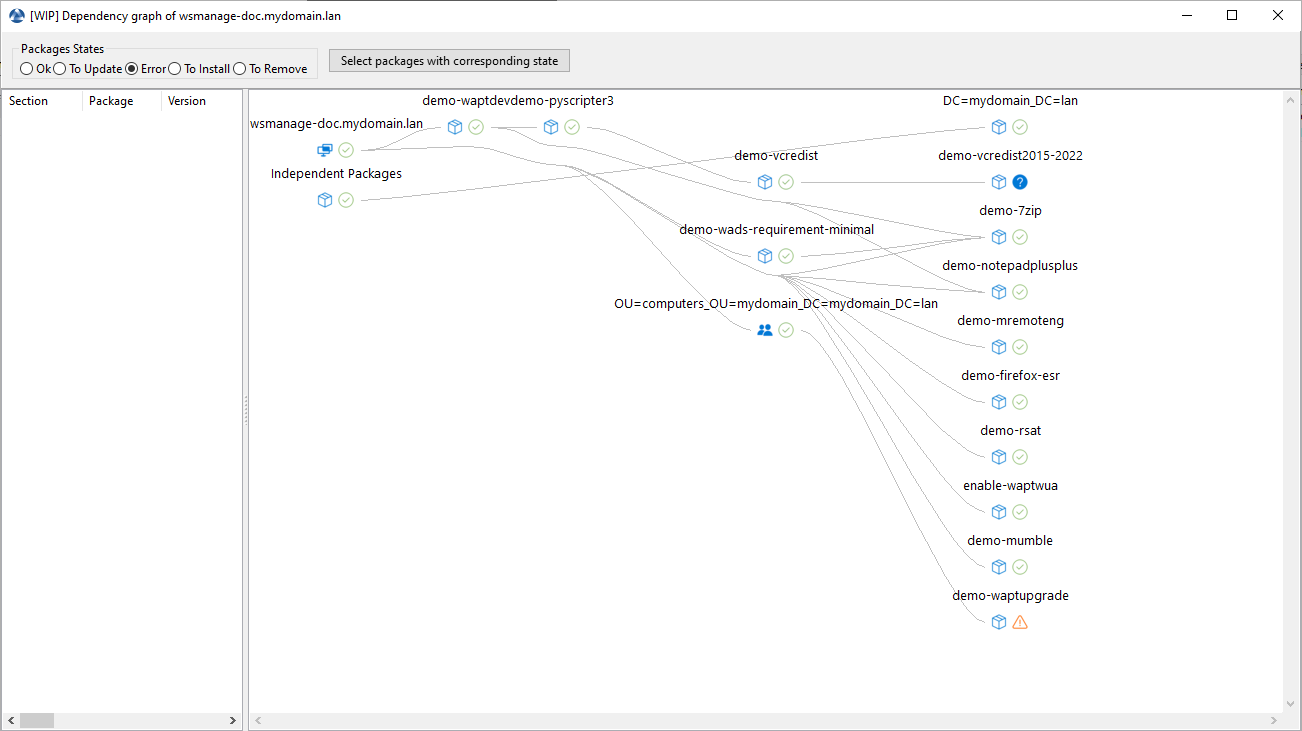
Exemple of a host with its graph dependencies
2.8.4. Changing the maturity of a WAPT package after having imported it in the local repository
When a package is imported on a WAPT repository it is possible to change the maturity by rigth-clicking on the WAPT package.
Choose the maturity of the WAPT package to import using the Change packages maturity menu item.

Window for changing the maturity of a WAPT package
Label |
Description |
|---|---|
The Increment the package version checkbox |
Increments the packaging version (version number after -). |
The Delete old packages after successful process checkbox |
Delete the old WAPT package after having changed the maturity. |
The Change package maturity dropdown list |
Configure the new maturity of the WAPT package. |
The New packages prefix field |
Configure a new prefix for the WAPT package. Prefix is case sensitive, we recommand to use lower case. |
You can stop the process by pressing the Abort process button.
You can confirm the process by pressing the Change the package maturity button.
Once finished, the status switches to ![]() .
.
Warning
You can change the maturity of a selection of WAPT packages at once
Changing the maturity of the WAPT package will change the hash of the file.
If the package is used in a GPO, like waptupgrade, the hash in the GPO will need to be changed.
2.8.5. Creating a group package
WAPT group packages allow to create a WAPT package containing other WAPT packages as dependencies.
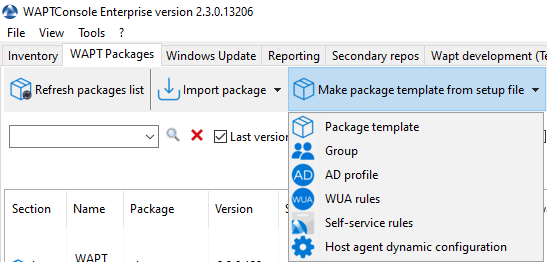
To create a bundle of WAPT packages, go to the WAPT Packages tab in the WAPT console, then click on the Make package template from setup file button and finally choose the Group menu item.
Change the name in the Package name field.
Fill in the description.
Add WAPT packages to the group package by dragging and dropping them or by Right-clicking on the WAPT package name and adding it to the bundle.
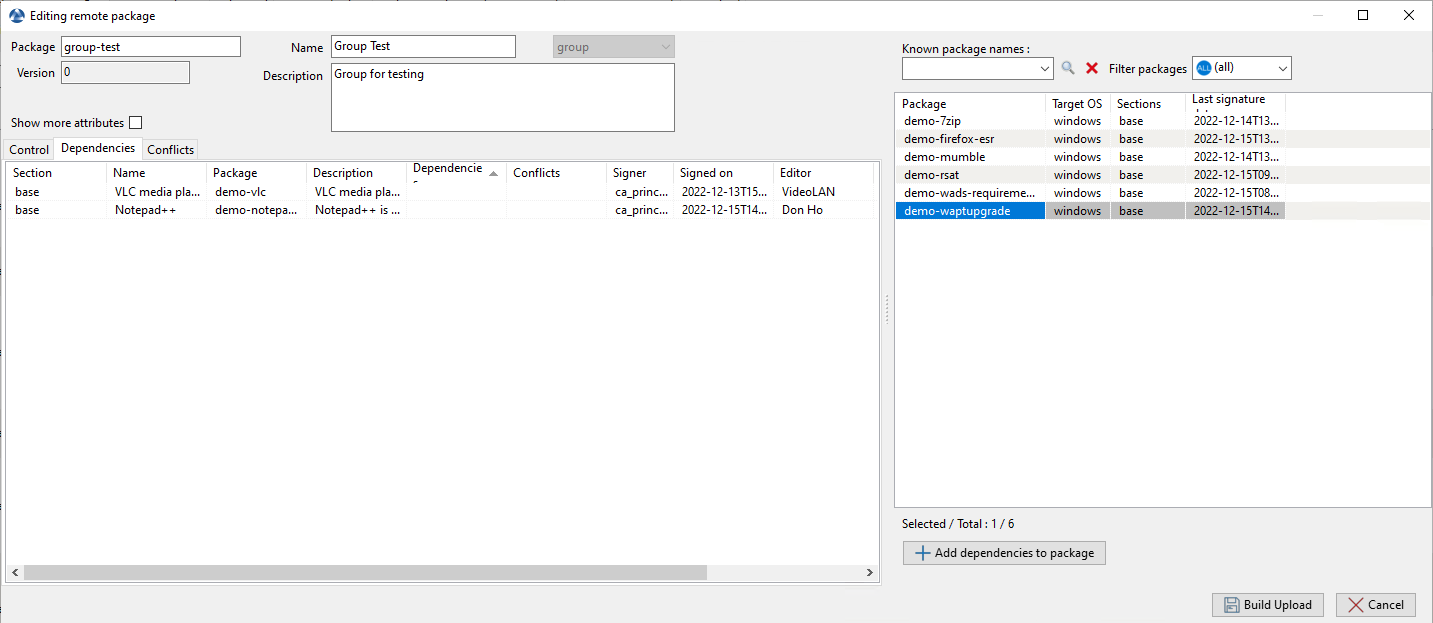
Creating a group package
Click on the Save button to save the bundle.
Hint
To uninstall a package, it is possible to add the package as a forbidden package to a group package. The forbidden WAPT package, if installed, will be removed before other WAPT packages are installed.
2.8.6. Removing a WAPT package
To delete a WAPT package from the repository, do a .
You can select multiple WAPT packages to delete at once.
Removing the package this way will only delete this package and not anterior versions. To do so, you will have to uncheck Last version only and select all packages version to delete. You can use the option Select obsolete packages to help you then Remove from repository to go faster.
If you remove a package used by at least one host, you will have an alert window. If you check Apply to the following it will remove the dependencies on all other concerned hosts.
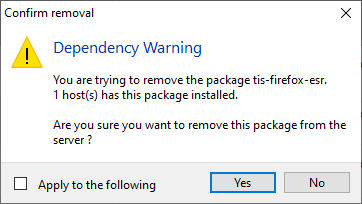
Window alerting that a package is used by at least one host when attempting to delete a package from the local repository
Note
If a package is installed on a workstation, removing a dependency will not uninstall the package itself. To uninstall a package from multiple workstations, you must explicitly uninstall it.
2.8.7. Editing a WAPT package
To edit a WAPT package, do a .
The WAPT package will be downloaded locally in the base package development folder, set in the WAPT Console settings.
If PyScripter is installed, PyScripter will automatically open the control and setup.py files.
Once edited you can upload the WAPT package using the WAPT Console.
2.8.8. Deploying WAPT packages from the WAPT Console
You can deploy WAPT packages on hosts using multiple methods:
Directly by adding a WAPT package to the selected host(s).
By adding a WAPT package to an Organizational Unit of which the host is a member.
By adding a package to a host profile that is applied to the host.
By adding the package to a group package of which the host is a member.
2.9. Adding a WAPT package to a host
If you want to add WAPT packages directly on the host, you have to edit the host package.
To do so, there are 3 methods:
Double-click on the host.
Right-click on the host then Edit host.
Select a host and use the Edit host button.
Then, you just have to drag and drop wanted package(s) and confirm.
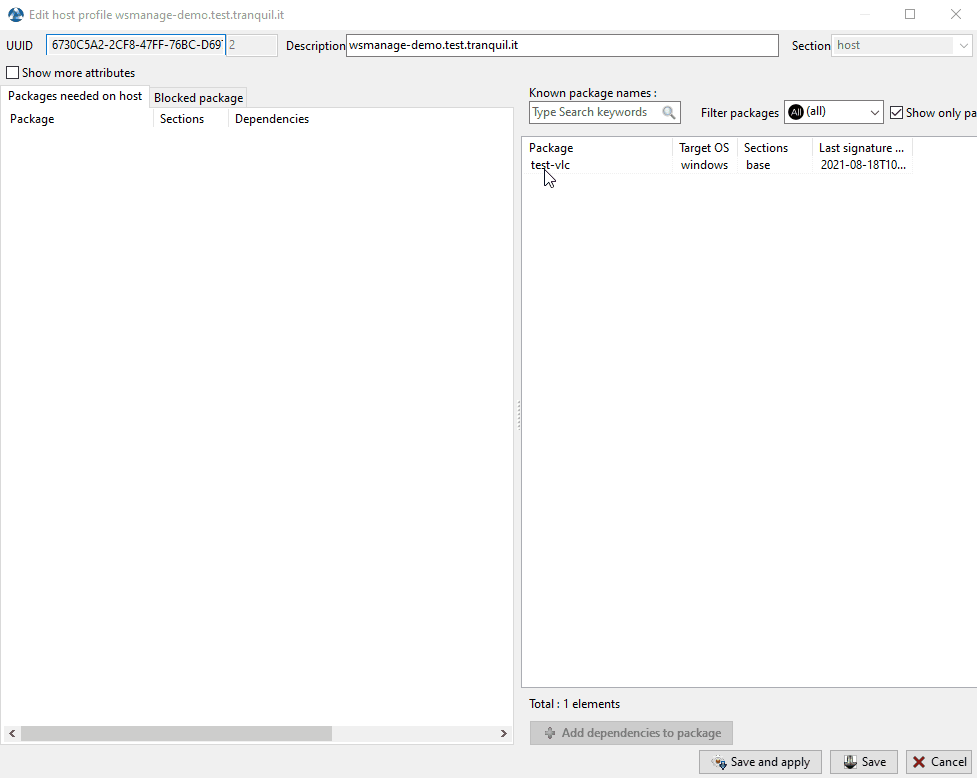
Method for adding a WAPT package onto a host
Pressing Save does the same thing as doing an update.
Pressing Save and apply does the same thing as an update immediatelly followed by an upgrade.
2.10. Adding or removing a WAPT package to several hosts
If you want to add or remove WAPT packages directly on several hosts, select the hosts then on one of them . You can add conflicting packages and remove conflicting packages from here too.
A new window will open, check the wanted package then click on OK.
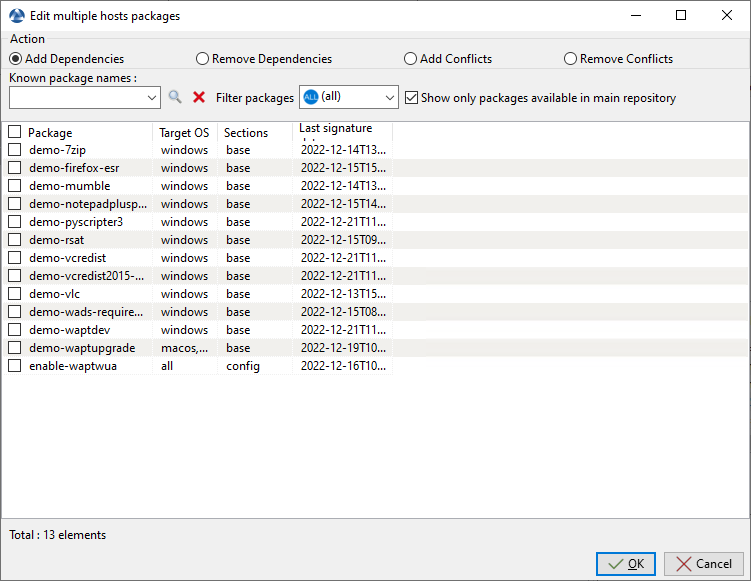
Method for adding or removing a WAPT package onto several host
After that, do an update immediately followed by an upgrade on the hosts.
2.11. Uninstalling a package using the conflict feature (do a prohibited package)
Once the package dependency has been removed, we can be sure that the package will not be reinstalled on the workstation via WAPT. However, the package is installed on many workstations and you want to uninstall it.
To do this, right_click on the Organizational Unit → Create or Edit Organizational Unit package, go to the Conflict tab, and add the package to be uninstalled.

Uninstalling a package using the conflict feature
The conflict feature also work for one host.
To do this, right_click on the host → Edit host, go to the Conflict tab, and add the package to be uninstalled.
2.12. Checking available updates for a host
This button will execute 2 actions:

give current state of the host to the WAPT Server
the WAPT Server displays whether the host MUST get updates
Every configuration modification require a Check updates.
2.13. Applying updates on a host
This button allows to apply pending updates on the selected host(s).

Warning
Use with caution, it will force close the software titles that the users are currently running.
One can use instead Apply upgrade for not running applications to prevent the users losing their unsaved work.
2.14. Performing a global search on all hosts
Performing global searches on all the criteria presented above is possible.
Choose the filters to check or uncheck.

Advanced search functionalities in the WAPT Console
Choice of filters
Options |
Description |
|---|---|
Host |
Host section in the Hardware inventory tab when a host is selected. |
Hardware |
DMI section in the Hardware inventory tab when a host is selected. |
Software |
Software inventory section when a host is selected. |
Packages |
Lists WAPT packages installed on the selected hosts. |
Has errors |
Searches only for hosts for which a task has not finished correctly. |
Needs updating |
Searches only for hosts needing upgrades. |
Connected only |
Searches only for connected hosts. |
Only authorized computers |
Searches only for hosts authorized by certificate of current WAPT Console user. |
WAPT Group |
Filters hosts based on their membership / dependency to a WAPT group package. |
AD Site |
Filter hosts based on their membership / dependency to a Site within Active Directory. |
AD Group |
Filters hosts based on their membership / dependency to a Active Directory group. |
OS |
Filters hosts based on their Operating System. |
Hint
Filters work with regular expression.
2.15. Creating a configuration package
WAPT configuration packages allow to create several WAPT configurations without having to create several WAPT Agents.
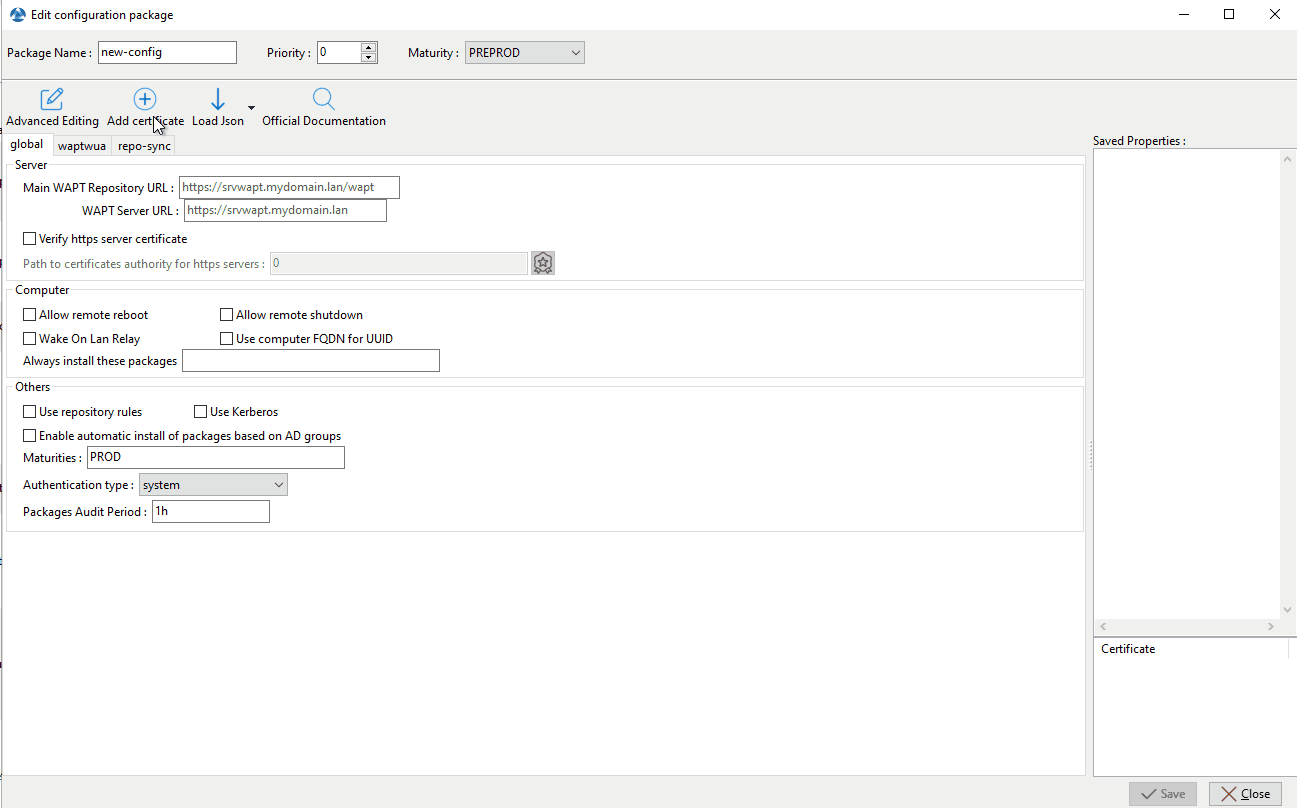
To create a configuration package, go to the WAPT Packages tab in the WAPT console, then click on the Make package template from setup file button and finally choose the Host agent dynamic configuration menu item.
Package group grid
A new window will open in order to create your new configuration package.
Change the name in the Package name field. Now there are several things that can be done.
2.15.1. The configuration toolbar
The Advanced Editing option will switch the simplified view into a complete list of options. Please see this section for advanced waptagent options.

Advanced WAPT package configuration form
You can use a filter to search the name of an attribute.
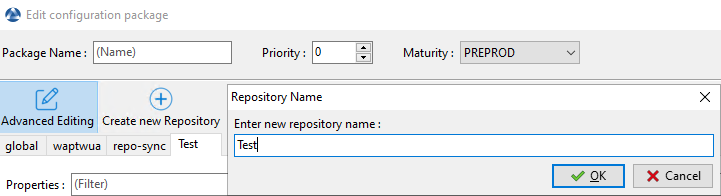
The Create new Repository will allow you to create a new WAPT repository if you have another repository than yours. If you do so, a new tab named by your repository will appear in the config package.
The Add certificate button will open a new window that will allow to select a certificate. The certificate will be included in the bundle of certificates authorized to perform actions on hosts.
Adding a certificate in a WAPT configuration package
You can remove the certificate with .
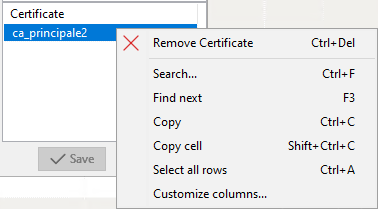
Removing a certificate in a WAPT configuration package
The Load Json button will import a json file which can be a configuration file.
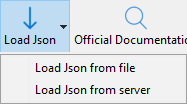
Loading a json file from a file or from the WAPT server
If you choose to download a json configuration file from the WAPT Server, you can choose amongst existing configurations.
Selecting a json file from the WAPT server
The Official documentation button will open a link to the Tranquil IT documentation with all
wapt-get.inioptions.
2.15.2. The configuration tabs
By default, there are 3 tabs: global, waptwua and repo-sync.
The global tab will have the same options when you create a WAPT Agent. The right pane summarizes the options that will be set.
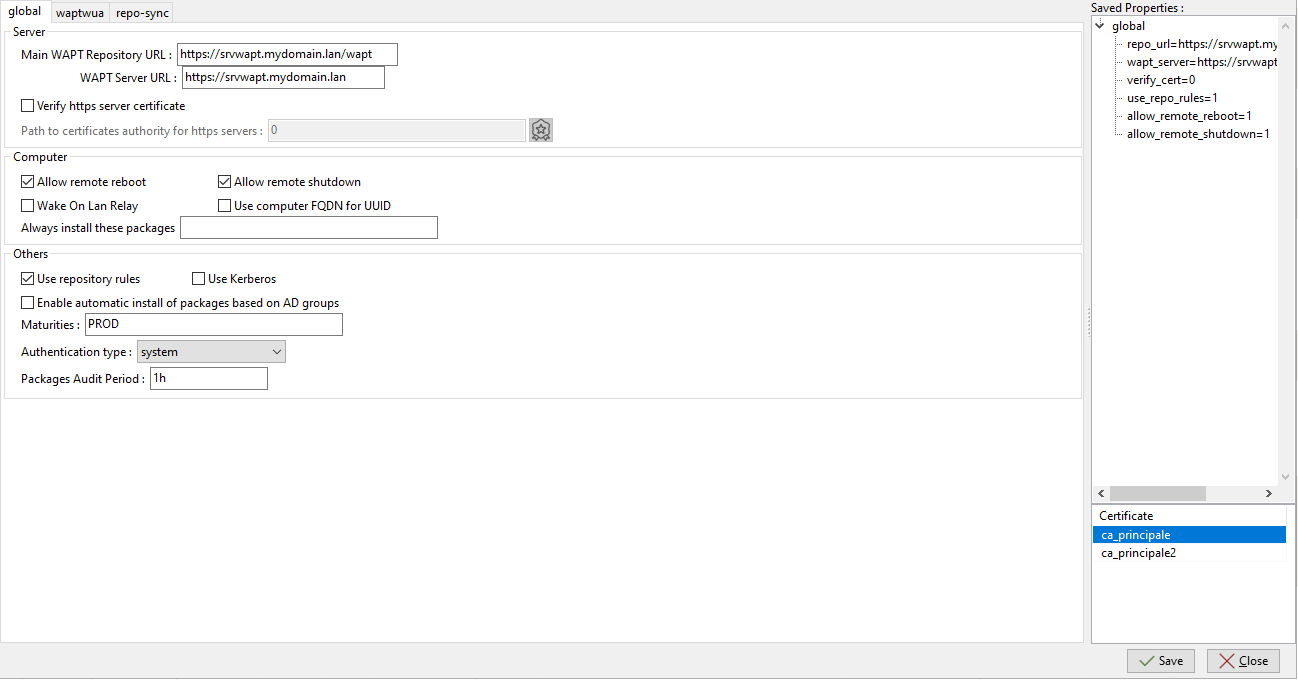
Global tab for configuring a WAPT package
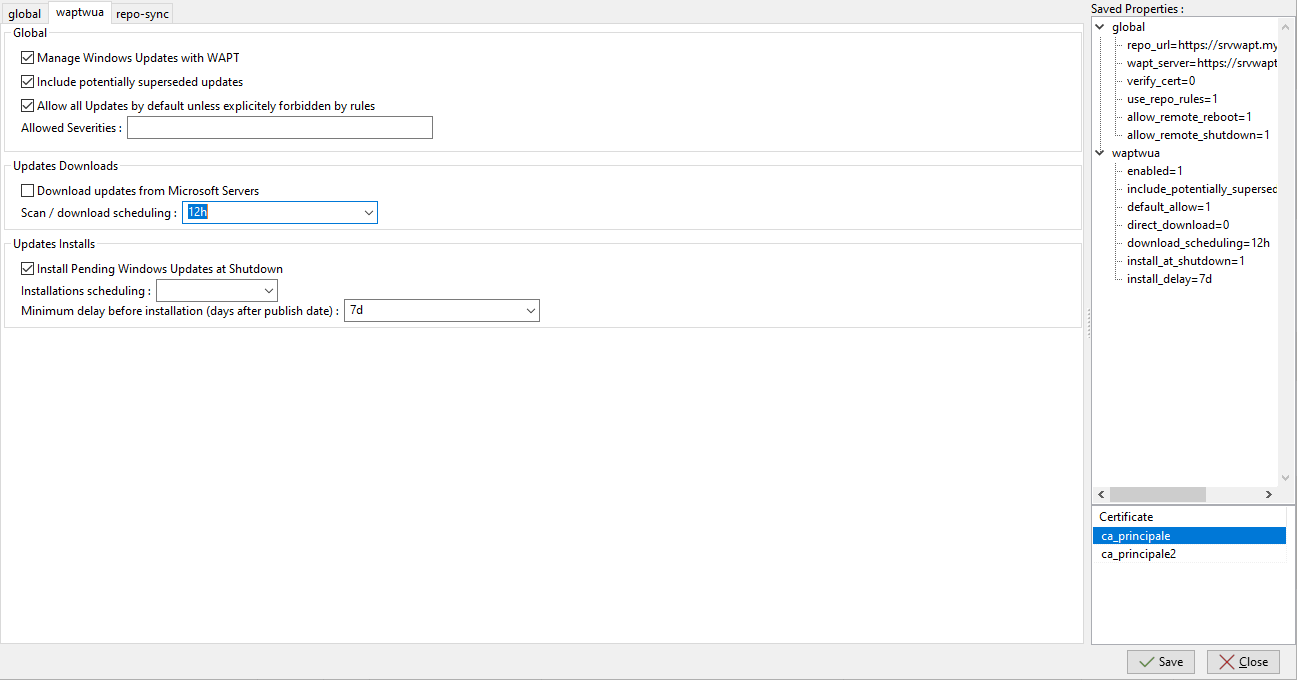
The waptwua tab will help you choose the options to use with WAPT Windows Updates.
Tab for enabling a remote host to use WAPT Windows Updates
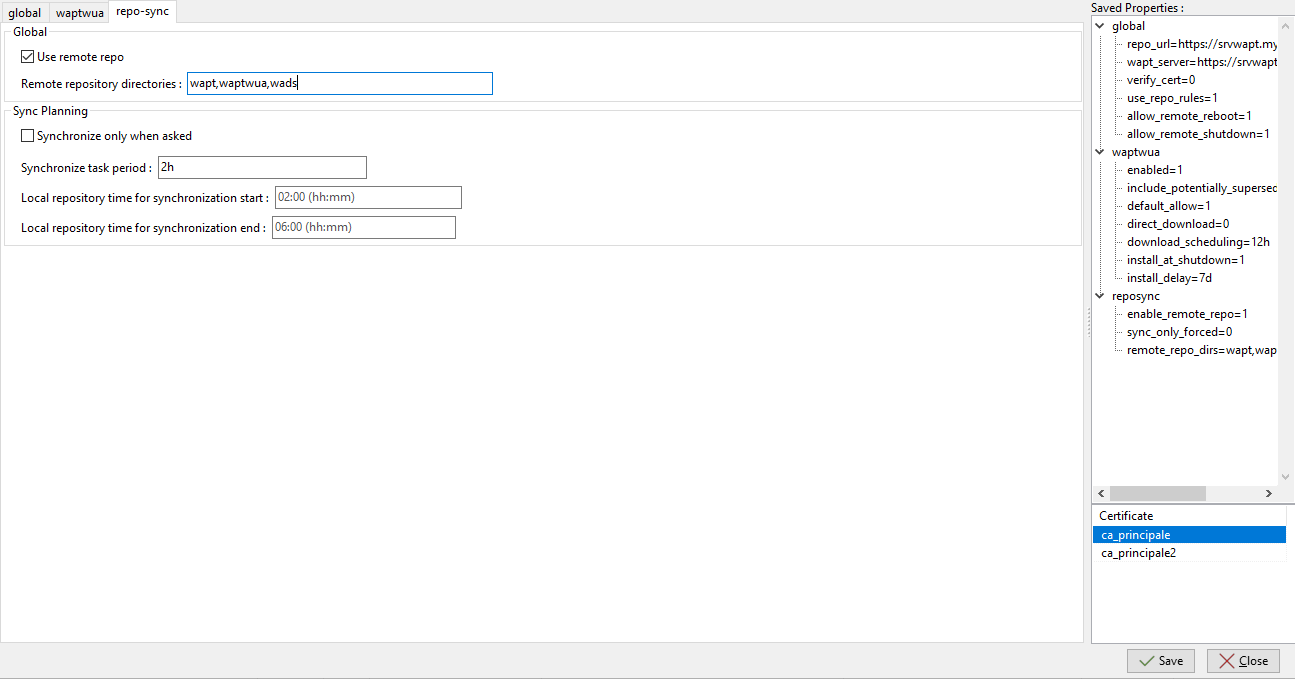
The repo-sync tab will help configure the remote host to become a remote repository.
Tab for configuring a WAPT package to make a WAPT Agent become a remote repository
2.15.3. Removing a configuration section
To delete an option or an entire section, use .
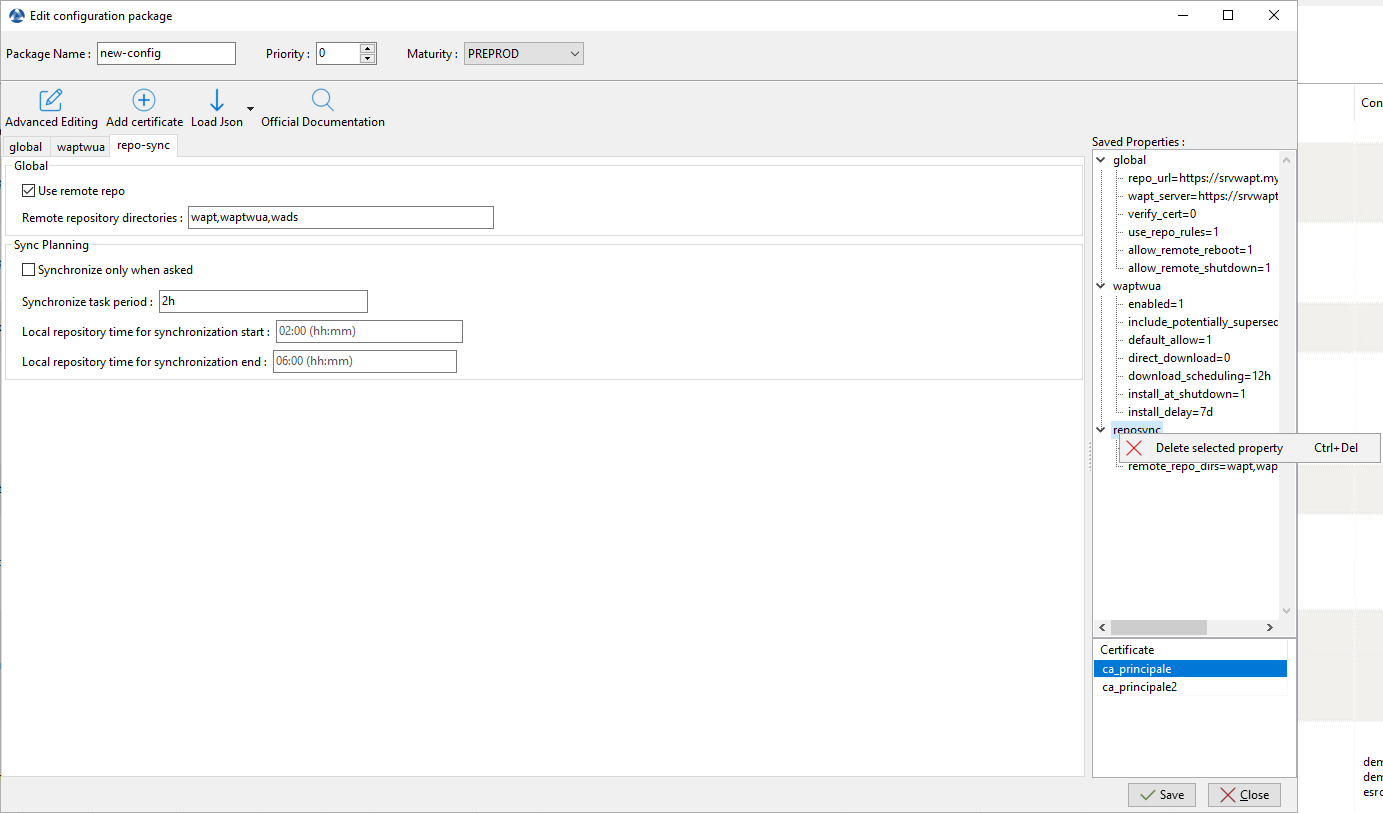
Deleting a property, an option or a section
2.15.4. Saving the configuration package and applying the new configuration to a remote host
Click on the Save button to save the new configuration bundle. The configuration file will be uploaded onto the WAPT Server in .json file format. Select the hosts and apply the configuration package like any WAPT package.
On the host, the configuration package will be located in the conf.d WAPT installation directory in a json format which can look like this:
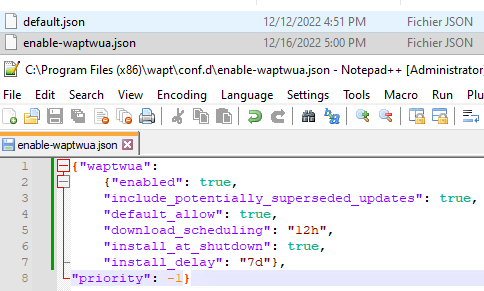
Example of a configuration file done by a WAPT configuration package
2.16. Removing the WAPT agent from the WAPT Console
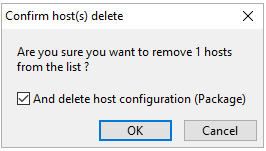
If you want to delete a WAPT Agent from the console, right-click on the target agent then click-right and select Remove Host (see above). You will have the possiblity to check And delete host configuration (Package), if you do so, it will delete the targeted host pakage and delete all information about the selected computer.
Note
Deleting a host from the WAPT Console does not uninstall the WAPT Agent from the computer. Please refer to this documentation to uninstall the WAPT Agent. If the WAPT Agent is not properly removed, the computer will register again with the WAPT Server.