8. Enhancing the security of your WAPT setup - Server side
By default, all WAPT packages are signed with your private key, which already provides a great level of security. However you can further improve the security of WAPT.
To fully secure your WAPT setup; you will want to do the following:
Enable authenticated registration to filter who is authorized to register the device with the WAPT Server.
Enable https certificate verification on the WAPT Agents and the WAPT Console to ensure that the WAPT Agents and the WAPT Console are connecting to the correct WAPT Server.
Configure authentication against Active Directory to allow access to the WAPT Console only to authorized WAPT admins.
Enable Client-Side Certificate Authentication to only allow authenticated devices to access the WAPT Server (Note: it is especially important if you want to expose your WAPT Server to the outside in a DMZ).
If you are using the Enterprise version of WAPT and you operate a large fleet with multiple administrators, you may be interested in knowing how to properly configure and apply the ACLs.
8.1. Configuring the firewall on the WAPT Server
WAPT Server firewall configuration is essential and should be the first step towards achieving better security in WAPT.
As WAPT aims to be secure by design, only a minimal set of open ports is needed on the WAPT Server compared to other solutions.
You will find in the following documentation firewall tips to improve WAPT security.
8.1.1. Configuring the firewall for WAPT Server on Debian and derivatives
By default on Debian Linux, no firewall rule applies.
Disable ufw and install firewalld instead.
ufw disable
apt update
apt -y install firewalld
Simply apply this firewalld configuration.
systemctl start firewalld
systemctl enable firewalld
firewall-cmd --zone=public --add-port=80/tcp --permanent
firewall-cmd --zone=public --add-port=443/tcp --permanent
systemctl restart firewalld
8.1.2. Configuring the firewall for WAPT Server on RedHat and derivatives
Simply apply this firewalld configuration.
systemctl start firewalld
systemctl enable firewalld
firewall-cmd --zone=public --add-port=80/tcp --permanent
firewall-cmd --zone=public --add-port=443/tcp --permanent
systemctl restart firewalld
8.2. Configuring kerberos authentication 
Note
Without kerberos authentication, you have to either trust initial registration or enter a password for each workstation on initial registration.
For more information, visit the documentation on registering a host with the WAPT Server and signing inventory updates.
The kerberos authentication will be used only when registering the device.
8.2.1. Installing the kerberos components and configuring krb5.conf file
apt install krb5-user msktutil libnginx-mod-http-auth-spnego
yum install krb5-workstation msktutil nginx-mod-http-auth-spnego
Note
Registering with kerberos is not available with a WAPT Server running on Windows.
Modify the /etc/krb5.conf file and replace all the content with the following 4 lines replacing MYDOMAIN.LAN with your Active Directory domain name (i.e. <MYDOMAIN.LAN>).
Attention
default_realm value MUST be written with ALL CAPS!!
[libdefaults]
  default_realm = MYDOMAIN.LAN
  dns_lookup_kdc = true
  dns_lookup_realm=false
Retrieving a service keytab. Use the kinit and klist. You can use an Administrator account or any other account with the delegated right to join a computer to the domain in the proper destination container (by default CN=Computers).
In the shell transcript below, commands are in black and returned text is commented in light gray:
sudo kinit administrator
## Password for administrator@MYDOMAIN.LAN:
## Warning: Your password will expire in 277 days on Mon. 17 sept. 2018 10:51:21 CEST
sudo klist
## Ticket cache: FILE:/tmp/krb5cc_0
## Default principal: administrator@MYDOMAIN.LAN
##
## Valid starting       Expires              Service principal
## 01/12/2017 16:49:31  02/12/2017 02:49:31  krbtgt/MYDOMAIN.LAN@MYDOMAIN.LAN
## renew until 02/12/2017 16:49:27
If the authentication request is successful, you can then create your HTTP Keytab with the msktutil command.
Adapt the command to your context.
sudo msktutil --server srvads.mydomain.lan --create --host srvwapt --computer-name srvwapt -b cn=computers --service HTTP/srvwapt.ad.mydomain.lan --keytab /etc/nginx/http-krb5.keytab --no-reverse-lookups --dont-update-dnshostname --enctypes 0x18
Attention
Be sure to have properly configured your WAPT Server hostname before running these commands;
In order to double check your hostname, you can run echo $(hostname) and it MUST return the name that will be used by WAPT Agent running on client workstations. If your WAPT server is available from the internet, you should add another servicePrincipalName (SPN) to match with the WAPT public URL. In order to update the keytab file, you must run the 2nd msktutil command every time you add a new SPN.
You can add an auto-update task in crontab. It will frequently change the machine account password in Active Directory so you can pass security audits. Crontab content:
32 23 * * * root msktutil --auto-update --keytab /etc/nginx/http-krb5.keytab --enctypes 0x18
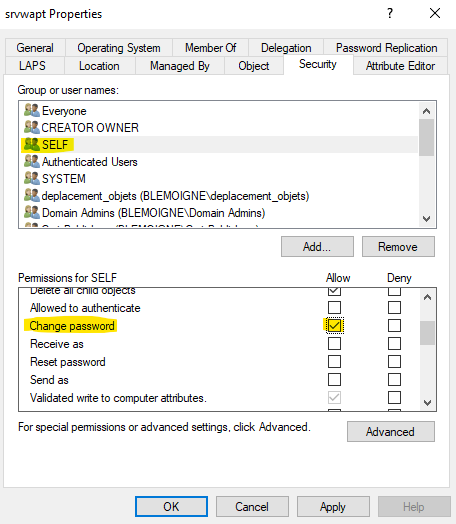
Warning
The computer account must be able to change its own password (Security tab, group SELF, “Change password” permission).
Apply the proper access rights to the
http-krb5.keytabfile. If you are with RedHat based OS with selinux, please fix rights with restorecon.
sudo chmod 640 /etc/nginx/http-krb5.keytab
sudo chown root:www-data /etc/nginx/http-krb5.keytab
sudo chown root:nginx /etc/nginx/http-krb5.keytab
sudo chmod 640 /etc/nginx/http-krb5.keytab
restorecon -v -R /etc/nginx/http-krb5.keytab
8.2.2. Post-configuring kerberos for the WAPT Server
You can now use post-configuration script to configure the WAPT Server to use kerberos.
The post-configuration script will configure Nginx and the WAPT Server to use kerberos authentication.
Hint
This post-configuration script MUST be run as root.
/opt/wapt/waptserver/scripts/postconf.sh --force-https
Kerberos authentication will now be configured.
8.2.3. Special use cases
8.2.3.1. My WAPT server is integrated into a global Active Directory (AD) environment.
Security Considerations
The French National Cybersecurity Agency (ANSSI) regularly observes that compromises of information systems (IS) based on Active Directory (AD) often stem from poor administrative practices and insufficient compartmentalization. These breaches typically begin with attacks targeting workstations. Attackers then exploit vulnerabilities in the IS to move laterally, escalate privileges, and eventually gain full control of the AD.
Once an attacker achieves this level of control, they can create persistent backdoors, allowing them to maintain long-term access to the IS, including the organization’s critical business processes and data.
ANSSI’s Secure Administration Guide.
The Guide to Secure Administration of Information Systems Based on an AD Directory addresses the specific challenges of administering AD environments and provides recommendations for partitioning the IS into trusted zones. This guide complements ANSSI’s broader technology-agnostic security recommendations for secure IS administration.
8.2.3.2. My WAPT Server does not have access to a writeable Active Directory
Connect to your Active Directory (Not a RODC).
Create a computer account srvwapt.
Add a SPN on the srvwapt$ account.
setspn -A HTTP/srvwapt.mydomain.lan srvwapt
Create a keytab for this WAPT Server.
ktpass -out C:\http-krb5.keytab -princ HTTP/srvwapt.mydomain.lan@MYDOMAIN.LAN rndpass -minpass 64 -crypto all -pType KRB5_NT_PRINCIPAL /mapuser srvwapt$@MYDOMAIN.LAN
Reset SRVWAPT$'s password [y/n]? y
Note
If the address of your WAPT Server is different from your active directory domain, replace HTTP/srvwapt.mydomain.lan@MYDOMAIN.LAN with HTTP/srvwapt.othername.com@MYDOMAIN.LAN.
Transfer this file to
/etc/nginx/(with winscp for example).Apply the proper access rights to the
http-krb5.keytabfile. If you are with RedHat based OS with selinux, please fix rights with restorecon.
sudo chmod 640 /etc/nginx/http-krb5.keytab
sudo chown root:www-data /etc/nginx/http-krb5.keytab
sudo chown root:nginx /etc/nginx/http-krb5.keytab
sudo chmod 640 /etc/nginx/http-krb5.keytab
restorecon -v -R /etc/nginx/http-krb5.keytab
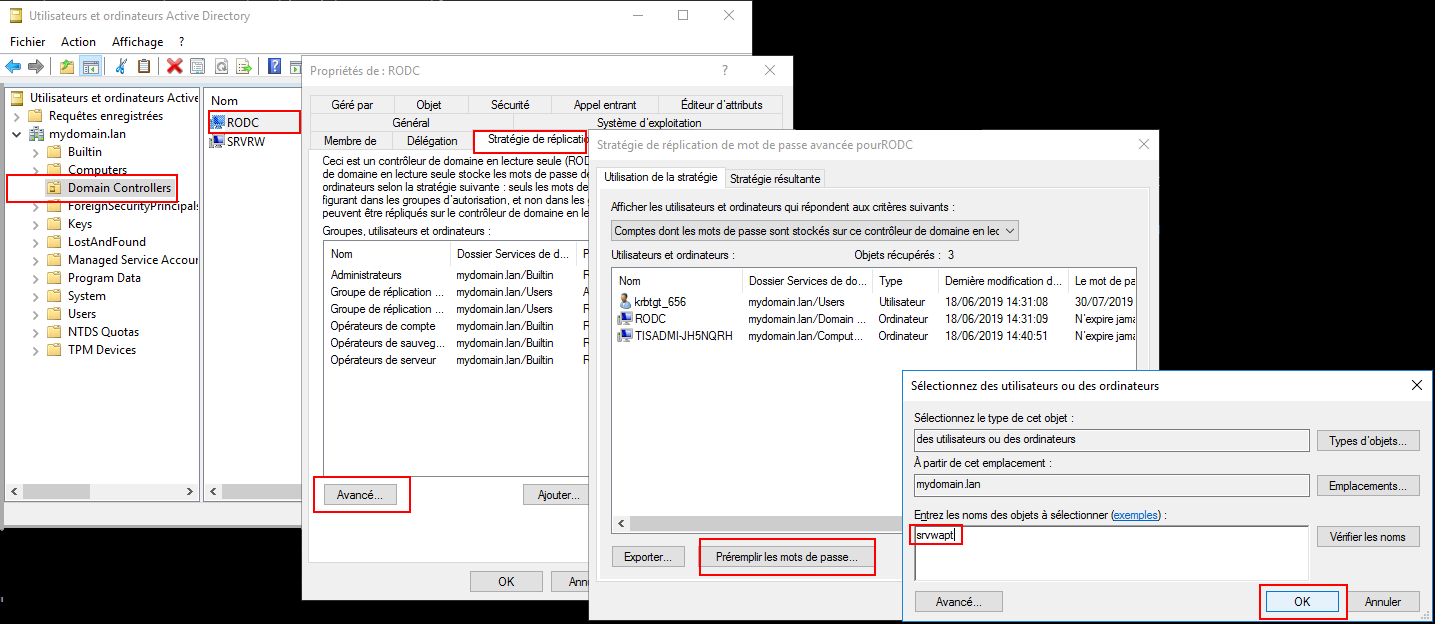
8.2.3.3. WAPT Agents only have access to a RODC domain controller
For RODC, add the srvwapt account to the allowed password group for replication.
Remember to preload the password of the WAPT Server with the different RODC servers.
8.2.3.4. You have multiple Active Directory domains with or without relationships
If you have multiple Active Directory domains, you MUST create one keytab per domain by following the procedure above, ex:
http-krb5-domain1.local.keytab;http-krb5-domain2.local.keytab;http-krb5-domain3.local.keytab.
You will then have to merge all these keytabs into a unique keytab:
ktutil
read_kt http-krb5-domain1.local.keytab
read_kt http-krb5-domain2.local.keytab
read_kt http-krb5-domain3.local.keytab
write_kt http-krb5.keytab
8.2.4. Debug problems with the kerberos
Attention
The WAPT Server address cannot be an IP, Kerberos works well only with DNS.
In your test, the url used MUST be exactly the same address as the one indicated in
C:\Program Files (x86)\wapt\wapt-get.ini.
8.2.4.1. Did you restart nginx correctly?
systemctl restart nginx
8.2.4.2. Check the permissions of the http-krb5.keytab file
[root@srvwapt.mydomain.lan]# ls -l /etc/nginx/http-krb5.keytab
-rw-r----- 1 root www-data 921 janv. 4 16:20 /etc/nginx/http-krb5.keytab
8.2.4.3. Is kerberos mode active on my WAPT Agent?
On the Windows host:
Check in your
C:\Program Files (x86)\wapt\wapt-get.inithat theuse_kerberosvalue isTrue.
[global]
use_kerberos=True
If you change the value, do not forget to restart the WAPT service.
net stop waptservice
net start waptservice
8.2.4.4. Is Kerberos mode active on my WAPT Server?
On the Linux host:
Check in your
/opt/wapt/conf/waptserver.inithat theuse_kerberosvalue isTrue.
[options]
use_kerberos=True
Check in your
/etc/nginx/sites-enabled/wapt.confthat this configuration is present.
location ~ ^/.*_kerberos$ {

      proxy_http_version 1.1;
      proxy_request_buffering off;

      proxy_set_header Host $host;
      proxy_set_header X-Real-IP $remote_addr;
      proxy_set_header X-Forwarded-For $proxy_add_x_forwarded_for;

      # be sure these headers are not forwarded
      proxy_set_header X-Ssl-Client-Dn "";
      proxy_set_header X-Ssl-Authenticated "";

      auth_gss on;
      auth_gss_keytab /etc/nginx/http-krb5.keytab;
      proxy_pass http://127.0.0.1:8080;

  }
If one of the two configurations is not present, restart the post-configuration and activate kerberos.
8.2.4.5. Checking that the keytab file contains the correct url
[root@srvwapt.mydomaine.lan]# KRB5_KTNAME=/etc/nginx/http-krb5.keytab klist -k
Keytab name: FILE:/etc/nginx/http-krb5.keytab
KVNO Principal
---- --------------------------------------------------------------------------
   ...
   3 HTTP/srvwapt.ad.mydomain.lan@AD.MYDOMAIN.LAN
   ...
8.2.4.6. Trying to register the host using a system account
To switch to a system account you MUST use the psexe tool from Microsoft: psexe.
In cmd as an Administrator.
C:\Users\\xxxxxx\\Downloads\\PSTools\\psexec.exe -accepteula -s -i cmd
In the new cmd window, check that you are identified as System.
C:\WINDOWS\\system32>whoami

NT AUTHORITY\System
Run register.
wapt-get register
8.2.4.7. Trying an authentication with the keytab from your WAPT Server
On the Linux host.
[root@srvwapt.ad.tranq ~]# ktutil
ktutil: read_kt /etc/nginx/http-krb5.keytab
ktutil: list
slot KVNO Principal
---- ---- ---------------------------------------------------------------------
  1    3                  srvwapt$@AD.TRANQUIL.IT
  2    3                  srvwapt$@AD.TRANQUIL.IT
  3    3                  srvwapt$@AD.TRANQUIL.IT
  4    3                  SRVWAPT$@AD.TRANQUIL.IT
  5    3                  SRVWAPT$@AD.TRANQUIL.IT
  6    3                  SRVWAPT$@AD.TRANQUIL.IT
  7    3              host/srvwapt@AD.TRANQUIL.IT
  8    3              host/srvwapt@AD.TRANQUIL.IT
  9    3              host/srvwapt@AD.TRANQUIL.IT
 10    3 HTTP/srvwapt.ad.tranquil.it@AD.TRANQUIL.IT
 11    3 HTTP/srvwapt.ad.tranquil.it@AD.TRANQUIL.IT
 12    3 HTTP/srvwapt.ad.tranquil.it@AD.TRANQUIL.IT
ktutil: quit
[root@srvwapt.ad.tranq ~]# kinit -k -t /etc/nginx/http-krb5.keytab srvwapt\$@AD.TRANQUIL.IT
[root@srvwapt.ad.tranq ~]# klist
Ticket cache: FILE:/tmp/krb5cc_0
Default principal: srvwapt$@AD.TRANQUIL.IT

Valid starting       Expires              Service principal
05/02/2021 19:06:05  06/02/2021 05:06:05  krbtgt/AD.TRANQUIL.IT@AD.TRANQUIL.IT
  renew until 06/02/2021 19:06:05
8.2.4.8. Attempting an authentication with curl
On the Linux host.
[root@srvwapt.ad.tranq ~]# kdestroy
[root@srvwapt.ad.tranq ~]# kinit sfonteneau
Password for sfonteneau@AD.TRANQUIL.IT:
[root@srvwapt.ad.tranq ~]# klist
Ticket cache: FILE:/tmp/krb5cc_0
Default principal: sfonteneau@AD.TRANQUIL.IT

Valid starting       Expires              Service principal
05/02/2021 19:10:42  06/02/2021 05:10:42  krbtgt/AD.TRANQUIL.IT@AD.TRANQUIL.IT
  renew until 06/02/2021 19:10:39

root@srvwapt.ad.tranq ~]# curl -v --negotiate -u : https://srvwapt.ad.tranquil.it/api/v3/add_host_kerberos -k
* Expire in 0 ms for 6 (transfer 0x563dece09f90)
* Uses proxy env variable no_proxy == 'localhost,127.0.01/8,192.168.0.0/16,10.0.0.0/8,172.16.0.0/12,ad.tranquil.it'
* Expire in 1 ms for 1 (transfer 0x563dece09f90)
...
{"success":true,"msg":"Authentication OK","result":{"auth_result":{"auth_method":"kerb","user":"sfonteneau","auth_date":"2024-11-04T16:53:03.817821","with2fa":false},"server_uuid":"7j54647e-1b54-11ea-bcbe-cae466b691e5","version":"2.6.0","server_domain":"ad.tranquil.it","edition":"enterprise","user_acls":{},"token":null},"request_time":0.006450653076171875}
8.2.4.9. Verifying that you are successfully obtaining a Kerberos ticket
Attention
Always execute commands in system account (see previous point)!
klist purge
klist get http/srvwapt.ad.mydomain.lan
You should get (in your language):
C:\Windows\System32>klist get http/srvwapt.ad.mydomain.lan

LogonId est 0:0x13794d
Un ticket pour http/srvwapt.ad.mydomain.lan a été récupéré.

Tickets mis en cache : (2)

#0> Client : sfonteneau @ AD.MYDOMAIN.LAN
  Serveur : krbtgt/AD.MYDOMAIN.LAN @ AD.MYDOMAIN.LAN
  Type de chiffrement KerbTicket : AES-256-CTS-HMAC-SHA1-96
  Indicateurs de tickets 0x40e00000 -> forwardable renewable initial pre_authent
  Heure de démarrage : 2/4/2021 15:51:07 (Local)
  Heure de fin :   2/5/2021 1:51:07 (Local)
  Heure de renouvellement : 2/11/2021 15:51:07 (Local)
  Type de clé de session : AES-256-CTS-HMAC-SHA1-96
  Indicateurs de cache : 0x1 -> PRIMARY
  KDC appelé : srvads.AD.MYDOMAIN.LAN

#1> Client : sfonteneau @ AD.MYDOMAIN.LAN
  Serveur : http/srvwapt.AD.MYDOMAIN.LAN @ AD.MYDOMAIN.LAN
  Type de chiffrement KerbTicket : AES-256-CTS-HMAC-SHA1-96
  Indicateurs de tickets 0x40a80000 -> forwardable renewable pre_authent 0x80000
  Heure de démarrage : 2/4/2021 15:51:07 (Local)
  Heure de fin : 2/5/2021 1:51:07 (Local)
  Heure de renouvellement : 2/11/2021 15:51:07 (Local)
  Type de clé de session : AES-256-CTS-HMAC-SHA1-96
  Indicateurs de cache : 0
  KDC appelé : srvads.AD.MYDOMAIN.LAN
If that does not work, check in your Active Directory that the serviceprincipalname attribute on the computer account of the WAPT Server has this value: HTTP/srvwapt.mydomain.lan.
8.2.4.10. Check that it works with Firefox
Note
You need to first configure Firefox for kerberos authentication.
Type about:config in the URL bar in your Firefox.
Edit
network.negotiate-auth.trusted-uris, and add the url of the WAPT Server:srvwapt.mydomain.lan.You can now visit the url: https://srvwapt.mydomain.lan/add_host_kerberos.
If the authentication does not work, then the WAPT Server will return a 403 error message.
8.2.4.11. In case of an error on one of the previous checks
Delete the host account from the Active Directory.
Delete the
/etc/nginx/http-krb5.keytabfile.Reboot the host you are testing with and re-run the keytab creation process again.
Note
It is important to restart the host to purge the kerberos tickets previously obtained by the host.
To avoid restarting you can also execute the command “klist purge” as SYSTEM.
8.3. Activating the verification of the SSL / TLS certificate
Important
When configuring any type of certificate (PKI, commercial, or self-signed), always verify the expiration date.
If the certificate is due to expire soon, you can prepare in advance by following this procedure.
If the certificate has already expired, there are only two ways to regain control of your environment:
Using Group Policy Objects (GPOs)—though GPOs have limitations and may not guarantee full validation of successful deployment.
Manually connecting a USB device to each machine under your responsibility.
More information here.
When running the WAPT Server post-configuration script, the script will generate a self-signed certificate in order to enable HTTPS communications.
The WAPT Agent checks the WAPT HTTPS Server certificate according to the verify_cert value in section [global] in C:\Program Files (x86)\wapt\wapt-get.ini.
Options for |
Working principle of the WAPT Agent |
|---|---|
|
the WAPT Agent will not check the WAPT Server HTTPS certificate. |
|
the WAPT Agent will check the WAPT Server HTTPS certificate using the certificate bundle.
|
|
the WAPT Agent will check the WAPT Server HTTPS certificate with the certificate bundle.
|
Hint
To quickly and easily enable verification of the HTTPS certificate, you can use the Pinning method.
8.3.1. Pinning the certificate
The pinning of certificate consists of verifying the SSL/ TLS certificate with a well defined and restricted bundle.
Danger
This method is the easiest when using a self-signed certificate.
But Never pin a commercial certificate : Pinning commercial certificates can lead to serious renewal failures.
For this, you need to launch the following commands in the Windows cmd.exe shell (with elevated privileges if UAC is active).
If you already have a Windows cmd.exe shell open, close it and open a new shell so to take into account the updated environment variables:
wapt-get enable-check-certificate
wapt-get restart-waptservice
Validate the certificate with wapt-get update
When you have executed the update command, make sure that everything has gone well, and if in doubt check Problems when enabling enable-check-certificate.
Attention
If wapt-get enable-check-certificate returns an error, remove the .crt with same name on C:\Program Files (x86)\wapt\sslserver
Note
The command enable-check-certificate downloads the certificate
srvwapt.mydomain.lan.crtin the folderC:\Program Files (x86)\WAPT\ssl\server.It then modifies the file
wapt-get.inito specify the valueverify_cert=C:\Program Files (x86)\wapt\ssl\server\srvwapt.mydomain.lan.crt.The WAPT Agent will now verify certificates using the pinned certificate.
Attention
If you use the certificate pinning method, BE REMINDED to archive the /opt/wapt/waptserver/ssl folder on your WAPT Server.
The file will have to be restored on your WAPT Server if you migrate or upgrade your WAPT Server, if you want the WAPT Agents to continue to be able to establish trusted HTTPS connections with the WAPT Server.
8.3.2. How to use a commercial certificate or certificates provided by your Organization?
If the pinning method does not suit you, you can replace the self-signed certificate generated during the installation of WAPT.
Replace the old certificate with the new one in the folder /opt/wapt/waptserver/ssl/ (Linux) or C:\wapt\waptserver\ssl\ (Windows).
The new key pair MUST be in PEM encoded Base64 format.
Note
Special case where your certificate has been signed by an internal Certificate Authority
Certificates issued by an internal Certificate Authority MUST have the complete certificate chain of the Certificate Authority.
You can manually add the certificate chain of the Certificate Authority to the certificate that will be used by Nginx.
Example: echo srvwapt.mydomain.lan.crt ca.crt > cert.pem
For Linux servers it is also necessary to reset the ACLs, if you are with RedHat based OS with selinux, please fix rights with restorecon :
chown root:www-data /opt/wapt/waptserver/ssl/*.pem
chown root:nginx /opt/wapt/waptserver/ssl/*.pem
restorecon -v -R /opt/wapt/waptserver/ssl/
Restart Nginx to take into account the new certificates.
systemctl restart nginx
net stop waptnginx
net start waptnginx
8.3.2.1. Configuring the WAPT Agent
For a commercial certificate you can set verify_cert = 1 in wapt-get.ini.
For a certificate issued by an internal Certificate Authority, you MUST place the Certificate Authority in the C:\Program Files (x86)\wapt\ssl\server\ca.crt folder and specify the certificate path with verify_cert in the wapt-get.ini file of the WAPT Agent.
To apply the new configuration to your entire fleet:
Regenerate a WAPT Agent with the appropriate settings.
Use a WAPT package to modify
wapt-get.iniand push the certificate.
8.3.3. Verifying the certificate in the WAPT Console
When the WAPT Console first starts, it reads the content of C:\Program Files (x86)\WAPT\wapt-get.ini and it builds its configuration file C:\Users\admin\AppData\Local\waptconsole\waptconsole.ini.
This properly sets the verify_cert attribute for the HTTPS communication between the WAPT Console and the WAPT Server.
8.4. Configuring user authentication against Active Directory
By default, the WAPT Server is configured with a single SuperAdmin account whose password is setup during initial post-configuration.
On large and security-minded networks, the SuperAdmin account should not be used since it cannot provide the necessary traceability for administrative actions that are done on the network assets.
It is thus necessary to configure authentication against the Active Directory for the WAPT Console users; this will allow to use named accounts for tasks.
Note
Active Directory authentication is used to authenticate access to the inventory via the WAPT Console.
However, all actions on the WAPT equipped remote devices are based on X.509 signatures, so an Administrator will need both an Active Directory login AND a private key whose certificate is recognized by the remote devices that the Administrator manages using WAPT.
Only the SuperAdmin account and the members of the Active Directory security group waptadmins will be allowed to upload packages on the main repository (authentication mode by login and password).
8.4.1. Enabling Active Directory authentication
Warning
We strongly recommend that you use *Kerberos authentication* instead of LDAP. However, it is possible to configure a secure LDAP connection.
To enable authentication of the WAPT Server with Active Directory, configure the file
waptserver.inias follows.
Note
The WAPT Server configuration file on GNU/ Linux and macOS systems is found in /opt/wapt/conf/waptserver.ini or in /opt/wapt/waptserver/waptserver.ini.
The WAPT Server configuration file on Windows systems is found in C:\wapt\conf\waptserver.ini.
8.4.1.1. Most secure : LDAP SASL Bind over GSSAPI
Network Requirements : DNS (53 TDP), Kerberos (88 TDP), LDAP/CLDAP (389 TDP/UDP) from WAPT Server to Domain Controller.
#waptserver.ini

wapt_admin_group=waptadmins      # parameter wapt_admin_group_dn is deprecated since WAPT 2.6
ad_domain_name=mydomain.lan
You must remove all properties starting with “ldap_*” if existing.
Now you can set the following configuration in /etc/krb5.conf (mandatory capital letters for Kerberos Realm):
[libdefaults]
  default_realm = MYDOMAIN.LAN
  dns_lookup_kdc = true
  dns_lookup_realm = true
If the DNS Lookup does not work, you can set the configuration file as follows (mandatory capital letters for Kerberos Realm).
[libdefaults]
  default_realm = MYDOMAIN.LAN
  dns_lookup_kdc = false
  dns_lookup_realm = false
[realms]
  MYDOMAIN.LAN = {
  kdc = 192.168.1.13        # KDC IP equals to Domain Controller IP
  kdc = 192.168.1.12
  }
8.4.1.2. LDAPS connection
This method is less secure than LDAP SASL Bind over GSSAPI
Network Requirements : DNS (53 TDP), LDAP (389 TDP) from WAPT Server to Domain Controller.
#waptserver.ini

wapt_admin_group=waptadmins      # parameter wapt_admin_group_dn is deprecated since WAPT 2.6
ldap_auth_server=ldaps://ldapserver.mydomain.lan:636
Note
If your certificate isn’t recognized, you can modify the verify_cert at false, in the waptserver.ini.
verify_cert = False
Options (Default Value) |
Description |
Example |
|---|---|---|
|
Defines the sAMAccountName of the Active Directory User Group allowed to connect to WAPT Console, it is a list that can contain several groups.
You can use this option over |
wapt_admin_group = waptadmins, wapttech |
|
Defines the LDAP authentication server. If not specified, a cldap query will be used with the ad_domain_name option to find the best domain controller based on the site and Active Directory service. |
ldap_auth_server = srvads.mydomain.lan |
|
Defines the LDAP authentication base DN. If not specified, The root will be used |
ldap_auth_base_dn = dc=domain,dc=lan |
|
Defines the domain name. |
ad_domain_name = mydomain.lan |
Restart waptserver service.
8.4.2. Enabling Single Sign On (SSO) for the WAPT Console and the self-service
Warning
This configuration is only available for WAPT Servers running on WAPT supported Linux distributions.
You can use Kerberos to authenticate yourself on the waptconsole and the selfservice. This way, users do not need to enter their password.
It is not necessary to register the WAPT Agent using kerberos in order to use the kerberos SSO on the WAPT Console and in the Self-Service.
8.4.2.1. Preparing the WAPT Server for Kerberos Single Sign On
Attention
To enable Kerberos on the WAPT Server with use_kerberos = True option, launch the WAPT Server postconf script.
/opt/wapt/waptserver/scripts/postconf.sh
Please, refer to the documentation on configuring kerberos for authentication beforehand.
If you do not want to use Kerberos for Client registration, set the option allow_unauthenticated_registration to True.
Finally, restart the waptserver and wapttasks services.
systemctl restart waptserver wapttasks
You will need to modify the waptserver.ini.
Then, you will need to add these options in the
waptserver.ini:ad_domain_name = mydomain.lan use_kerberos = True
The
ldap_account_service_loginandldap_account_service_passwordrequire a service user account on your Active Directory.It is not necessary that the service account had elevated right, just enough rights to read groups and group members.
Finally, restart services on the WAPT Server:
systemctl restart waptserver wapttasks
8.4.2.2. Configuring the WAPT Agent
On the client side, you will have to make sure that theses 2 options are set in the wapt-get.ini of the WAPT Agent:
service_auth_type = waptserver-ldap
use_kerberos = True
It is possible to make changes in wapt-get.ini manually or by deploying a WAPT package with the new configuration settings.
An example package is available from the Tranquil IT repository.
With this configuration, you can launch your WAPT Console or your selfservice without being prompted for a password.
To make this feature work, the Active Directory has to be available.
Note
The WAPT Console will continue to ask for a login / password. It is perfectly normal, this way you can use another user than the current user logged in the underlying desktop session.
Otherwise, you just have to put your login and click on OK.
8.4.3. Enabling SSL/ TLS support for the LDAP connection to the Active Directory Domain Controller
By default, authentication on Active Directory relies on LDAP SSL (default port 636).
SSL / TLS is not enabled by default on Microsoft Active Directory until a SSL certificate has been configured for the Domain Controller.
Note
The WAPT Server uses Certificate Authority bundles from the operating system for validating the SSL/ TLS connection to Active Directory.
If the Active Directory certificate is self-signed or the certificate has been signed by an internal CA, you will need to add the certificates to the operating system certificate store.
To do so, just add a Certificate Authority in the /etc/pki/ca-trust/source/anchors/ and update the certificate store.
cp cainterne.crt /usr/local/share/ca-certificates/cainterne.crt
update-ca-certificates
cp cainterne.crt /etc/pki/ca-trust/source/anchors/cainterne.crt
update-ca-trust
certutil -addstore -f "ROOT" cainterne.crt
Once you have setup LDAP SSL/ TLS on your Active Directory (please refer to Microsoft documentation for that), then you can enable support for SSL/TLS security for AD in
waptserver.ini.
ldap_auth_ssl_enabled = True
Restart waptserver service.
8.5. Configuring Client-Side Certificate Authentication
If your business needs a public WAPT Server on Internet, it can be secured with Client-Side Certificate Authentication.
That configuration restricts the visibility of the WAPT Server only to registered WAPT clients. It is done by relying on the WAPT Agent private key generated during registration. It works as follows:
The WAPT Agent sends a CSR to the WAPT Server which the WAPT Server signs and sends back to WAPT Agent.
Using the signed certificate, the Agent can access protected parts of the Nginx web server.
Note
We strongly recommend enabling Kerberos or login / password registration in the WAPT Server post-configuration.
Warning
All actions are to be carried out on the WAPT Server
8.5.1. Enabling Client-Side Certificate Authentication on WAPT Server
Warning
For Linux check if the symbolic link in sites-enabled exists:
cd /etc/nginx/sites-enabled/
find . -maxdepth 1 -type l -ls
The expected result should be:
269091 0 lrwxrwxrwx 1 root root 36 juil. 22 15:51 ./wapt.conf -> /etc/nginx/sites-available/wapt.conf
Otherwise use the following command:
ln -s /etc/nginx/sites-available/wapt.conf ./wapt.conf
To enable the authentication, you need to add those parameters on WAPT server configuration file in the option section:
use_ssl_client_auth = True
Relaunch the post-configuring script.
Attention
Please note that as of 2026-07-24, WAPT does not support CRL, which means that when you delete a host in the WAPT Console, the host will still have access to the WAPT repository.
The WAPT Deployment utility cannot use https to retrieve the WAPT Agent, you will have to add this section in the file:
server {
  listen                      80;
  listen                      [::]:80;
  server_name                 _;

  location ~ ^/(wapt/waptsetup-tis.exe|wapt/waptagent.exe|wapt/waptdeploy.exe)$ {
      add_header Cache-Control "store, no-cache, must-revalidate, post-check=0, pre-check=0";
      add_header Pragma "no-cache";
      root "/var/www";
  }

  return 301                  https://$host$request_uri;
}