1. Getting start creating WAPT packages
1.1. Setting up your WAPT development and test environment
1.1.1. Prerequisites
Attention
It is required to be a Local Administrator of the host to use WAPT’s integrated environment for developing WAPT packages.
We advise you to create/ edit packages in a fully controlled environment that is safe and disposable.
The usage of a disposable virtual host (like Virtualbox) is recommended.
Import the tis-waptdev package in your local repository and install it on your development computer.
1.1.2. Recommendations regarding the test environment
The recommended method to correctly test your WAPT packages is to use representative sample of hosts in your inventory. So the more heterogeneous your installed base of hosts, the larger your sample should be.
This method consists of testing the installation of the package on as many platforms and configurations as possible, so to improve its reliability, before the WAPT package is transferred to production repositories.
To explain how package maturities work, you can refer to this video for a detailed overview.
1.1.3. Testing method
1.1.3.1. Operating systems and architectures
Desktop Operating Systems
Windows XP |
Windows 7 |
Windows 10 |
Windows 11 |
Redhat and derivatives |
Debian and derivatives |
Server Operating Systems
Windows Server 2008 R2 |
Windows Server 2012 and R2 |
Windows Server 2019 |
Architectures
x86 |
x64 |
Deployment Environments
Physical and virtual hosts |
Laptops |
When possible, RC and Beta version of Operating Systems should be tested.
1.1.3.2. State of Windows Updates
Microsoft Windows host without any Windows update installed: the objective is to detect Windows updates that are required for the software to work properly and to adapt the WAPT package accordingly;
Microsoft Windows host with all the latest Windows updates: the objective is to detect Windows updates that break the package and to adapt the WAPT package accordingly;
1.1.3.3. State of software installations
Hosts with many installed packages: the objective is to detect a possible dependency with an existing application;
Hosts with many installed packages: the objective is to detect a possible conflict with an existing application;
Install older versions of the software: it is possible that the software installer does not support uninstalling a previous version of the software, in this case, the WAPT package will have to remove older versions of the software before installing the new version;
1.2. Principles of creating package template from the WAPT Console
Attention
To create WAPT packages directly from the WAPT Console, it is necessary to have installed the WAPT development environment tis-pyscripter3 or tis-vscode. It is NOT recommended to use tis-pyscripter4.
We recommand you to download the tis-waptdev package instead and install it on your computer on which you will create WAPT packages.
If you do not remember how to download a package from the Tranquil IT store, please see how to download package in your private repository.
If you do not remember how to install a package, please see how to install a package on a host.
1.2.1. Creating a package template from the WAPT Console
We use the 7-zip MSI setup downloaded from the 7-zip official website.
Create a WAPT package Template from the installer.
In the WAPT Console, click on Tools –> Make package from setup from file:
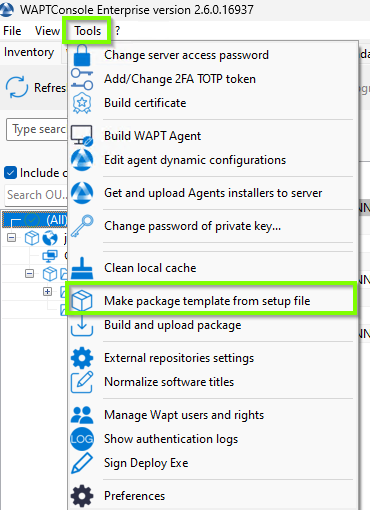
Menu option for creating a WAPT package template in the WAPT Console
Select the downloaded MSI setup file (Windows installer(.msi/.msix/.exe)) and fill in the required fields. Verify that the package name does not contains any version number.
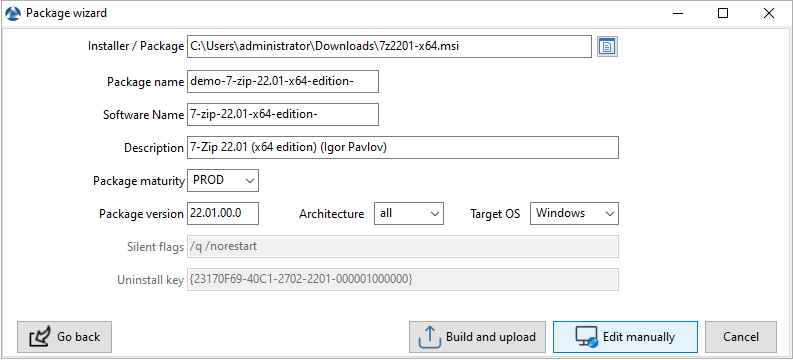
Dialog box requesting information when creating the WAPT package in the WAPT Console
Two solutions are available:
Click on Edit manually (recommended) to verify the WAPT package and customize it to your Organization’s specific needs.
Click on Build and upload to directly build and upload the package into your private repository.
Warning
The button Build and upload directly uploads the package into the private repository without testing.
This method works relatively well with MSI installers because their installation is more standardized.
However, the first method that consists of first testing locally the package before uploading is the recommended method.
Note
If you prefer to use the command line, you can use this method.
1.2.2. Customizing the WAPT package before uploading it to the repository
Before uploading a package to your WAPT repository, you may choose to customize its behavior to your Organization’s needs by editing it with PyScripter.
When creating the package template, click on Edit manually.

“Edit manually” button in dialog box
A new dialog box will appear, advising that the WAPT package has been downloaded to the WAPT repository.
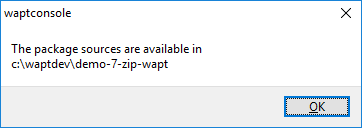
Package Creation Information
The PyScripter IDE launches automatically to allow you to edit files in the WAPT package.
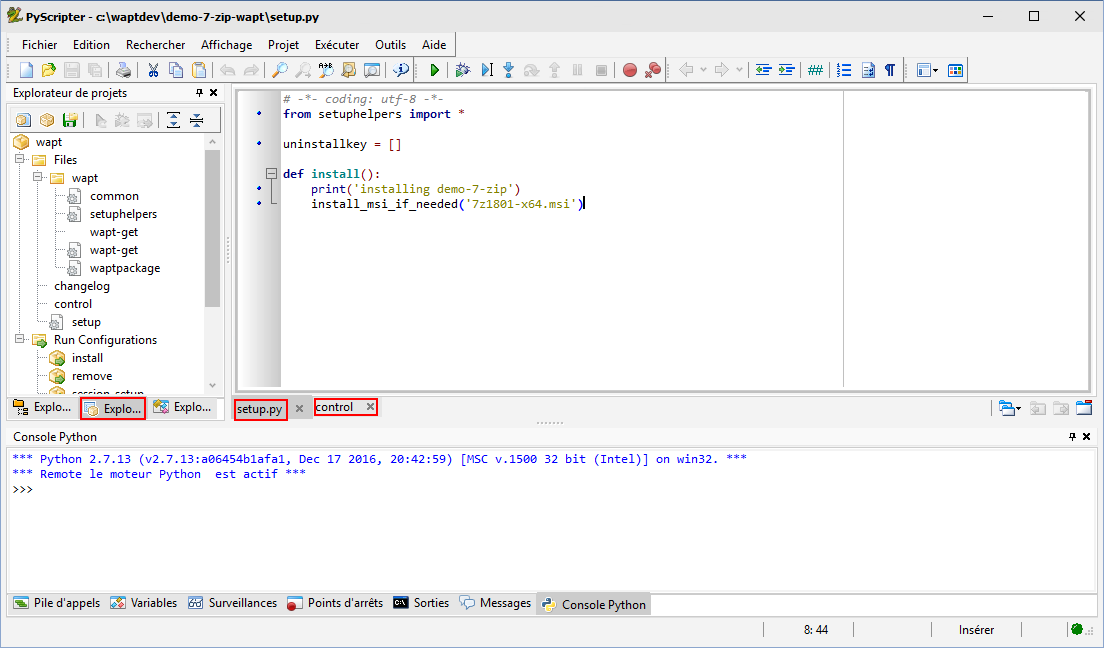
PyScripter - Customizing a WAPT package within PyScripter
1.2.3. Presentation of PyScripter
1.2.3.1. PyScripter project explorer
This is the initial view of the Pyscripter explorer when you open a WAPT Package.
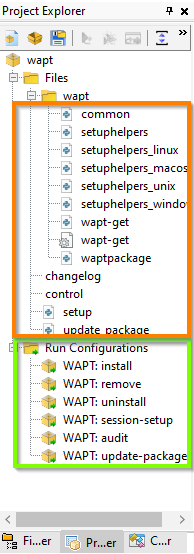
PyScripter - Navigating a project within the PyScrypter file explorer
The PyScripter project explorer lists the different files that you might need, notably the control file and the setup.py file.
1.2.3.2. Editor panel
The editing panel in orange in the image above.
The edition panel in PyScripter allows to edit the setup.py file and the control file.
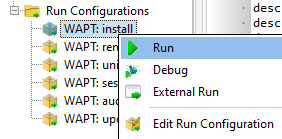
1.2.3.3. Run Configurations
In the image above, the green box highlights the pre-installed configurations.
The Run option in the project explorer of PyScripter will allow you to launch actions on the packages that you are editing.
These functions are explained in the table below.
Function |
Description |
|---|---|
install |
Used to install the package on the system of our test machine. |
remove |
Used to uninstall the package from the system of the test machine. |
uninstall |
Enables you to run a custom uninstall of the test machine package. |
session_setup |
Allows the package to be installed via the user context of the test machine. |
session_cleanup |
Enables to clean up changes made in the user context |
audit |
Enables the package to be audited. |
update-package-source |
Enables automation of a software package binary. |
1.2.3.4. Python console
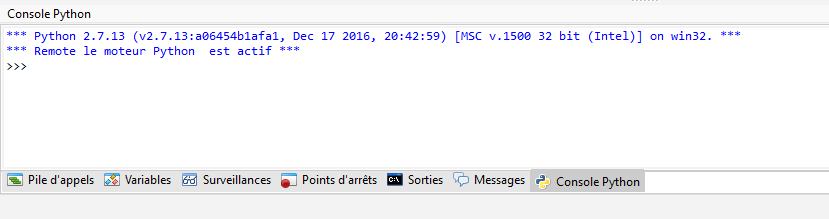
PyScripter - Running the Python console from within Pyscripter
This is the Python console visible in PyScripter, it will allow you to display the python output when you execute Run commands.
You can also use it to test/ debug portions of your script setup.py.
To learn more about the composition of a WAPT package, visit the documentation on the structure of a WAPT package.
1.2.3.5. Testing locally the installation of the WAPT package
You can then test the launch of an installation on your development station.
The PyScripter console allows you to check whether the installation went well.
1.2.3.6. Testing locally the uninstallation of the WAPT package
You can then test the uninstall script on your development station.
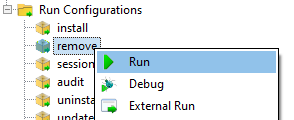
The PyScripter console allows you to check whether the uninstallation went well.
1.2.4. Exploring Package Files with the WAPT Console
To explore all the files of a WAPT package using the WAPT Console, you must enable the Show Developer Features option. To do this:
Go to the View tab in the WAPT Console.
Select Display Preferences and activate the Show Developer Features checkbox.
How to explore package files ? Navigate to WAPT Packages section, select your package and do a right-click on Edit_package
Once enabled, you can access the file explorer for the package.
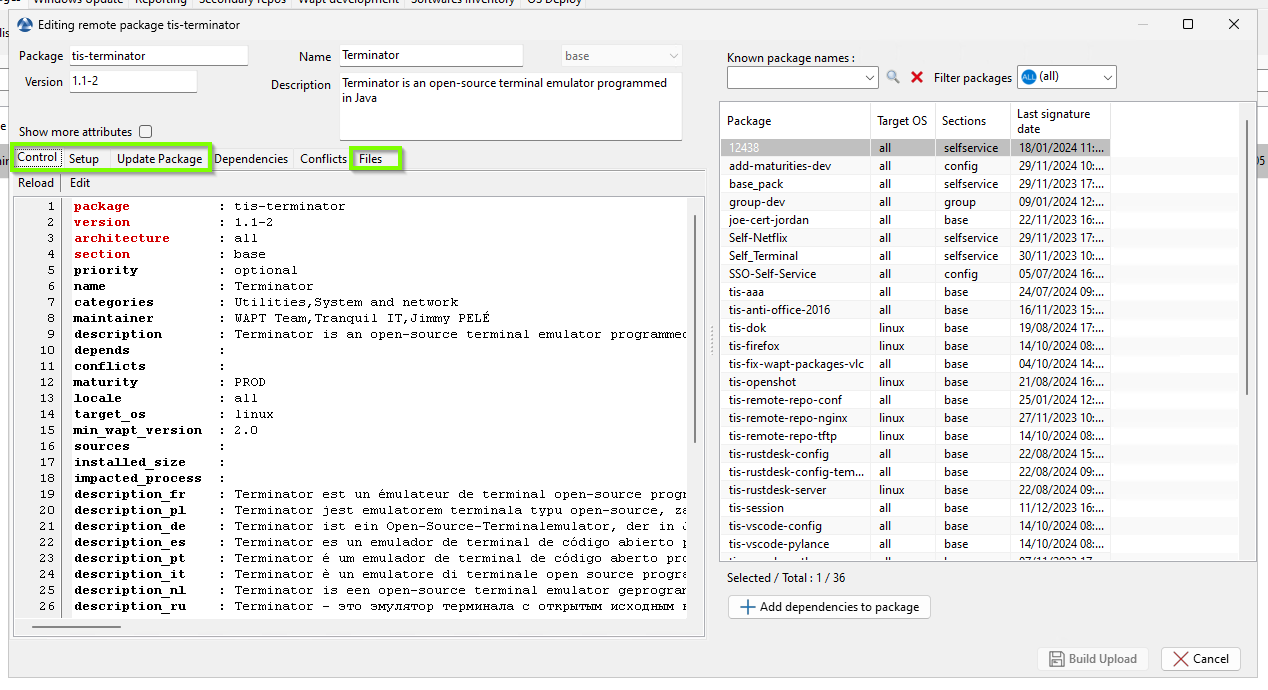
WAPT Console techview
1.3. Creating your first WAPT Packages
1.3.1. Packaging .msi packages (example)
For this example we will take tightvnc.
You can download it here.
Now, you can then generate your package template, please refer to the documentation for creating packages from the WAPT Console.
Edit the control file (architecture, impacted_process, target_os, description, maintainer …).
For more information, visit the documentation on the control file structure.
Your PyScripter opens, go to your setup.py:
# -*- coding: utf-8 -*-
from setuphelpers import *

uninstallkey = []

def install():
    print('installing tis-tightvnc')
    install_msi_if_needed('tightvnc-2.8.5-setup-64bit.msi')
The function will test whether a version of the software is already installed on the host using the uninstall key.
If the uninstall key is already present, the new version of the software will be installed only if the installed version is older.
After the installation, the function will finally test that the uninstall key is present and its version, to ascertain that all went well.
Options (Default Option) |
Description |
|---|---|
|
Defines the minimal version above which the software will update. |
|
Lists the programs to kill before installing the package. |
|
Defines the accepted codes other than 0 and 3010 returned by the function. |
|
Defines the maximum installation wait time (in seconds). |
|
Defines the additional properties to pass as arguments to MSI setup file. |
|
Defines the value passed as parameter to control the version number instead of the value returned by the installed_softwares function. |
|
Automatically removes an older version of a software whose uninstall key is identical. |
|
Forces the installation of the software even though the same uninstall key has been found. |
The wapt-get install_msi_if_needed method searches for an uninstall key in the MSI file properties, it is not necessary to fill it manually in the setup.py file.
You also do not have to fill in killbefore if the value specified in the impacted_process field of the control file is correct.
Note
The setup.py could have looked like this, but the method is less elegant because it does less checking.
# -*- coding: utf-8 -*-
from setuphelpers import *

uninstallkey = ["{8B9896FC-B4F2-44CD-8B6E-78A0B1851B59}"]

def install():
    print('installing tis-tightvnc')
    run('msiexec /norestart /q /i "tightvnc-2.8.5-setup-64bit.msi"')
Run the installation and see what happens when the software is already installed.
wapt-get -ldebug install C:\waptdev\tis-tightvnc-wapt
Installing WAPT file C:\waptdev\tis-tightvnc-wapt
MSI tightvnc-2.8.5-gpl-setup-64bit.msi already installed. Skipping msiexec

Results:

=== install packages ===
C:\waptdev\tis-tightvnc-wapt | tis-tightvnc (2.8.5.0-1)
1.3.1.1. Passing additional arguments
To pass additional arguments, store them in a dict.
# -*- coding: utf-8 -*-
from setuphelpers import *

uninstallkey = []

properties = {
    'SERVER_REGISTER_AS_SERVICE': 0,
    'SERVER_ADD_FIREWALL_EXCEPTION': 0,
    'ADDLOCAL': 'Server,Viewer'

    }

def install():
    print(u'Installation en cours de TightVNC')
    install_msi_if_needed('tightvnc-2.8.5-setup-64bit.msi', properties = properties )
Note
The setup.py could have looked like this, but the method is less elegant because it does less checking.
# -*- coding: utf-8 -*-
from setuphelpers import *

uninstallkey = ["{8B9896FC-B4F2-44CD-8B6E-78A0B1851B59}"]

def install():
    print('installing tis-tightvnc')
    run('msiexec /norestart /q /i "tightvnc-2.8.5-setup-64bit.msi" SERVER_REGISTER_AS_SERVICE=0 SERVER_ADD_FIREWALL_EXCEPTION=0')
1.3.1.2. Video demonstration
1.3.2. Packaging .exe packages (example)
Download the .exe installer from a reliable source.
Download the installer in exe format Firefox ESR x64 on https://download.mozilla.org/?product=firefox-esr-latest-ssl&os=win64.
Look up documentation relating to silent flags:
On the Official Mozilla website.
Other methods for finding information on silent flags:
Search on the Internet with the search terms: Firefox silent install.
Then generate your package template, please refer to the documentation for creating packages from the WAPT Console. PyScripter loads up and opens the .exe package project.
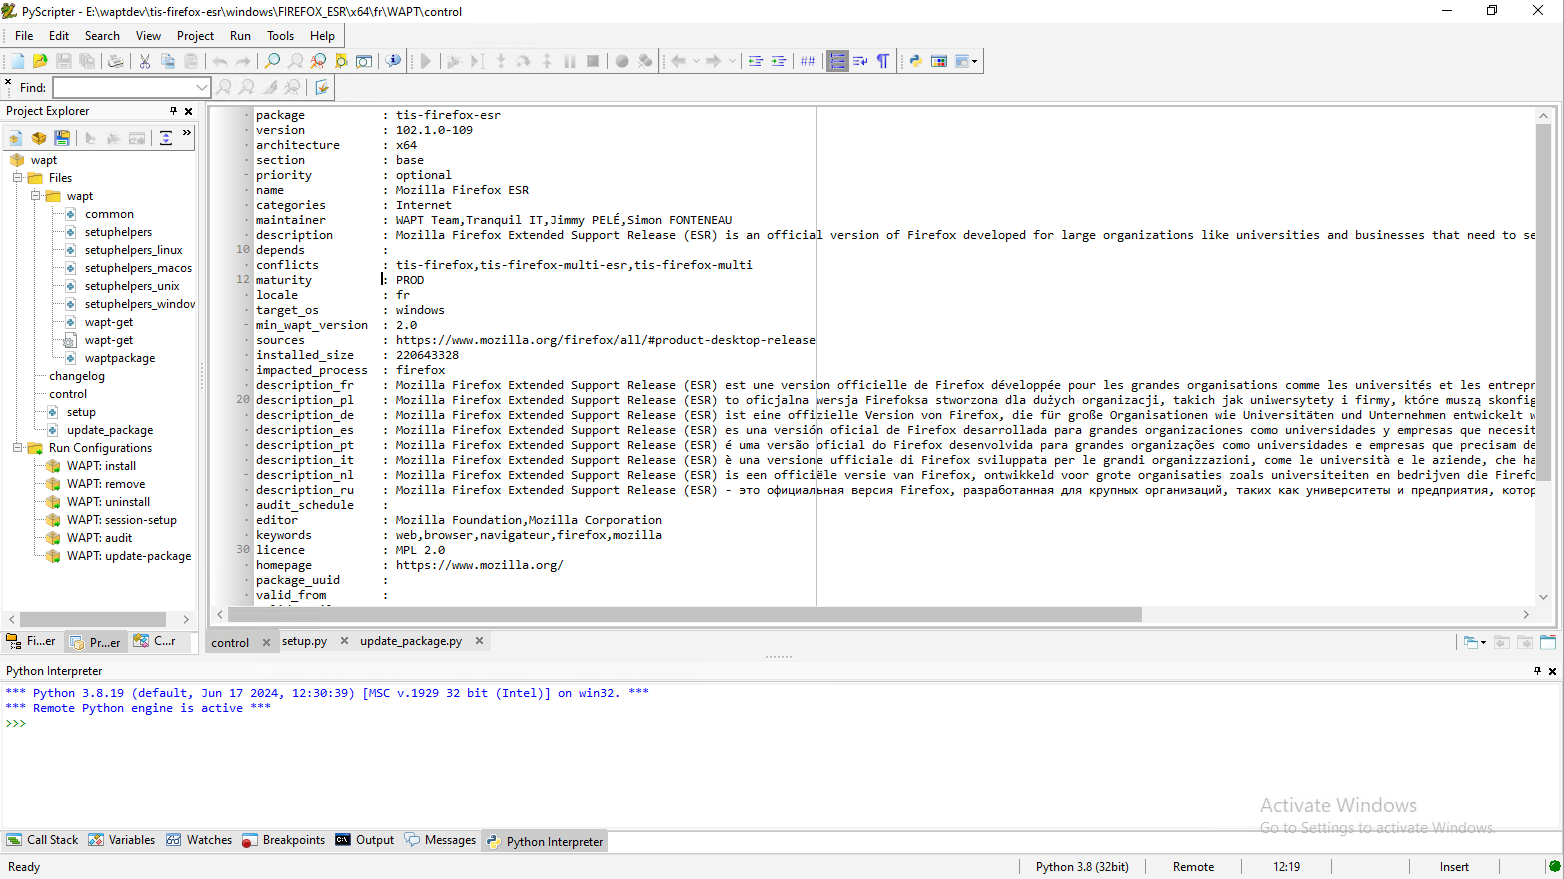
PyScripter - Opening the FirefoxESR WAPT package
Edit the
controlfile (architecture,impacted_process,target_os,description,maintainer…). For more information, visit the documentation on the control file structure.Check the
controlfile content. Mozilla Firefox-ESR does not comply to industry standards and returns an erroneous version number (it appears to be the installer packaging software version number).Original
controlfile.package : tis-firefox-esr version : 4.42.0.0-0 architecture : all section : base priority : optional maintainer : user description : automatic package for firefox setup 52.6.0esr impacted_process :
Modified
controlfile.package : tis-firefox-esr version : 52.6.0-1 architecture : all section : base priority : optional maintainer : Tranquil-IT Systems description : Mozilla Firefox 52.6.0 ESR impacted_process : firefox.exe
A sub-version -1 has been appended to the software version number; it is the packaging version of the WAPT package.
It allows the Package Developer to release several WAPT package versions of the same software, very useful for very rapid and iterative development.
Using install_exe_if_needed
The function is slightly the same as that used with .msi installers, with some differences:
The function requires to pass the silent flag as an argument.
The function requires to pass the uninstall key as an argument.
# -*- coding: utf-8 -*-
from setuphelpers import *

uninstallkey = []

def install():
    print('installing tis-firefox-esr')
    install_exe_if_needed("Firefox Setup 45.5.0esr.exe",silentflags="-ms",key='',min_version="4.42.0.0")
Options (Default Option) |
Description |
|---|---|
|
Defines the silent parameters to pass as arguments to the installer. |
|
Defines the software uninstall key. |
|
Defines the minimal version above which the software will update. |
|
Lists the programs to kill before installing the package. |
|
Defines the accepted codes other than 0 and 3010 returned by the function. |
|
Defines the maximum installation wait time (in seconds). |
|
Defines the value passed as parameter to control the version number instead of the value returned by the installed_softwares function. Example https://forum.tranquil.it/viewtopic.php?t=1337. |
|
Automatically removes an older version of a software whose uninstall key is identical. |
|
Forces the installation of the software even though the same uninstall key has been found. |
The package will then have this behavior:
Firefox will install only if Firefox is not yet installed or if the installed version of Firefox is less than 45.5.0, unless the
--forceoption is passed as argument when installing the package.On installing, the running firefox.exe processes will be killed (with the value indicated in
impacted_processof thecontrolfile).The function will add by itself the uninstall key, so leave the uninstall key argument empty.
When finishing the installation of the package, the function will check that the uninstall key is present on the host and that the version of Firefox is greater than 45.5.0; if this not the case, the package will be flagged as ERROR.
1.3.2.1. Finding the uninstallation key
Unlike .msi files, the key to uninstall an .exe is not in the file properties.
So you need to install the software first to know the uninstall key.
Therefore you MUST start once the installation from PyScripter with the run configuration and then install.
Once the software is installed, go to the WAPT Console, then find your development host.
In the Software inventory tab find the software title and copy the value indicated in the uninstallkey column.
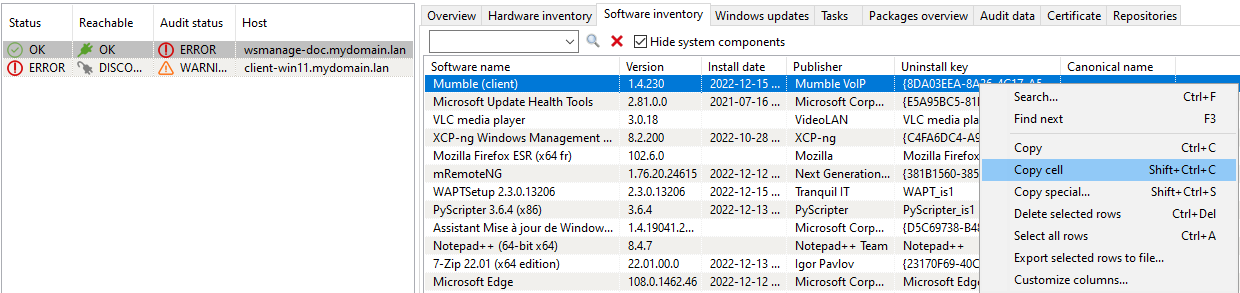
Retrieving an uninstallkey from the WAPT Console
You MUST also check the value of the version with the value indicated in min_version in your setup.py.
Modify your setup.py with the new parameters:
# -*- coding: utf-8 -*-
from setuphelpers import *

uninstallkey = []

def install():
    print('installing tis-firefox-esr')
    install_exe_if_needed("Firefox Setup 45.5.0esr.exe",silentflags="-ms",key='Mozilla Firefox 45.5.0 ESR (x64 fr)',min_version="45.5.0")
To test that your key works correctly, you MUST run an installation again in PyScripter.
WAPT should not attempt to install the software because it is already present, the following message should display:
>>>
*** Remote Interpreter Reinitialized ***
Command Line : install "c:\waptdev\tis-firefox-esr_x64_PROD_fr-wapt\WAPT\.."
Using config file: C:\Program Files (x86)\wapt\wapt-get.ini
Installing WAPT files c:\waptdev\tis-firefox-esr_x64_PROD_fr-wapt
Exe setup Firefox_Setup_78.7.1esr.exe already installed. Skipping

Results:

=== install packages ===
c:\waptdev\tis-firefox-esr_x64_PROD_fr-wapt | tis-firefox-esr (78.7.1-102)
Now you can now test the uninstallation:
You can now build and upload your package, please refer to the documentation for build and upload packages from the WAPT Console.
Note
If you leave the uninstallkey blank, uninstalling your package will not work.
1.3.2.2. Special case of a non-silent uninstaller
In some particular cases, a package using install_exe_if_needed fills in the uninstall key, but the uninstall key points to a non silent uninstaller.
We have to circumvent that problem by using a function that will remove the uninstall key at the end of the installation.
:emphasize-lines: 13

# -*- coding: utf-8 -*-
from setuphelpers import *

uninstallkey = []

def install():
    install_exe_if_needed("setup.exe",
                          silentflags="/s",
                          key='{D9E87643-0005-447E-9111-78697A9C1595}',
                          min_version="14.0")
    uninstallkey.remove('{D9E87643-0005-447E-9111-78697A9C1595')

def uninstall():
    run(r'"C:\Program Files\Kutl\uninstall.exe" /supersilent')
Hint
The uninstall feature can also be used to run code in addition to uninstalling software, ex: delete folder, delete shortcut …
1.3.2.3. Video demonstration
1.3.3. Packaging empty packages
1.3.4. Building the package and sending it to the WAPT Server
Once the package is ready, build it and send it to the WAPT Server.
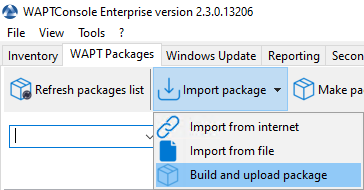
Select the package in the
c:\waptdevfolder.
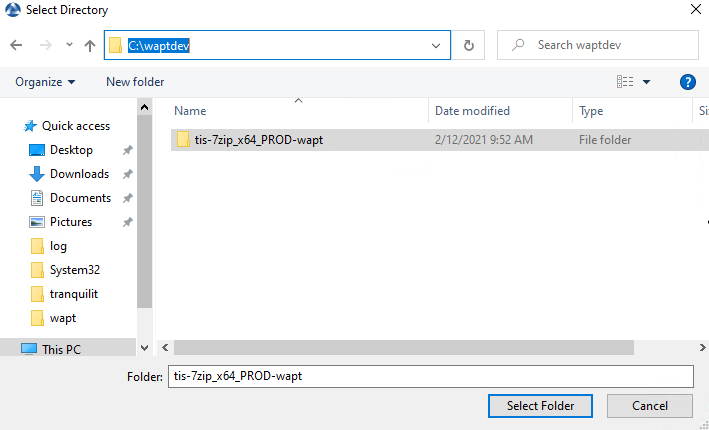
Browser window for selecting the WAPT package to import into the private repository
Confirm the selected package.
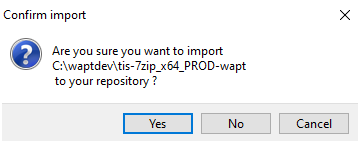
WAPT Console dialog box for confirming the importation of a WAPT package into the private repository
You have just uploaded your first wapt package.
Warning
Once your package has uploaded, refresh the package list using the Refresh packages list button or by pressing F5 on your keyboard.
1.3.4.1. Working with non standard return codes
Return codes are used to feed back information on whether a software has installed correctly.
In Windows, the standard successful return code is [0].
If you know that your WAPT packages installs correctly, yet you still get a return code other than [0], then you can explicitly tell WAPT to ignore the error code by using the parameter accept_returncodes.
You can find out how to use the accept_returncodes parameter by exploring this package code.
# -*- coding: utf-8 -*-
from setuphelpers import *
import re

uninstallkey = []

def is_kb_installed(hotfixid):
    installed_update = installed_windows_updates()
    if [kb for kb in installed_update if kb['HotFixID' ].upper() == hotfixid.upper()]:
        return True
    return False

def waiting_for_reboot():
    # Query WUAU from the registry
    if reg_key_exists(HKEY_LOCAL_MACHINE,r"SOFTWARE\Microsoft\Windows\CurrentVersion\WindowsUpdate\Auto Update\RebootRequired") or \
        reg_key_exists(HKEY_LOCAL_MACHINE,r"SOFTWARE\Microsoft\Windows\CurrentVersion\Component Based Servicing\RebootPending") or \
        reg_key_exists(HKEY_LOCAL_MACHINE,r'SOFTWARE\Microsoft\Updates\UpdateExeVolatile'):
        return True
    return False

def install():
    kb_files = [
        'windows10.0-kb4522355-x64_af588d16a8fbb572b70c3b3bb34edee42d6a460b.msu',
        ]
    with EnsureWUAUServRunning():
      for kb_file in kb_files:
          kb_guess = re.findall(r'^.*-(KB.*)-',kb_file)
          if not kb_guess or not is_kb_installed(kb_guess[0]):
              print('Installing {}'.format(kb_file))
              run('wusa.exe "{}" /quiet /norestart'.format(kb_file),accept_returncodes=[0,3010,2359302,-2145124329],timeout=3600)
          else:
              print('{} already installed'.format(kb_file))

      if waiting_for_reboot():
          print('A reboot is needed!')
Hint
The full list of Windows Installer Error Messages can be found by visiting this page.