2. WAPT Packages Overview
This page provides an overview of the different types of WAPT packages.
In WAPT, most operations revolve around the concept of a package. This includes classic software packages, as well as package template, Group packages, AD packages, WUA rules, Self-service rules, Host agent dynamic configuration packages.
All packages are accessible from the WAPT Packages tab.
All the following packages are stored in the web directory https://srvwapt.mydomain.lan/wapt/.
Warning
Before installing a package on any host, ensure the WAPT certificate is deployed to that host. You can view the certificate on the target machine in the Certificate tab under the Inventory section in the WAPT console.
2.1. Package template
Package templates are available by clicking WAPT Packages → Make package template from setup file.
Each template in this section includes a wizard to guide you through the package creation process.
WAPT offers seven types of package templates:
Windows installer (.msi/.msix/.exe) → For installing software on Windows.
Portable Windows application → For deploying portable software on Windows.
Windows Update package (.msu) → For installing out-of-band KB updates or updates required by other company services.
macOS package (.dmg/.pkg/.mpkg) → For software installation on macOS.
Linux package (.deb/.rpm) → For software installation on Debian/Ubuntu and Red Hat/CentOS systems.
Certificate package (.crt) → For deploying the WAPT certificate to machines.
Empty package → For performing custom actions on the machine (requires basic command-line or Python knowledge).
2.1.1. Editing a Package Template
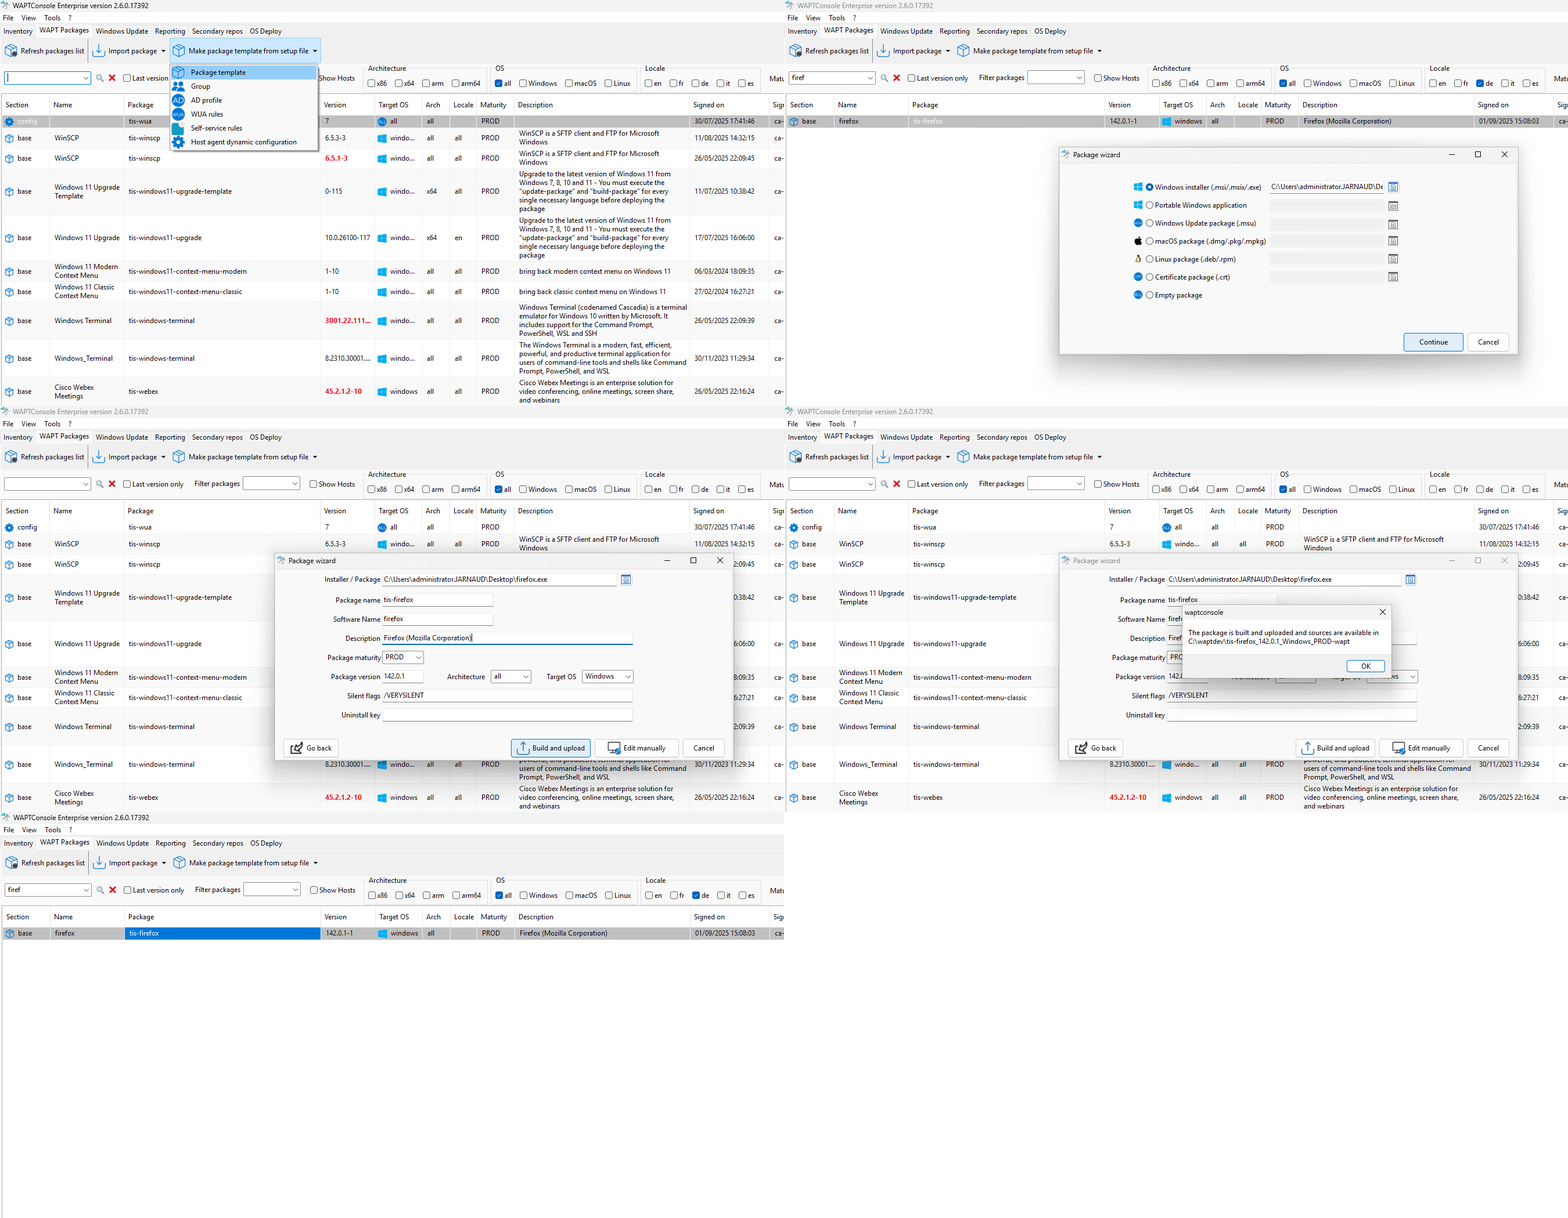
Editing a package template
Steps to Edit a Package Template:
For basic files (.msu, .crt, .msi, etc.), upload your file using the file selection button.
Click Continue in the dialog box.
In the Package Wizard, customize the package name, software name, and description.
The wizard suggests default silent installation flags. Modify these if needed (refer to the software vendor’s documentation for compatibility).
You now have three options:
Build and upload: Builds the package and uploads it to the WAPT server. The package is now ready for use.
Edit manually: Opens a code editor (PyScripter by default). Make your changes, then use Import package → Build and upload package to finalize. The package will appear in the WAPT Packages list.
Cancel: Aborts the package creation process.
Hint
The Empty package template does not include a file upload field. It directly opens the code editor and can be used to create a meta-package.
Note
If a package is installed on a workstation, removing a dependency will not uninstall the package itself.
To uninstall a package from multiple workstations, you must explicitly uninstall it.
2.2. Group Package
A Group Package allows you to bundle multiple packages into a single unit. This is particularly useful when you need to deploy the same set of packages to multiple machines. Instead of installing each package individually, you can deploy a single Group Package containing all the required packages.
Group Packages are often used to deploy certificates or basic tools (e.g., tis-vlc, tis-thunderbird, tis-7zip) to specific Organizational Units (OUs) or machines.
2.2.1. Editing a Group Package
This package template is available via: Make package template from setup file → Group.
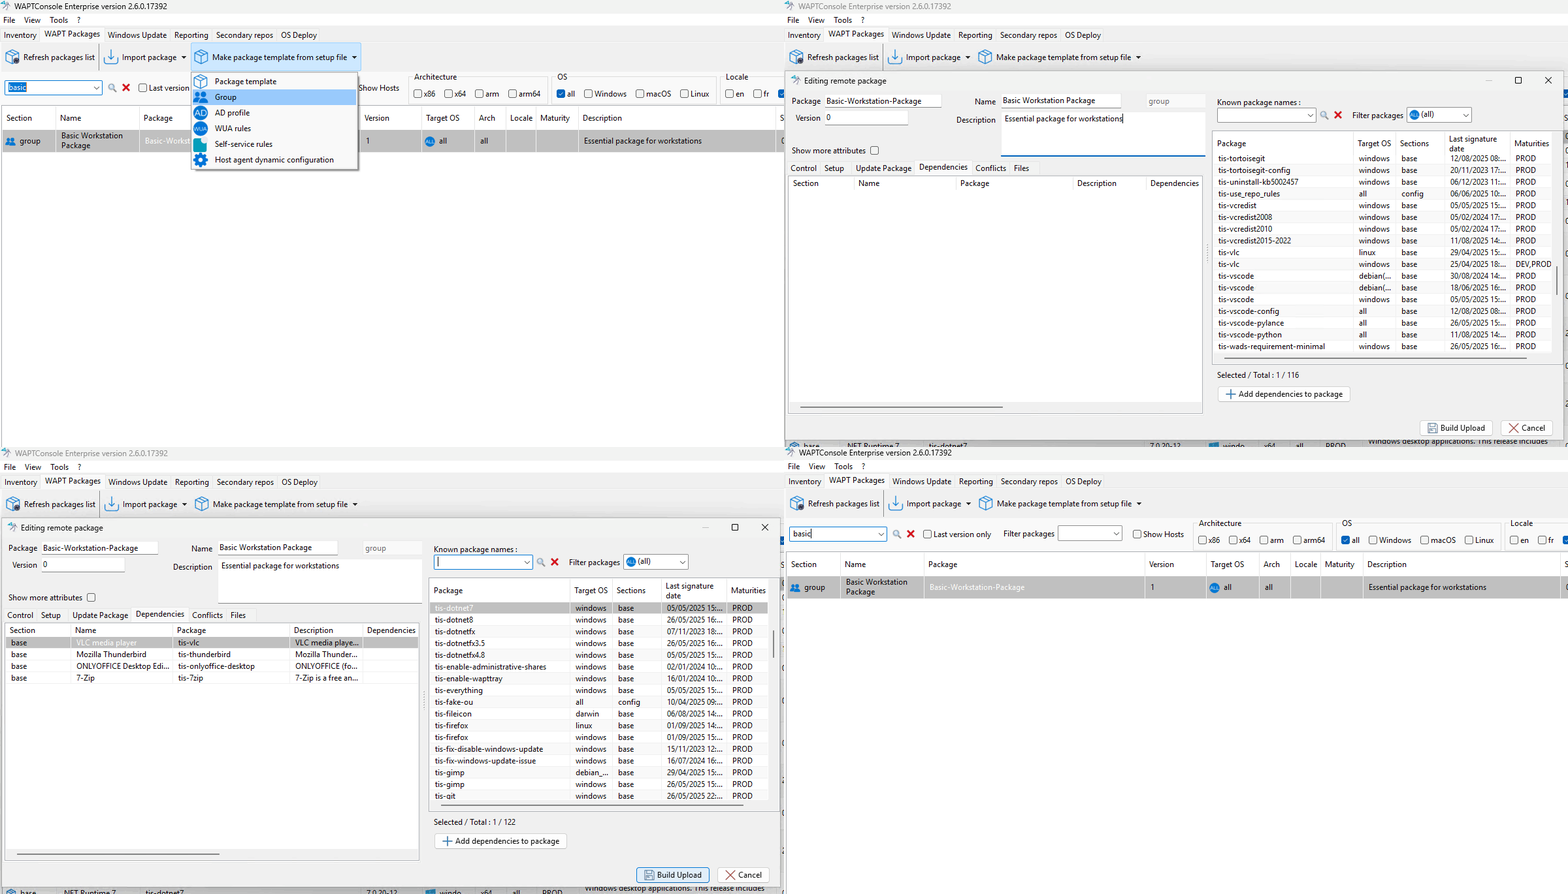
Editing a Group Package
Steps to Edit a Group Package:
Customize the package fields:
Provide a name and description.
By default, the initial version is set to 0.
Add dependencies:
By default, the Group Package opens in the Dependencies tab.
To add a package as a dependency:
Select a package from the right panel and add it as a dependency to the Group Package.
Alternatively, drag and drop the package from the right panel to the left.
Add conflicting packages (optional):
Conflicting packages allow you to specify packages that should be uninstalled when this Group Package is installed.
Finalize the Group Package:
Once the Group Package is complete, click Build Upload.
Your Group Package is now ready for deployment.
Note
If a package is installed on a workstation, removing a dependency will not uninstall the package itself.
To uninstall a package from multiple workstations, you must explicitly uninstall it.
2.3. AD Profile
The AD Profile package is designed to work with Active Directory computer groups. Unlike standard packages, AD Profile packages operate dynamically based on Active Directory group membership:
The WAPT Agent automatically retrieves the list of Active Directory groups to which the host belongs.
If an AD Profile package has the exact same name (case-sensitive) as an Active Directory group, the WAPT Agent will automatically install the corresponding profile package for that group.
If the host is removed from an Active Directory group, the associated AD Profile package will be uninstalled.
AD Profile packages are not explicitly assigned to the host (e.g., as dependencies in the host package). Instead, they are implicitly managed by the WAPT Agent’s dependency engine during WAPT upgrades.
Note
For performance reasons, this feature is only enabled if the use_ad_groups option is set to True in the wapt-get.ini configuration file.
Important
Requirements:
The name of the AD group and the AD Profile package must match exactly (case-sensitive).
Use the AD button to search for the Active Directory computer group and avoid typing errors.
Example:
AD Security Group:
hw_laptopsWAPT Profile Package:
hw_laptops
2.3.1. Editing an AD Profile Package
You can create an AD Profile Package with Make package template from setup file → AD profile.
A window will open, prompting you to select which WAPT packages you want to include in the new AD Profile Package.
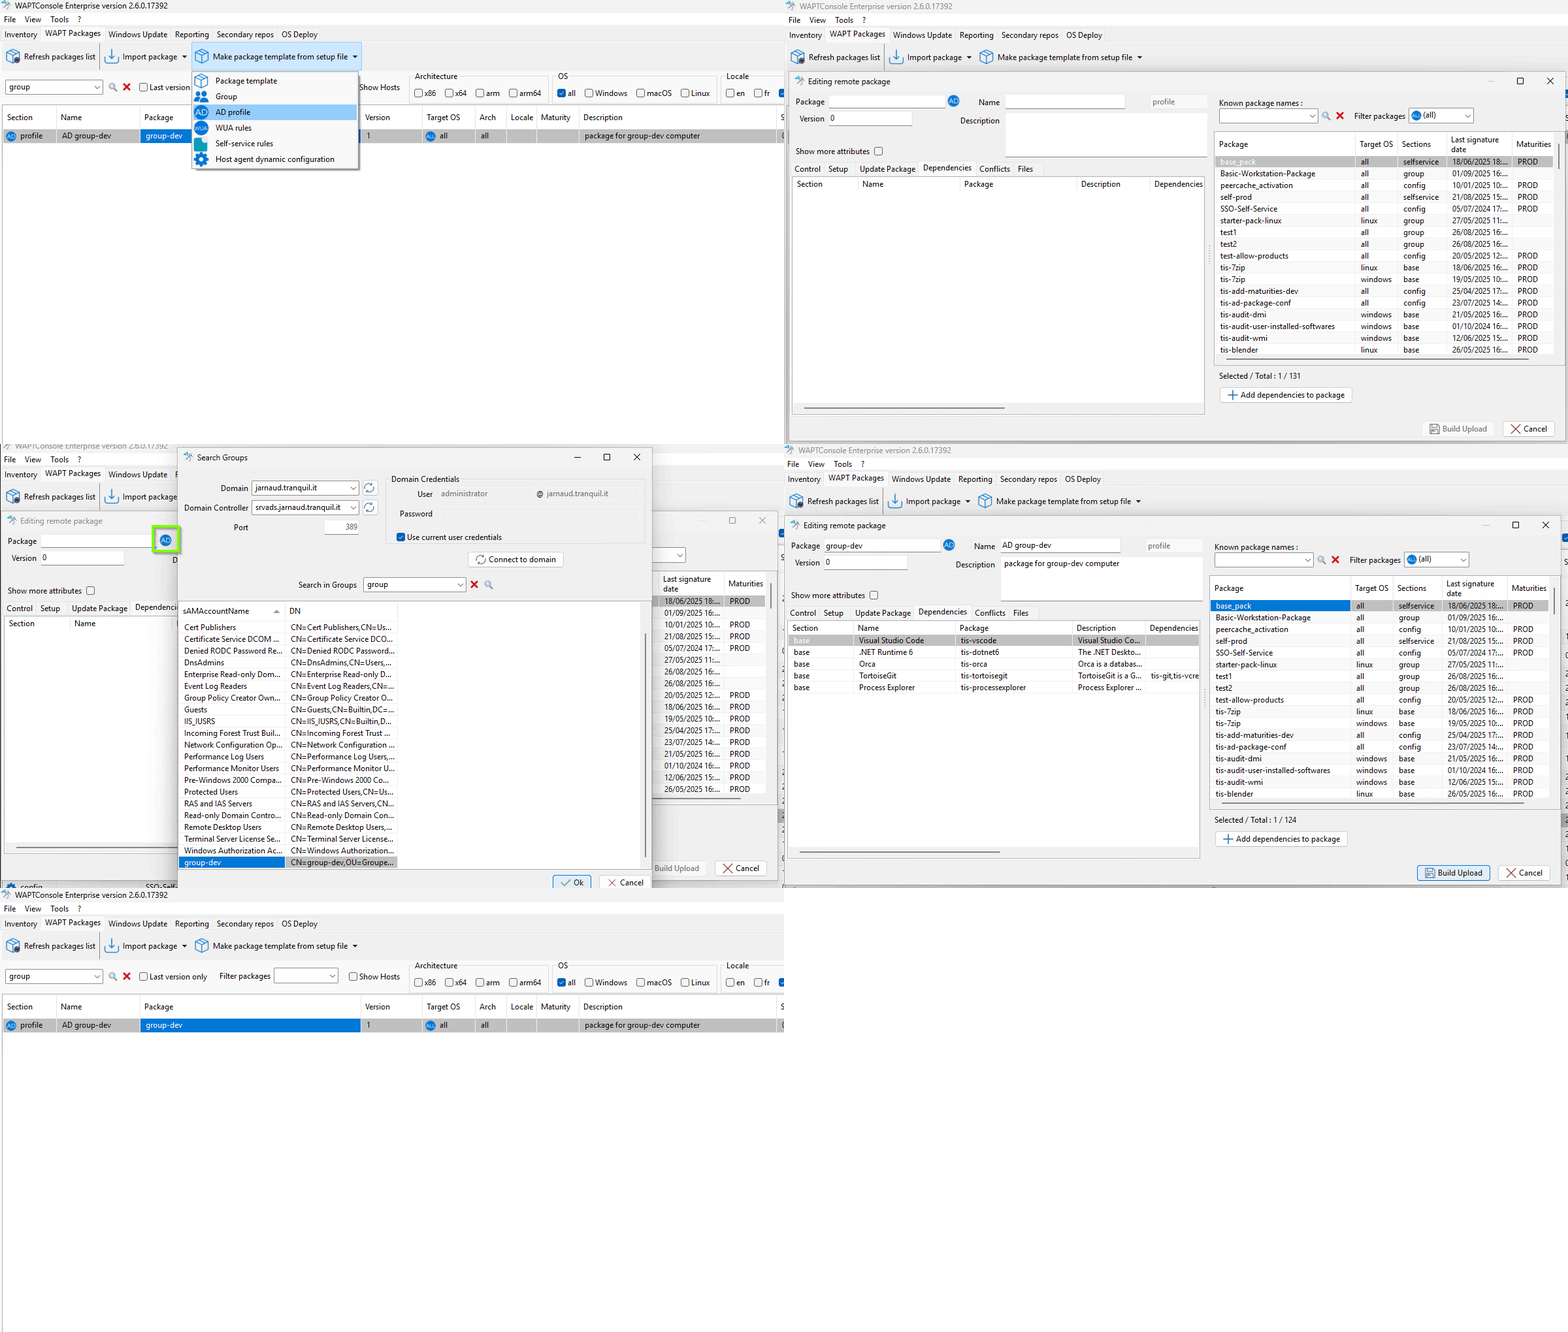
Editing an AD Profile Package
Steps to Edit an AD Profile Package:
Set the package name:
Fill in the package name field with the exact name of the Active Directory (AD) computer group (use the AD button to assist you).
Provide a version number and description.
Add packages to the profile:
Select packages from the right panel and move them to the left panel (Dependencies tab).
You can also drag and drop packages using your mouse.
Finalize the package:
Click Build Upload to complete the process.
Your AD Profile Package is now ready for automatic deployment.
Note
If a package is installed on a workstation, removing a dependency will not uninstall the package itself.
To uninstall a package from multiple workstations, you must explicitly uninstall it.
2.4. WUA rules
For more information about WAPTWUA, see this documentation.
When a WAPTWUA package is installed on a host, it informs the WAPTWUA Agent which KBs are authorized or forbidden.
If multiple WAPTWUA packages are installed on the same host, their rules are merged.
Important
If a .cab file is neither authorized nor forbidden in any WAPTWUA package, the WAPT Agent will use the default_allow setting from wapt-get.ini:
If
default_allowis set toTrue, only forbidden.cabfiles must be explicitly specified.If
default_allowis set toFalse, only authorized.cabfiles must be explicitly specified.
Hint
To safely test Windows Updates:
Set the default maturity level of the WAPTWUA package to
PREPROD.Test the updates on a small group of PREPROD hosts.
If the updates work as expected, deploy them to the entire fleet of computers.
2.4.1. Editing a WUA Rules Package
To create or edit a WUA Rules Package, go to: Make package template from setup file → WUA Rules.
You can also manage WUA Rules directly from the WAPT Packages tab.
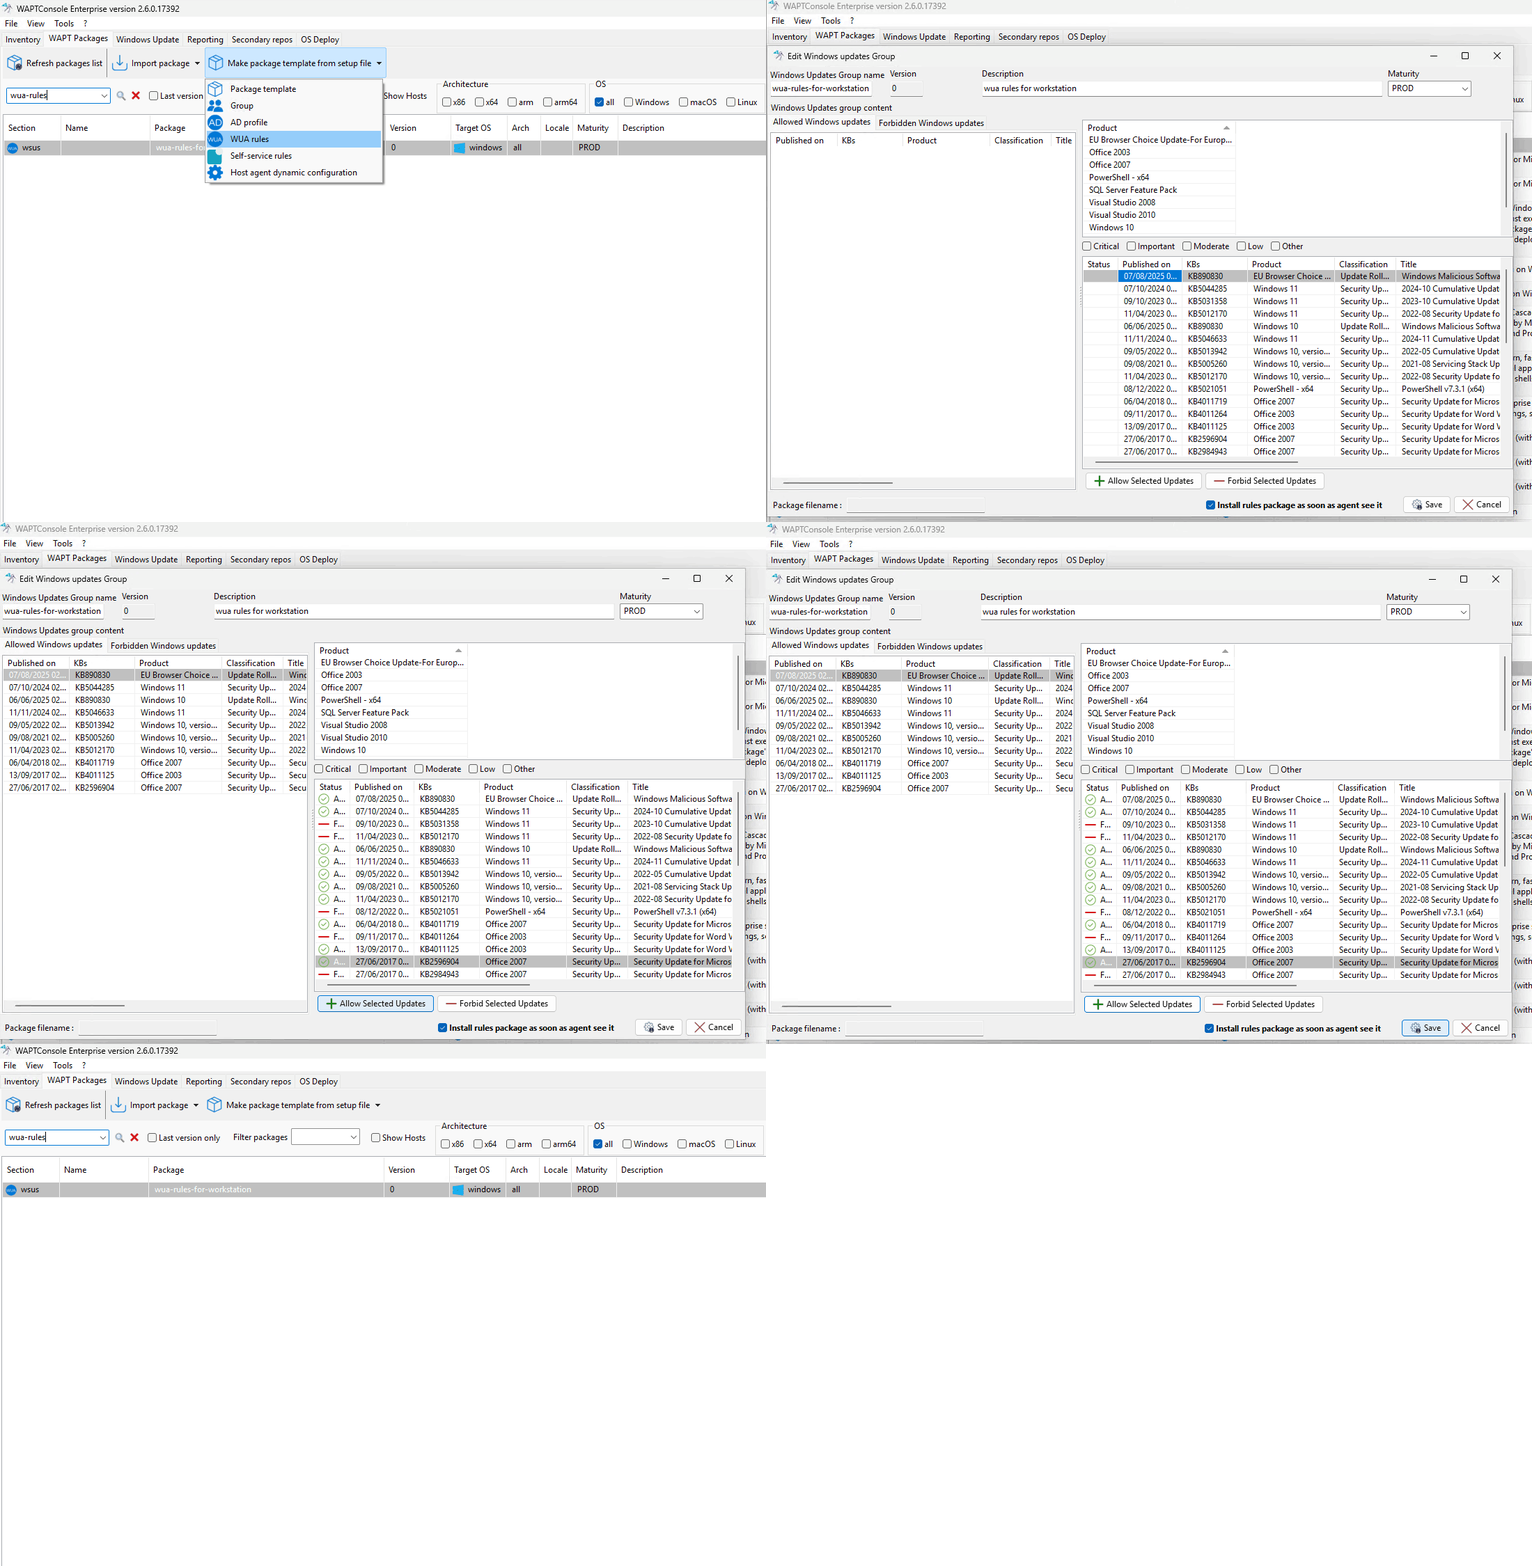
Editing a WUA Rules Package in the WAPT Console
Steps to Edit a WUA Rules Package:
Set the package details:
Provide a name, description, and select the maturity level.
Manage Windows Updates (KBs):
For each update (KB), you can:
Authorize the update by clicking Allow Selected Updates.
Block the update by clicking Forbid Selected Updates.
Save your changes:
Click Save to finalize the package.
Your WUA Rules Package is now ready for use.
2.5. Self-Service Rules Package
A Self-Service Rules Package defines which users or groups (Active Directory or local) are authorized to install specific packages independently. This allows users to install approved software without requiring administrative intervention.
The WAPT Self-Service feature is automatically available on any workstation with the WAPT Agent installed.
Note
To enable package filtering for Local Administrators, set the following parameter in the WAPT configuration: waptservice_admin_filter = True.
This ensures that Local Administrators only see the packages they are explicitly authorized to install.
2.5.1. Editing a Self-Service Rules Package
To create a Self-Service Rules Package, follow these steps: Make package template from setup file → Self-service rules.
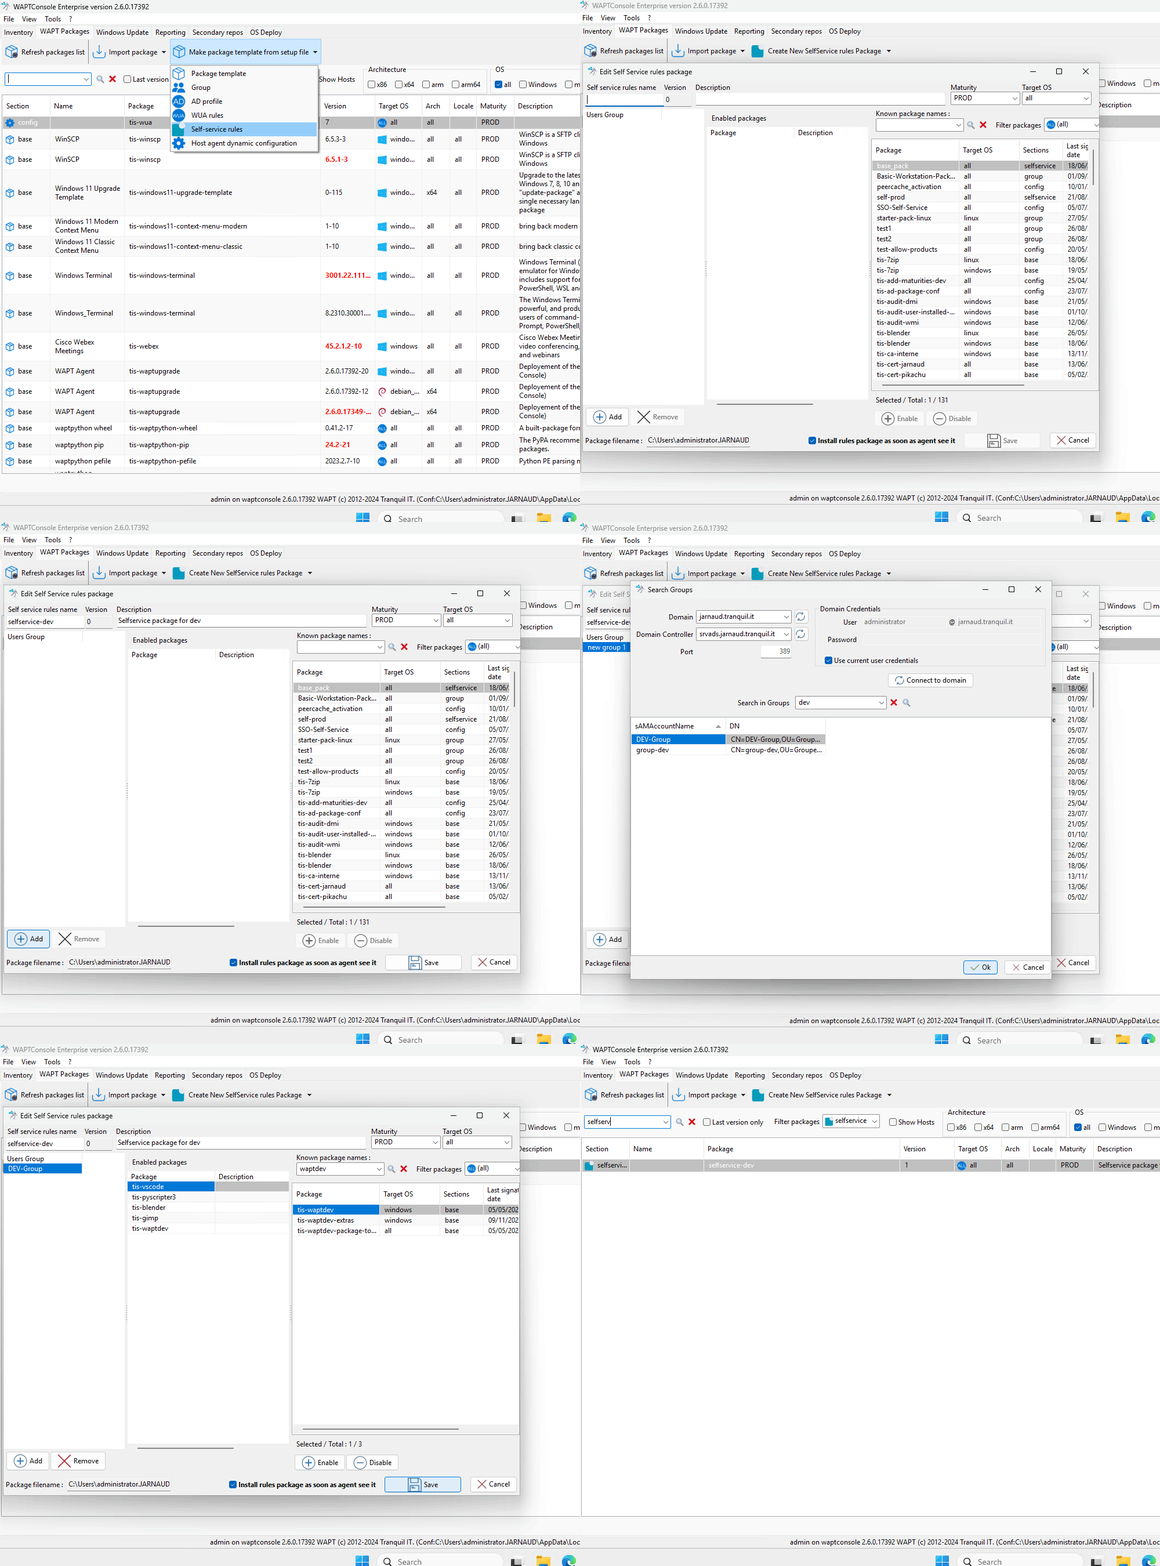
Editing a Self-Service Rules Package
Steps to Edit a Self-Service Rules Package:
Set the package details:
Enter a name, description, and select the maturity level and target operating system.
Add user groups:
In the left panel, click Add and right-click on Users Groups.
Press F2 to rename the group to match an Active Directory (AD) group in your domain (case-sensitive).
Alternatively, right-click on Users Groups and select Search in domain.
Enter your domain credentials.
Click Connect to domain.
Select the user groups you want to include.
Add authorized packages:
Select a package from the left panel and click Enable to add it to the self-service list.
Alternatively, drag and drop the package into the center panel.
Save your changes:
Click Save to finalize the package.
Your Self-Service Rules Package is now ready for use.
2.6. Host Agent Dynamic Configuration
Configuration packages allow you to modify the WAPT Agent’s configuration parameters. This approach enables the use of a generic WAPT Agent while customizing its behavior through host-specific profiles.
For example:
Some hosts may require different WAPTWUA rules.
Others may need to be set to a DEV maturity level.
Note
To view or edit the WAPT Agent configuration for a specific computer:
Select the computer in the WAPT Console.
Right-click and choose Show Host’s WAPT Agent Configuration.
A window will appear, displaying the current configuration and the configuration packages applied to the computer.
2.6.1. How Dynamic Configuration Works
When a dynamic configuration package is applied, it creates a section named default-“X” (e.g., default-global, default-waptwua, or default-reposync) in the wapt-get.ini file.
To view the currently applied parameters, refer to the default-“X” section.
The original “X” section displays the initial configuration of the agent.
Additionally, the JSON configuration files for these packages are stored in: C:\Program Files (x86)\wapt\conf.d\.
Each file follows the naming convention: <configpackagename>.json.
2.6.2. Configuration Package Interface
When you open a configuration package, you can access up to three different tabs (or two if WUA is not enabled during post-configuration):
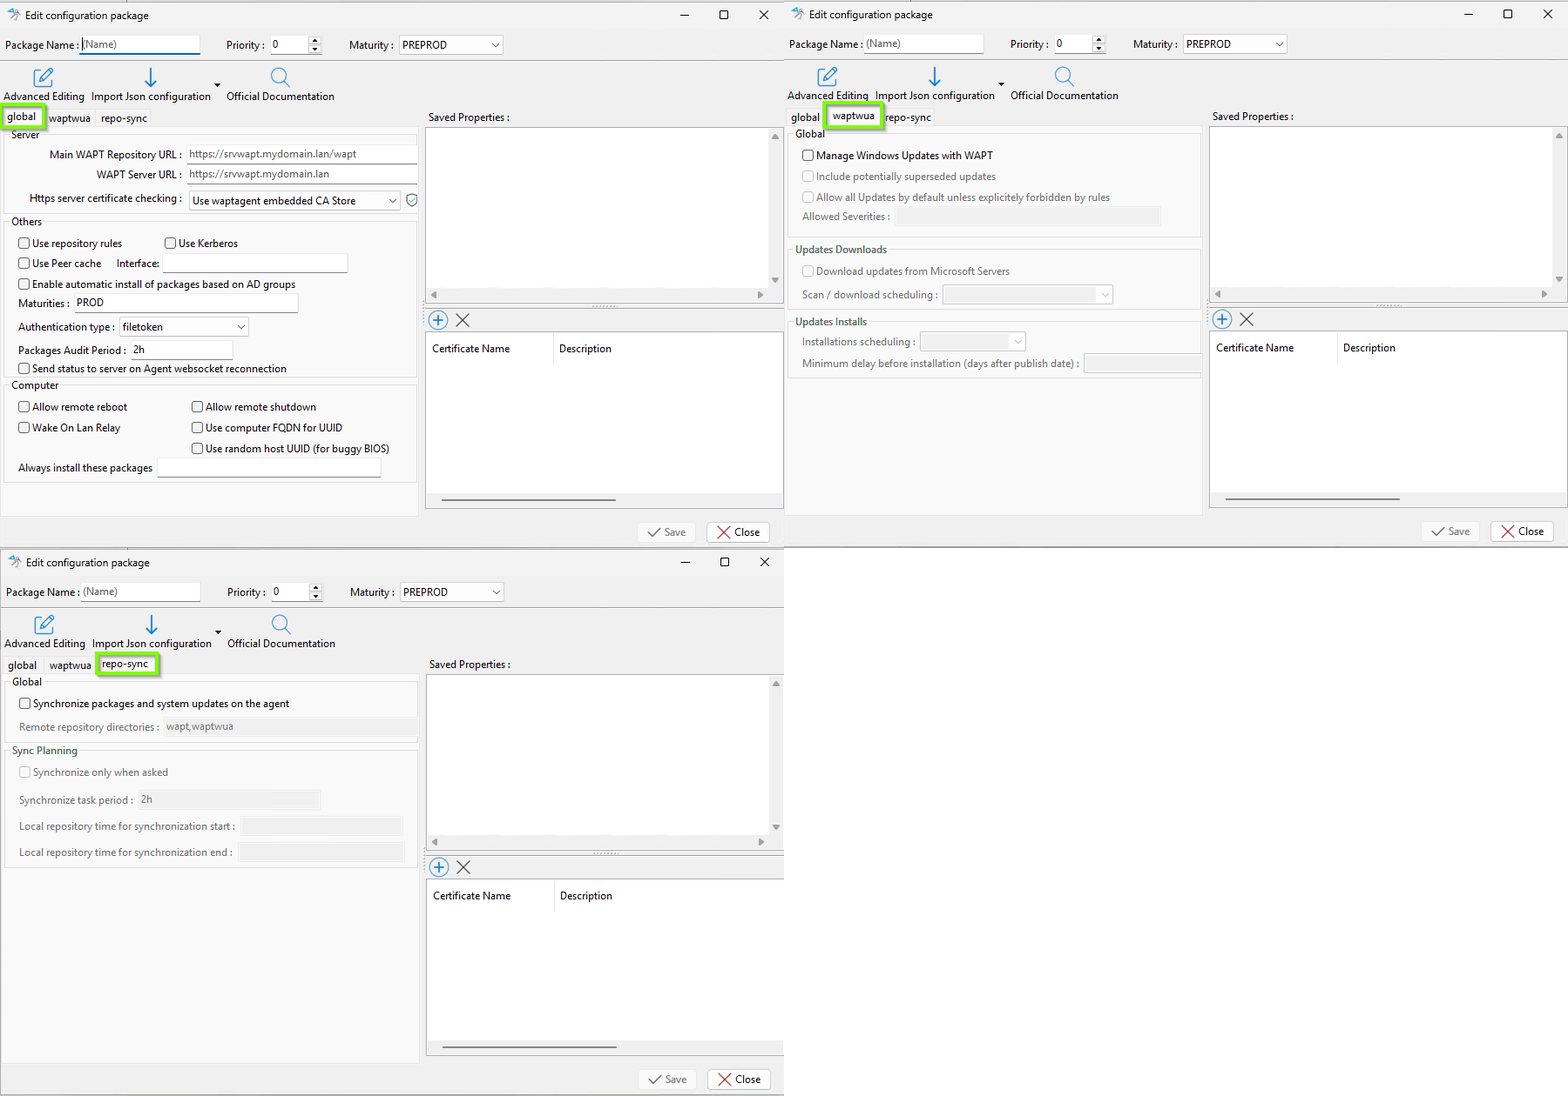
Tabs in a Configuration Package
Options |
Description |
Example |
|---|---|---|
repo_url |
Define the main WAPT repository URL |
repo_url = https://srvwapt.my.domain.lan/wapt |
wapt_server |
Define the wapt server URL |
wapt_server = https://srvwapt.my.domain.lan |
verify_cert |
Defines whether the HTTPS certificate client authentication is activated on the WAPT Server. |
verify_cert = 0 |
Use repository rules |
Enable (1) or disable (0) the repository rules for the waptagent repository documentation. |
Use repository rules = 1 |
use_kerberos |
Defines whether Kerberos authentication of the WAPT Agents is to be used with the WAPT Server, yes (1) or not (0). |
use_kerberos = 1 |
peercache_enable |
enable the function of peercache on the waptagent peercache documentation |
peercache_enable = 1 |
peercache_interface_name |
specifies the interface on which you want to run peercache. Indicate the full IP as specified by ipconfig. |
peercache_interface_name = 192.168.1.0 |
use_ad_groups |
Enable or disable automatic install of packages based on AD groups AD profile package |
use_ad_groups = 1 |
maturities |
List of package maturities than can be viewed and installed by WAPT Agent. Default value is |
maturities = PROD,PREPROD |
service_auth_type |
Sets how the self service authentication works. Possible values are: system, waptserver-ldap, waptagent-ldap or filetoken. |
service_auth_type = filetoken |
waptaudit_task_period |
Defines the frequency at which audits are triggered (hh:mm). |
waptaudit_task_period = 2h |
update_server_status_on_connect |
Send (1) or not send (0) status to server on Agent websocket reconnection. |
update_server_status_on_connect = 0 |
allow_remote_reboot |
Enable (1) or disable (0) a remote reboot on the waptagent. |
Allow_remote_reboot = 1 |
allow_remote_shutdown |
Enable (1) or disable (0) a remote shutdown on the waptagent. |
allow_remote_shutdown = 1 |
wol_relay |
Enable (1) or disable (0) the Wake On Lane for the waptagent. |
wol_relay = 1 |
use_fqdn_as_uuid |
authorise (1) or not authorise (0), to use computer FQDN for UUID. |
use_fqdn_as_uuid = 0 |
use_random_uuid |
authorise (1) or not authorise (0), to use_random host UUID. |
use_random_uuid = 0 |
host_profiles |
Alway install somes specify packages. If these packages are manually removed, they will be reinstalled on next upgrade. |
host_profiles = tis-7zip, tis-waptupgrade |
Options |
Description |
Example |
|---|---|---|
enabled |
enable (1) or disable (0) the WUA service on the agent waptwua documentation. |
enabled = 1 |
include_potentially_superseded_updates |
Defines whether the Windows Update agent will show both the latest KB and the superseeded ones (1), or only the lastest KB (0). |
include_potentially_superseded_updates = 1 |
default_allow |
authorise (1) or not authorise (0) all updates by default unless explicitely forbidden by rules. |
default_allow = 1 |
allowed_severities |
Allows somes KB criticalities to be automatically installed on the waptagent (Critical, Important, Moderate). |
allowed_severities = Critical, Important |
direct_download |
authorise (1) or not authorise (0), the waptagent to download updates from Microsoft Server. |
direct_download = 0 |
download_scheduling |
Defines the Windows Update scan recurrence in hours and minutes (Will not do anything if waptwua package rule or wsusscn2.cab file have not changed) (hh:mm). |
download_scheduling = 3d |
install_scheduling |
Defines the Windows Update install recurrence in hours and minutes (will do nothing if no update is pending) (hh:mm). |
install_scheduling = 7d |
install_delay |
Sets a deferred installation delay in days before publication (days after publich date of the KB). |
install_delay = 5d |
Danger
These options should only be used on a secondary repository.
Options |
Description |
Example |
|---|---|---|
enable_remote_repo |
enable (1) or disable (0) the remote repository operation. |
enable_remote_repo = 1 |
remote_repo_dirs |
Define the folders to synchronize on the secondary repository. |
remote_repo_dirs = wapt,waptwua,wads |
sync_only_forced |
Enable (0) or disable (1) automatic synchronization. |
sync_only_forced = 0 |
local_repo_sync_task_period |
Define a time interval before a new sync in hours. |
local_repo_sync_task_period = 2:00 |
local_repo_time_for_sync_start |
Defines a time to start a synchronisation will be performed automatically on the repository. |
local_repo_time_for_sync_start = 02:30 |
local_repo_time_for_sync_end |
Defines a time limit after which no synchronisation will be performed automatically on the repository. |
local_repo_time_for_sync_end = 06:30 |
2.6.3. Editing a Configuration Package
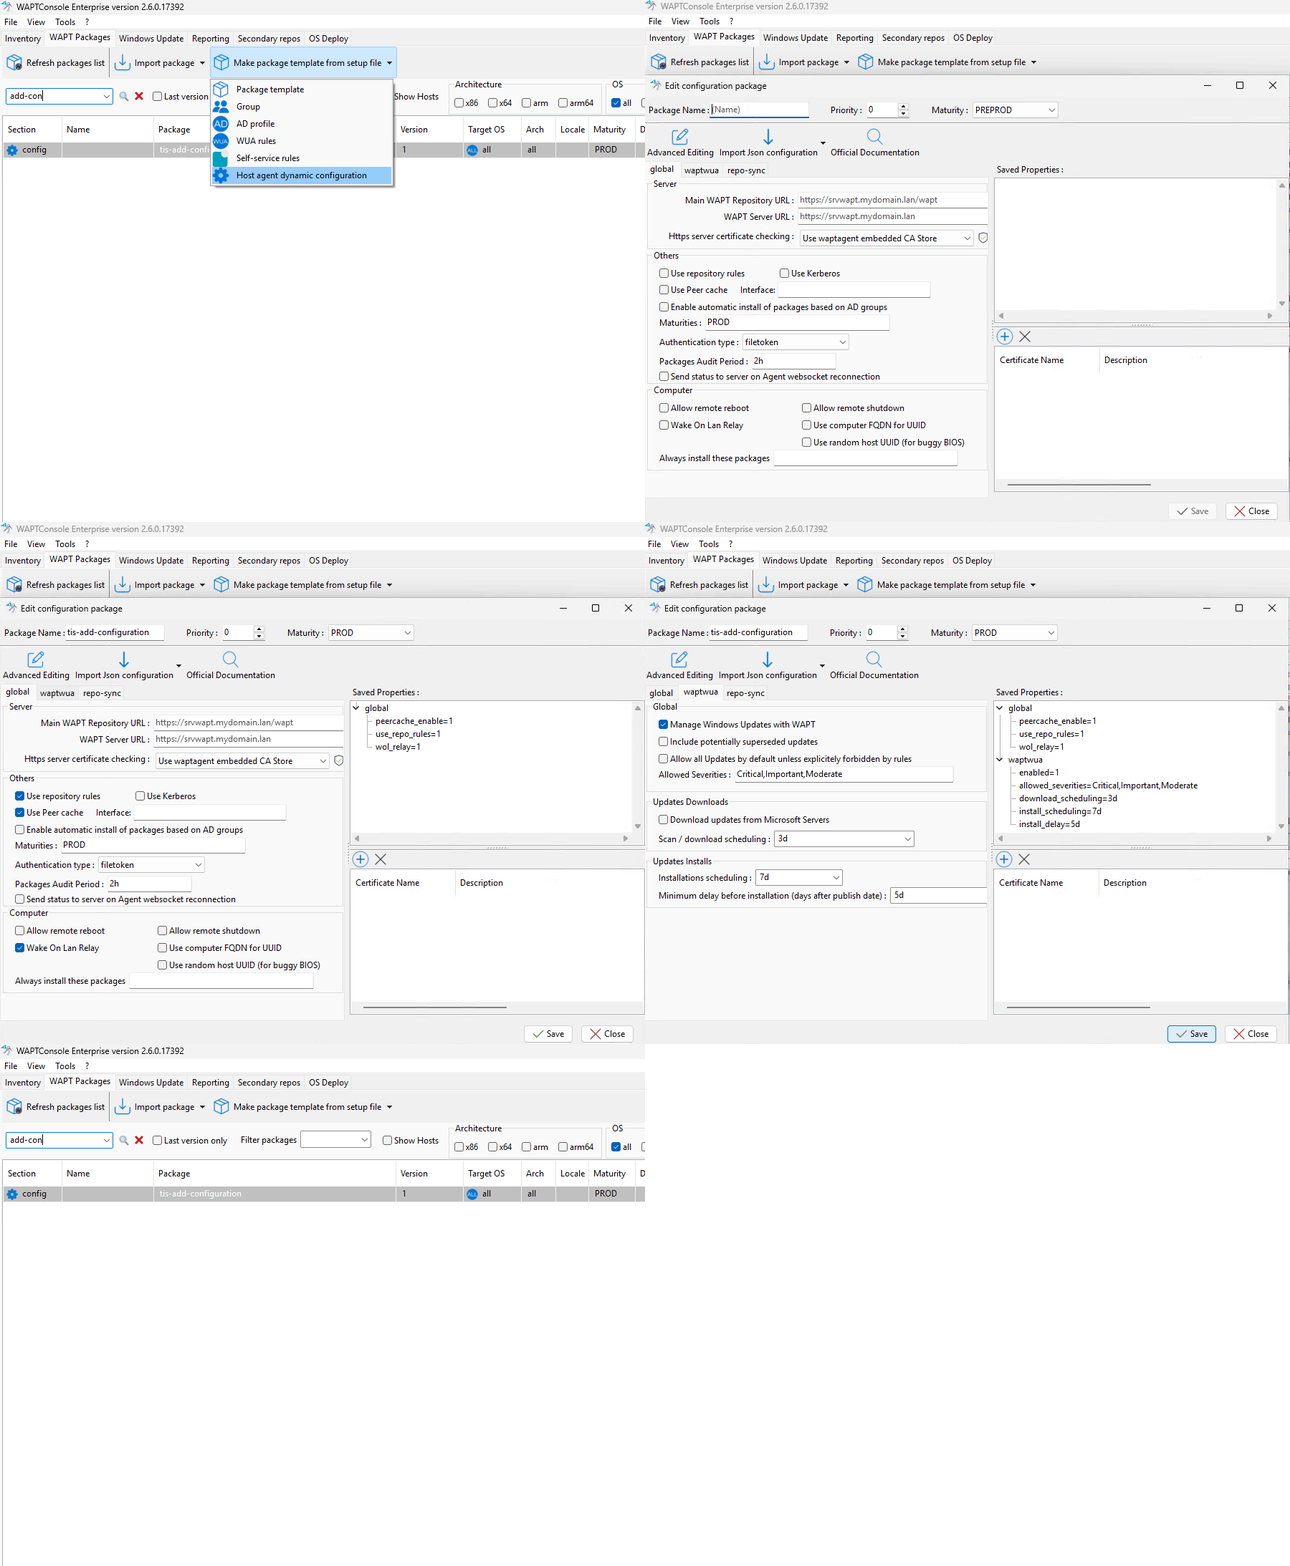
Editing a Configuration Package
Steps to Edit a Configuration Package:
Set the package details:
Enter a name.
Set the priority (if applicable).
Select the maturity level.
Configure the parameters:
Choose the desired configuration panel (e.g., Global, WAPTWUA, or RepoSync).
Enable or disable the required parameters.
For some parameters, you may need to enter a value or select an option.
Save your changes:
Click Save to apply the configuration.
Your Configuration Package is now ready.